How to create indoor or outdoor signal mapper
1. Introduction
1.1 What is Outdoor & Indoor signal measuring Solution?
To help customers identify optimal sensor placement locations, we have designed a one-click signal strength measurement solution. You only need an **LA66 USB LoRaWAN Adapter **and a Dragino account.
The** outdoor signal measurement solution **supports simultaneous testing with multiple gateways. It allows for both individual gateway signal map displays and combined overlays from multiple gateways.
For **indoor signal measurement solution **, due to the complex layout and numerous obstacles, the solution adopts manual coordinate marking instead of relying on unstable mobile device positioning.
Both dashboards support data export.
1.2 Features
- Extensive support
- Only a LA66 USB LoRaWAN Adapter and one Dragino account are needed, the gateway and LNS can be freely matched.
- High-accuracy sensors
- Reliable data readings
- Real-Time measuring
- Button to switch receiving data or stop
- Continuous measuring
- User-Friendly Interface
- Intuitive dashboard design
1.3 Specifications
- Mobile Support: Dedicated mobile app for on-the-go monitoring
- Device Manual: LA66 USB LoRaWAN Adapter User Manual
- **Dragino APP: **https://www.dropbox.com/scl/fo/qdiwkpcxc03qu2r2w0g46/AKqR2FByUdkoWZPZh-diYfQ?rlkey=t1a1kwlvr93c1459mz9jifers&st=kji4rdg0&dl=0
2. How to Build?
2.1 Network Structure
[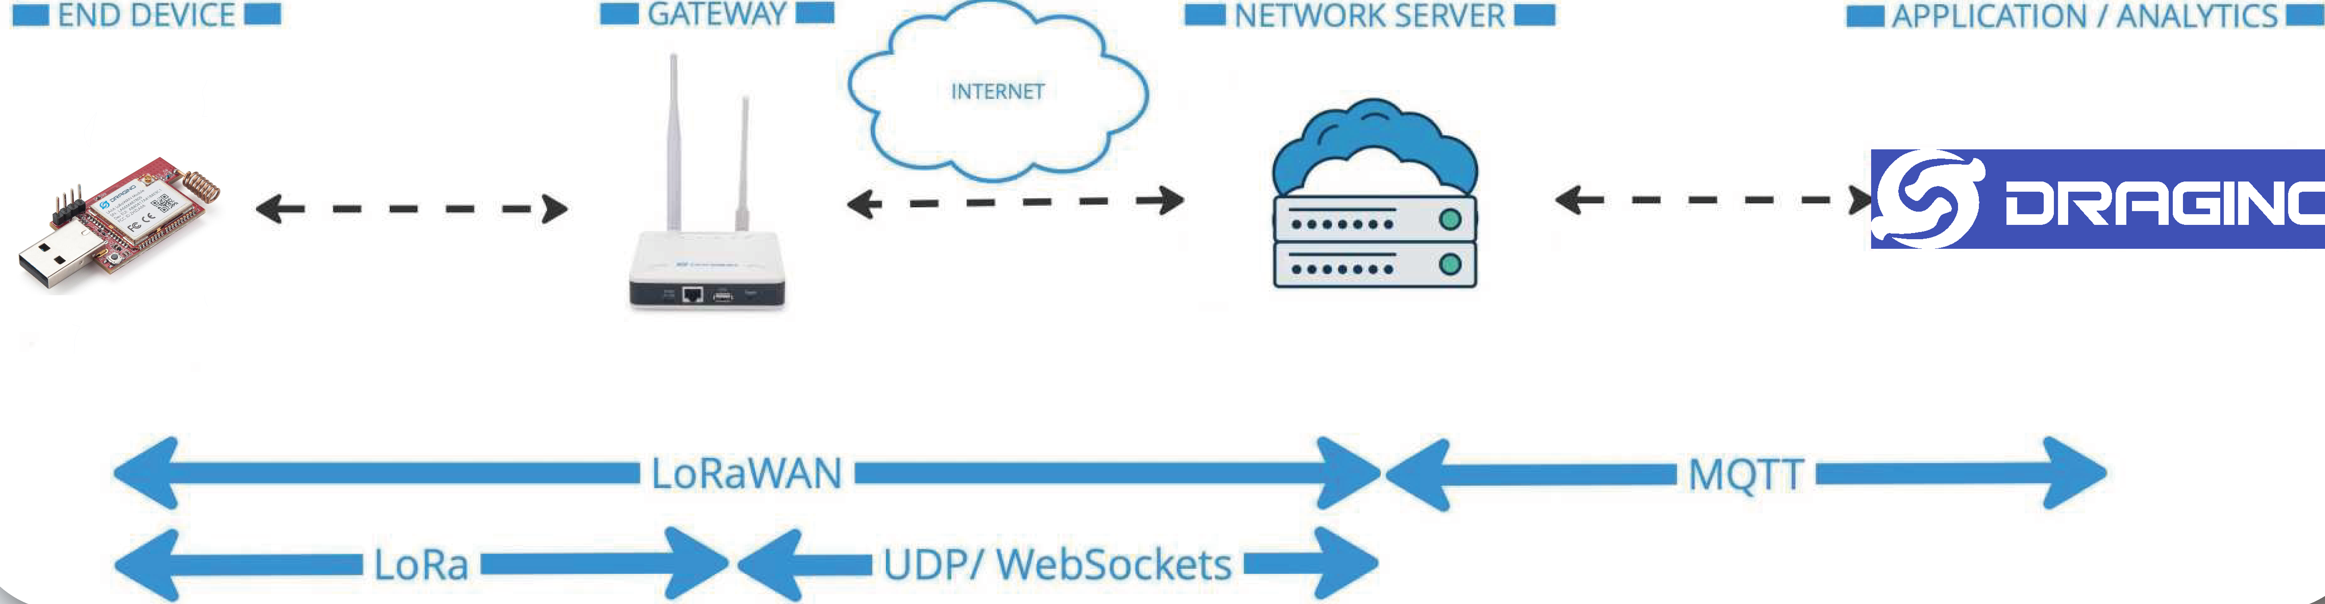 ]{title="Click and drag to resize"}
2.2 Get Account
To begin, contact your local representative to obtain a customer account or send mail to support@dragino.cc
2.3 Get Device And Configuration
- End Nodes: LA66 USB LoRaWAN Adapter
- **Gateway(If you want):**For data transmission.
- **ThingsEye APP (Android only):**https://play.google.com/store/apps/details?id=com.teyiwulian.thingseye.app&utm_source=play_console_redirect&pli=1
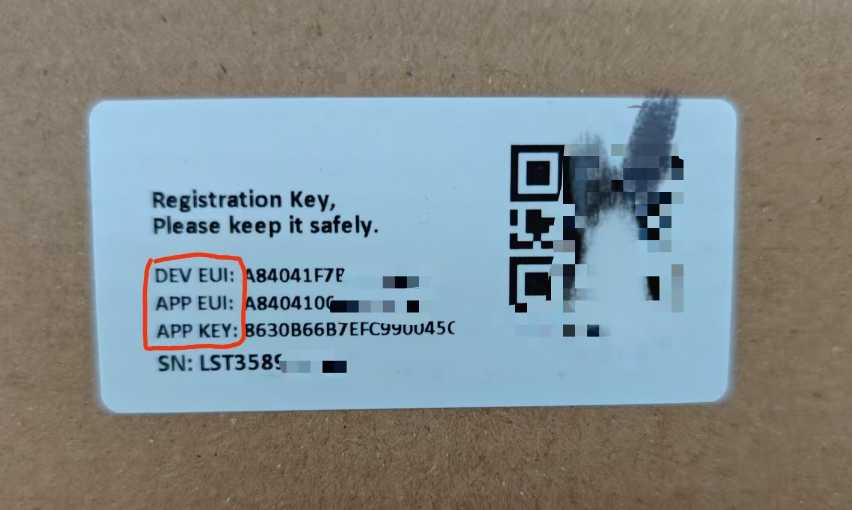
2.4 Register Devices on LNS 1. Have a check of package box to get DEVEUI/ APPEUI/ APPKEY(OTTAKEY)
2. Register on LNS and replace decoding------ChirpStack_map and TTN_map
- If you using other LNS, you can code yourself(The first nine bits of the uploaded data are the flag bit + position, and the rest are the title) or send mail to support@dragino.cc)
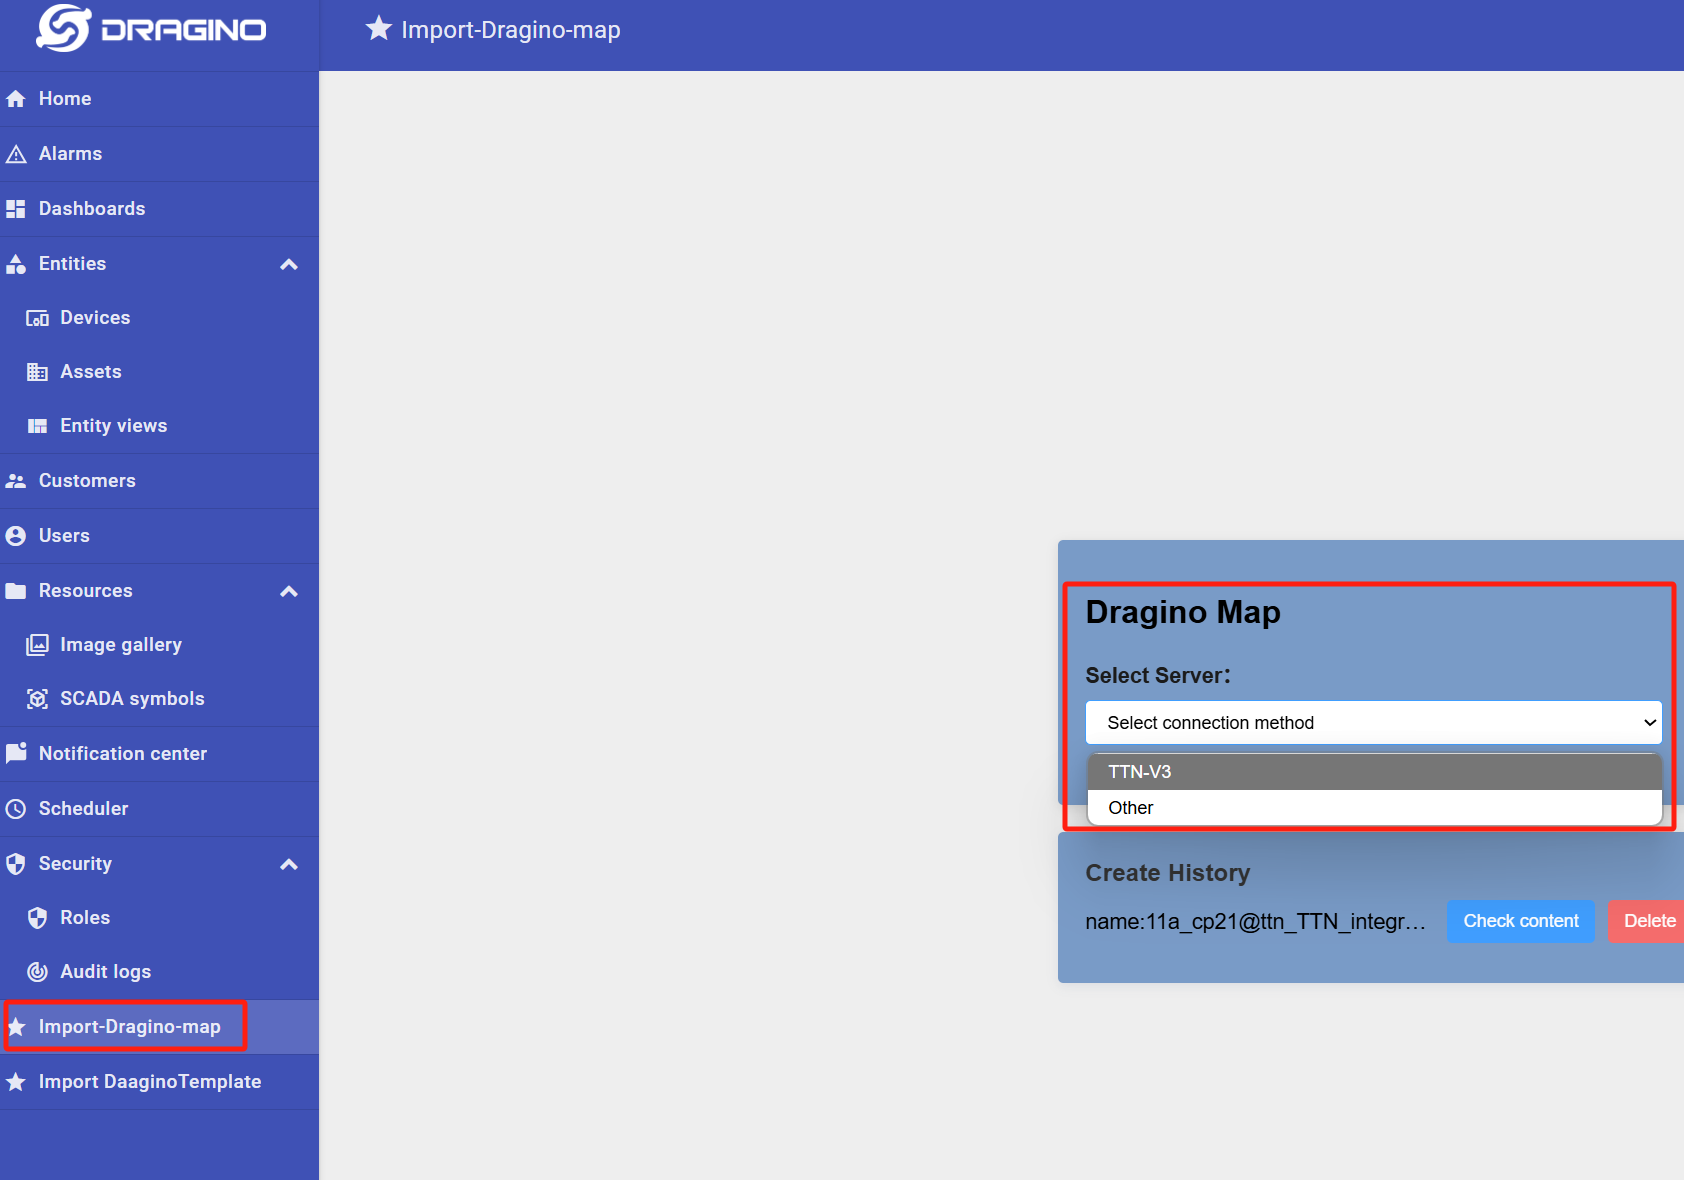
**2.5 LNS Connection Method Choose LNS: **After log in Dragino platform, click the button "Import-Dragino-map"and choose the LNS you using.
2.5.1 Register a TTN account and connect the gateway and sensors.
Register a TTN account
https://id.thethingsnetwork.org/oidc/interaction/NYqiq-Uu3V_sg3Lz54Onk/register
TTN registration screenshot: 1762910518611-841.pngTTN registration screenshot: 1762910544032-838.png
TTN registration screenshot: 1762910571349-677.pngTTN registration screenshot: 1762910474654-725.png
2.5.2 Access and Configure gateway(Use Dragino LPS8N as a reference device)
Next, you need to configure the gateway and register it with TTN. The following are the gateway configuration methods provided by Dragino:
https:///docs/wiki/lorawan-gateway/lora-concentrators-multi-channel/lps8n/
2.5.3 Create a gateway in TTN V3 Server
Step 1: Get a Unique gateway ID.
Every LPS8N has a unique gateway id. The ID can be found at LoRaWAN page:
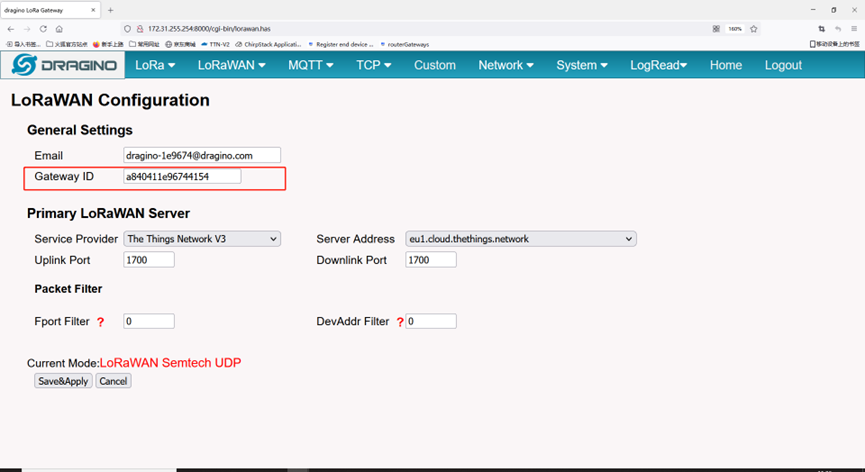
The example gateway id is: a840411e96744154 Step 2: Choose the TTNv3 Cluster Picker
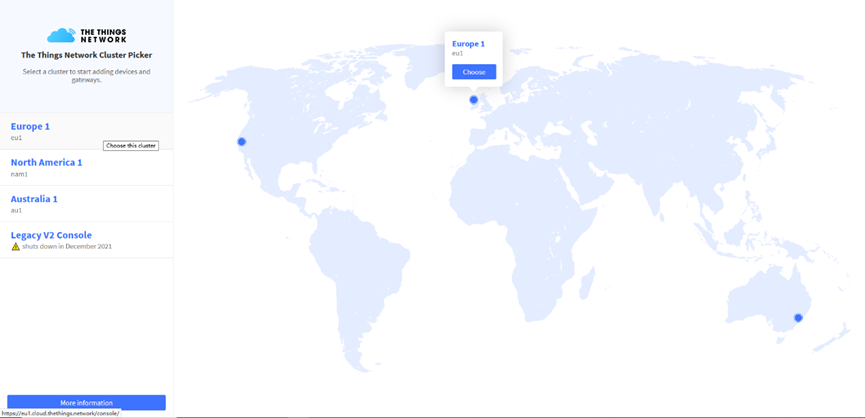
Note: Choose the cluster corresponds to a specific Gateway server address
- Europe 1** corresponding Gateway server address:** eu1.cloud.thethings.network
- North America 1 **corresponding Gateway server address: **nam1.cloud.thethings.network
- Australia 1 **corresponding Gateway server address: **au1.cloud.thethings.network
- Legacy V2 Console : TTN v2 shuts down in December 2021 Step 3: Create a Gateway
Click the Gateway icon and then click Add gateway.
Open the following page:
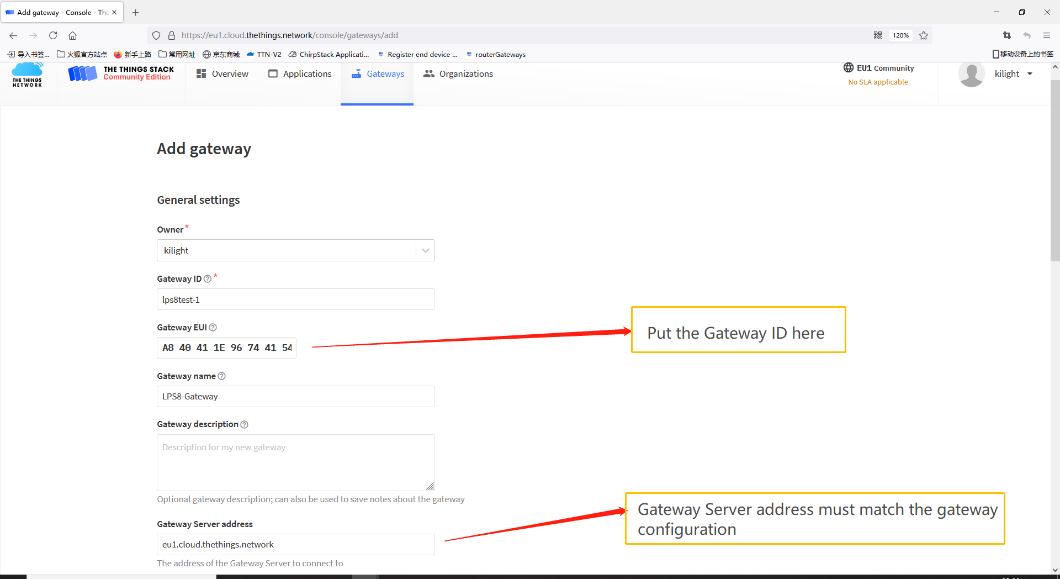

Notice: Gateway Server address must match the gateway configuration, otherwise you will have problem for End Node to join the network.
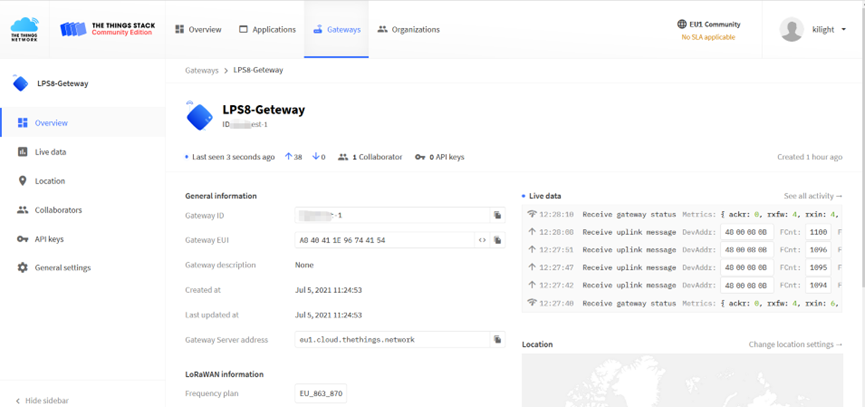
After creating the gateway, you can see the gateway info, as below.

2.5.4 Configure LPS8N to connect to TTN v3
You can now configure the LPS8N to let it connect to TTN network V3.
Make sure your LPS8N has a working Internet Connection first.
Choose the right server provider and click Save&Apply.
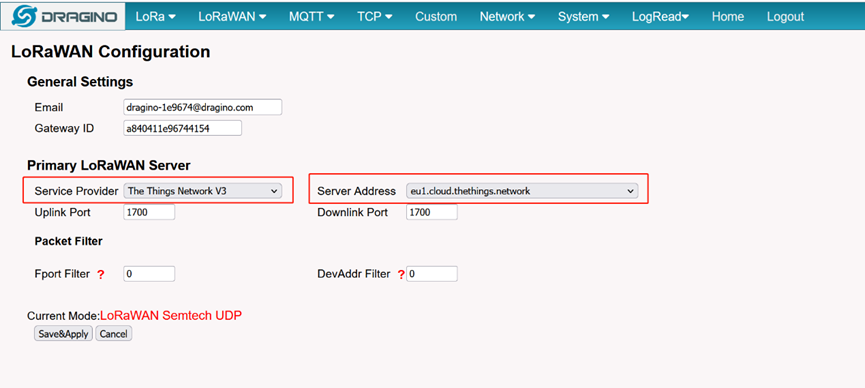
Note: The server address must match the Gateway server address you choose in TTN V3.
In the home page, we can see the LoRaWAN connection is ready now.
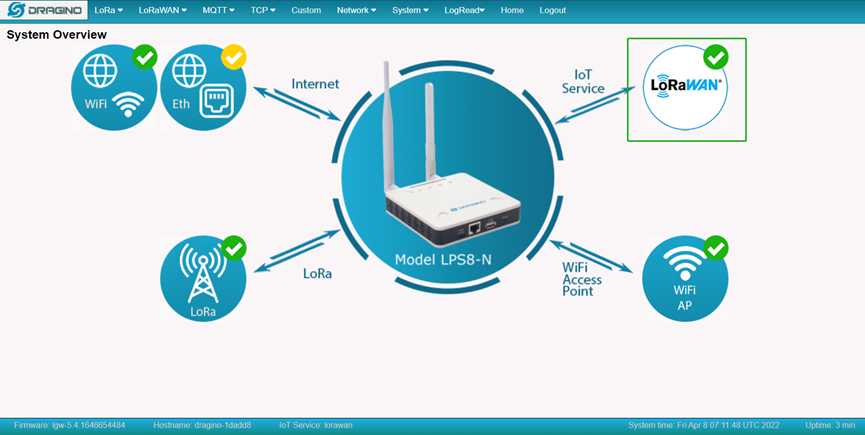
In TTN v3 portal, we can also see the gateway is connected.
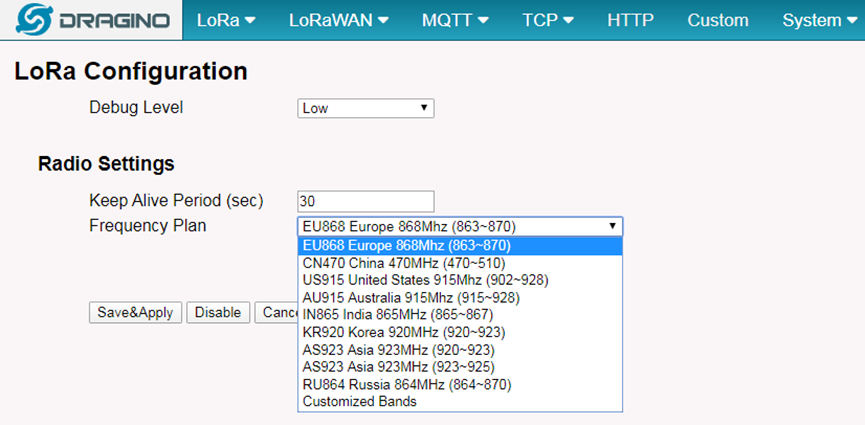
2.5.5 Configure frequency
We also need to set the frequency plan in LPS8N to match the end node we use, so to receive the LoRaWAN packets from the LoRaWAN sensor.
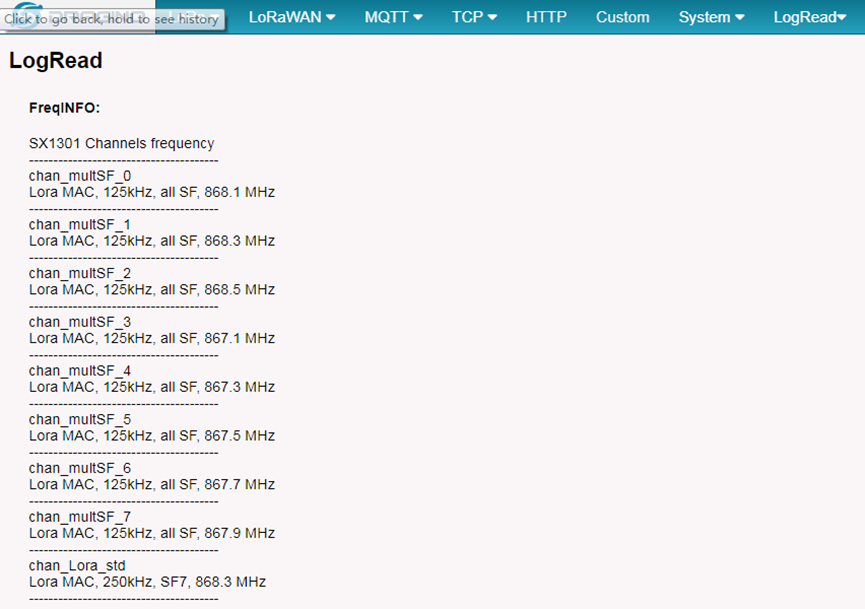
In logread page, user can check the frequency actually used.
2.5.6 Register sensor on TTN
Step 1: Create a Device definition in TTN v3 with the OTAA keys.
Three codes are required to define the device in TTN v3:
- DEV EUI - Unique ID code for a particular device.
- APP EUI - ID code for an Application defined in TTN v3.
- APP Key - Unique key to secure communications with a particular device.
A set of these codes are stored in each device by the manufacturer as the default codes for that particular device. Each device is shipped with a sticker with the default Device EUI as shown below.
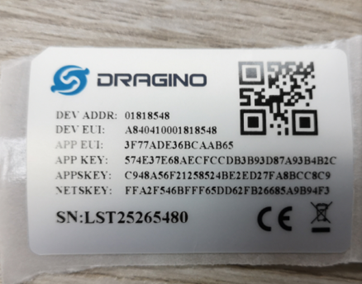
Note: You may be able to change these codes in a device by using a configuration facility on the device e.g. the LA66 uses a serial port access and a series of AT commands. Changing the codes may be necessary in the case where you have to use codes assigned by a LoRa WAN server.
For the TTN v3 server, you can use the codes set in the device as in the following example.
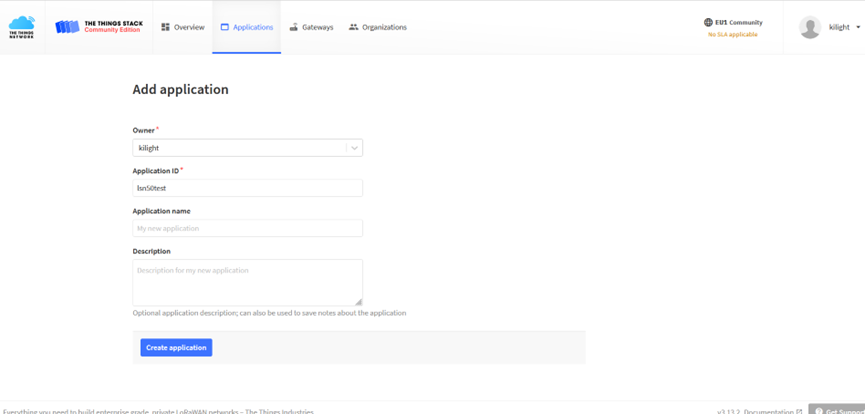
To avoid uploading data from other devices to Thingseye, we recommend creating a new application to store data for this LA66 separately.

Select Add Application to open the screen below.
Open the Application select Add end device
Start Register the end device
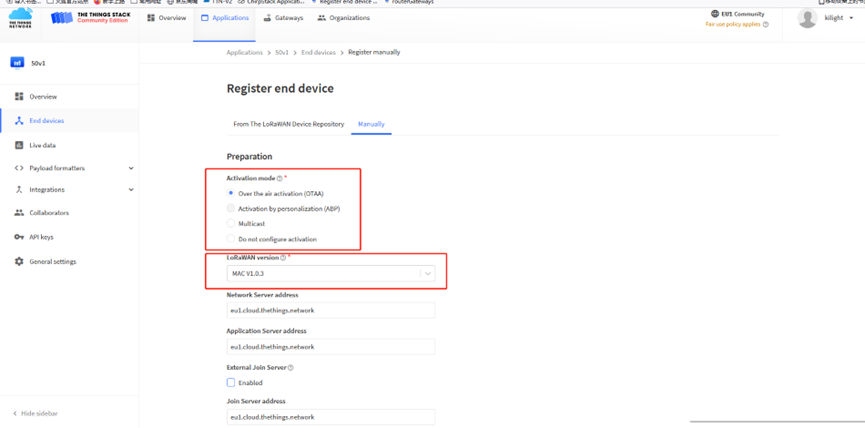
Select OTAA activation mode
The LoRaWAN version for your device should be provided by the manufacturer in a datasheet as LoRaWAN version or LoRaWAN specification. The most commonly used LoRaWAN versions are v1.0.2 and v1.0.3.
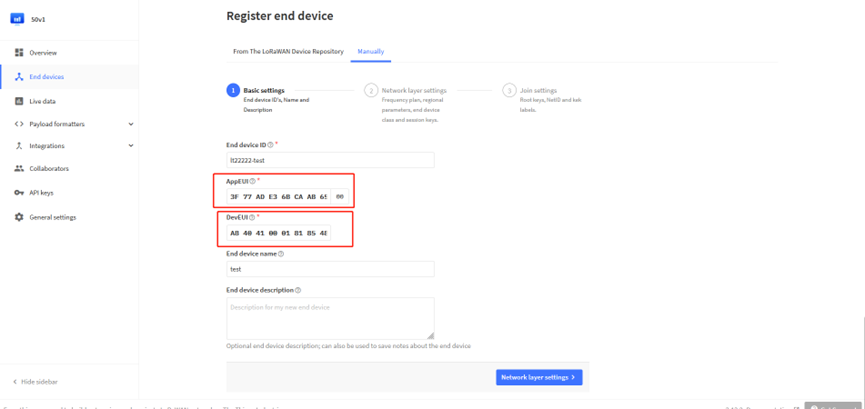
First, input the End device ID, AppEUI and DevEUI.
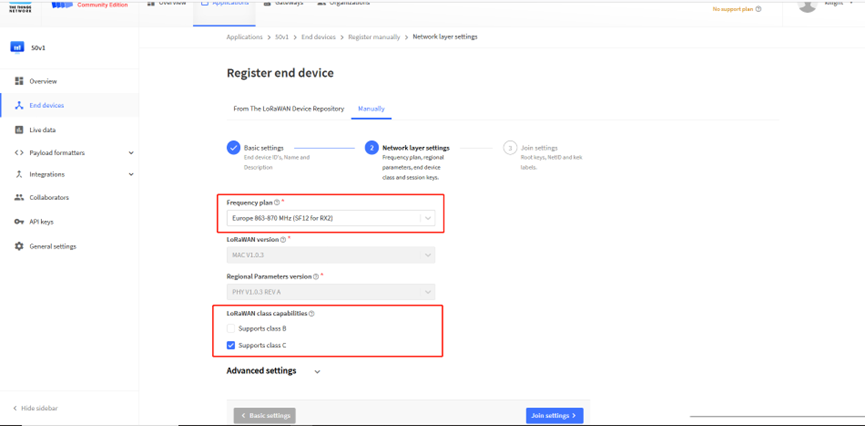
Secondly, choose the corresponding frequency and LoRaWAN class capabilities.

Finally, Application layer settings input the corresponding AppKey. Before saving the configuration, check that the data matches the device.
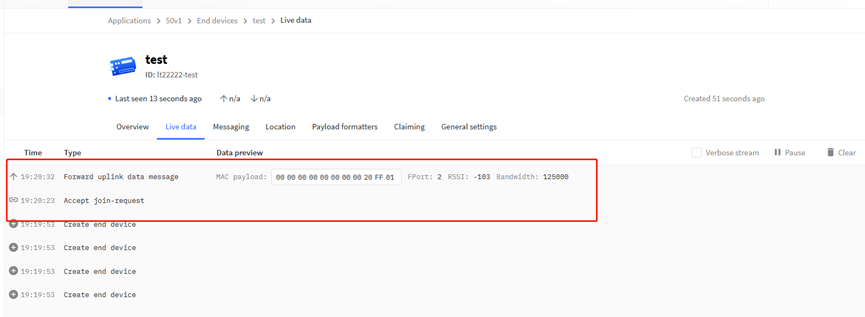
Step 2: Power on LA66 device and it will automatically join the TTN network. After joining successfully, it will start to upload messages to the TTN v3. Select the Live data tab and you will see the data appearing in the panel.
Note that it may take some time for the device data to appear in the TTN v3 display.
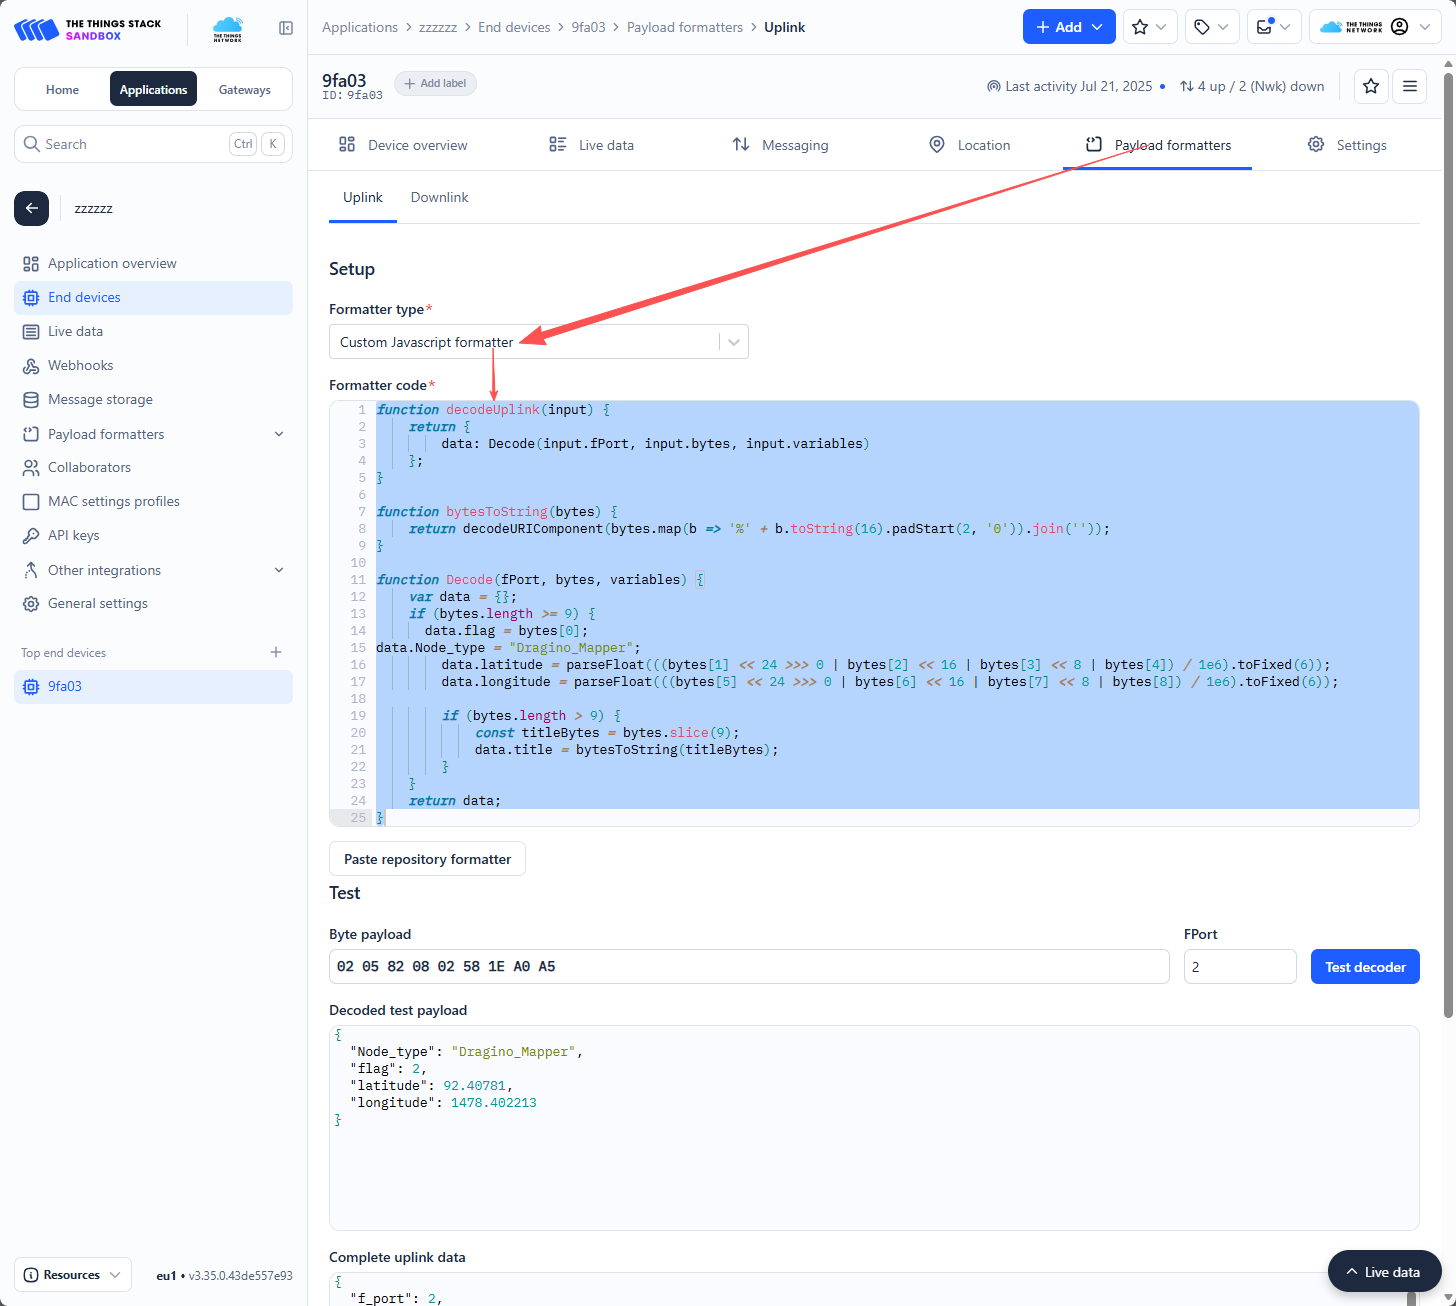
Step 3 Place the decoder in the corresponding position.
dragino-end-node-decoder/LA66 USB/ChirpStack_map.txt at main · dragino/dragino-end-node-decoder
2.6 Configure on the Thingeye platform.
2.6.1 Example of TTN
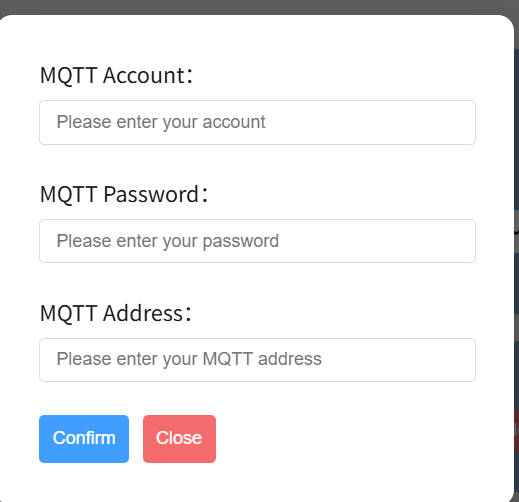
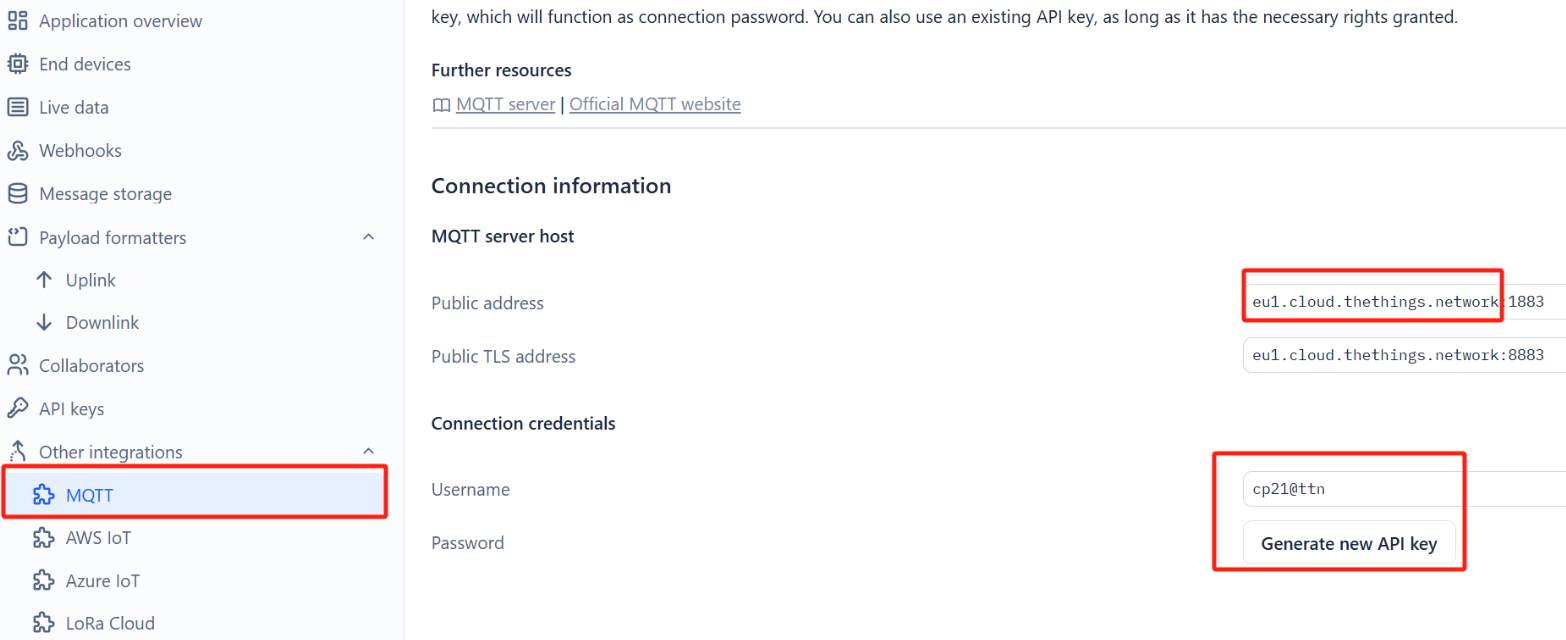
Find MQTT in the Other integrations option on the TTN platform
Enter the username in the MQTT Account option
Enter the password in the MQTT Password option
Enter the Public address in the MQTT Address option (do not add the port number)
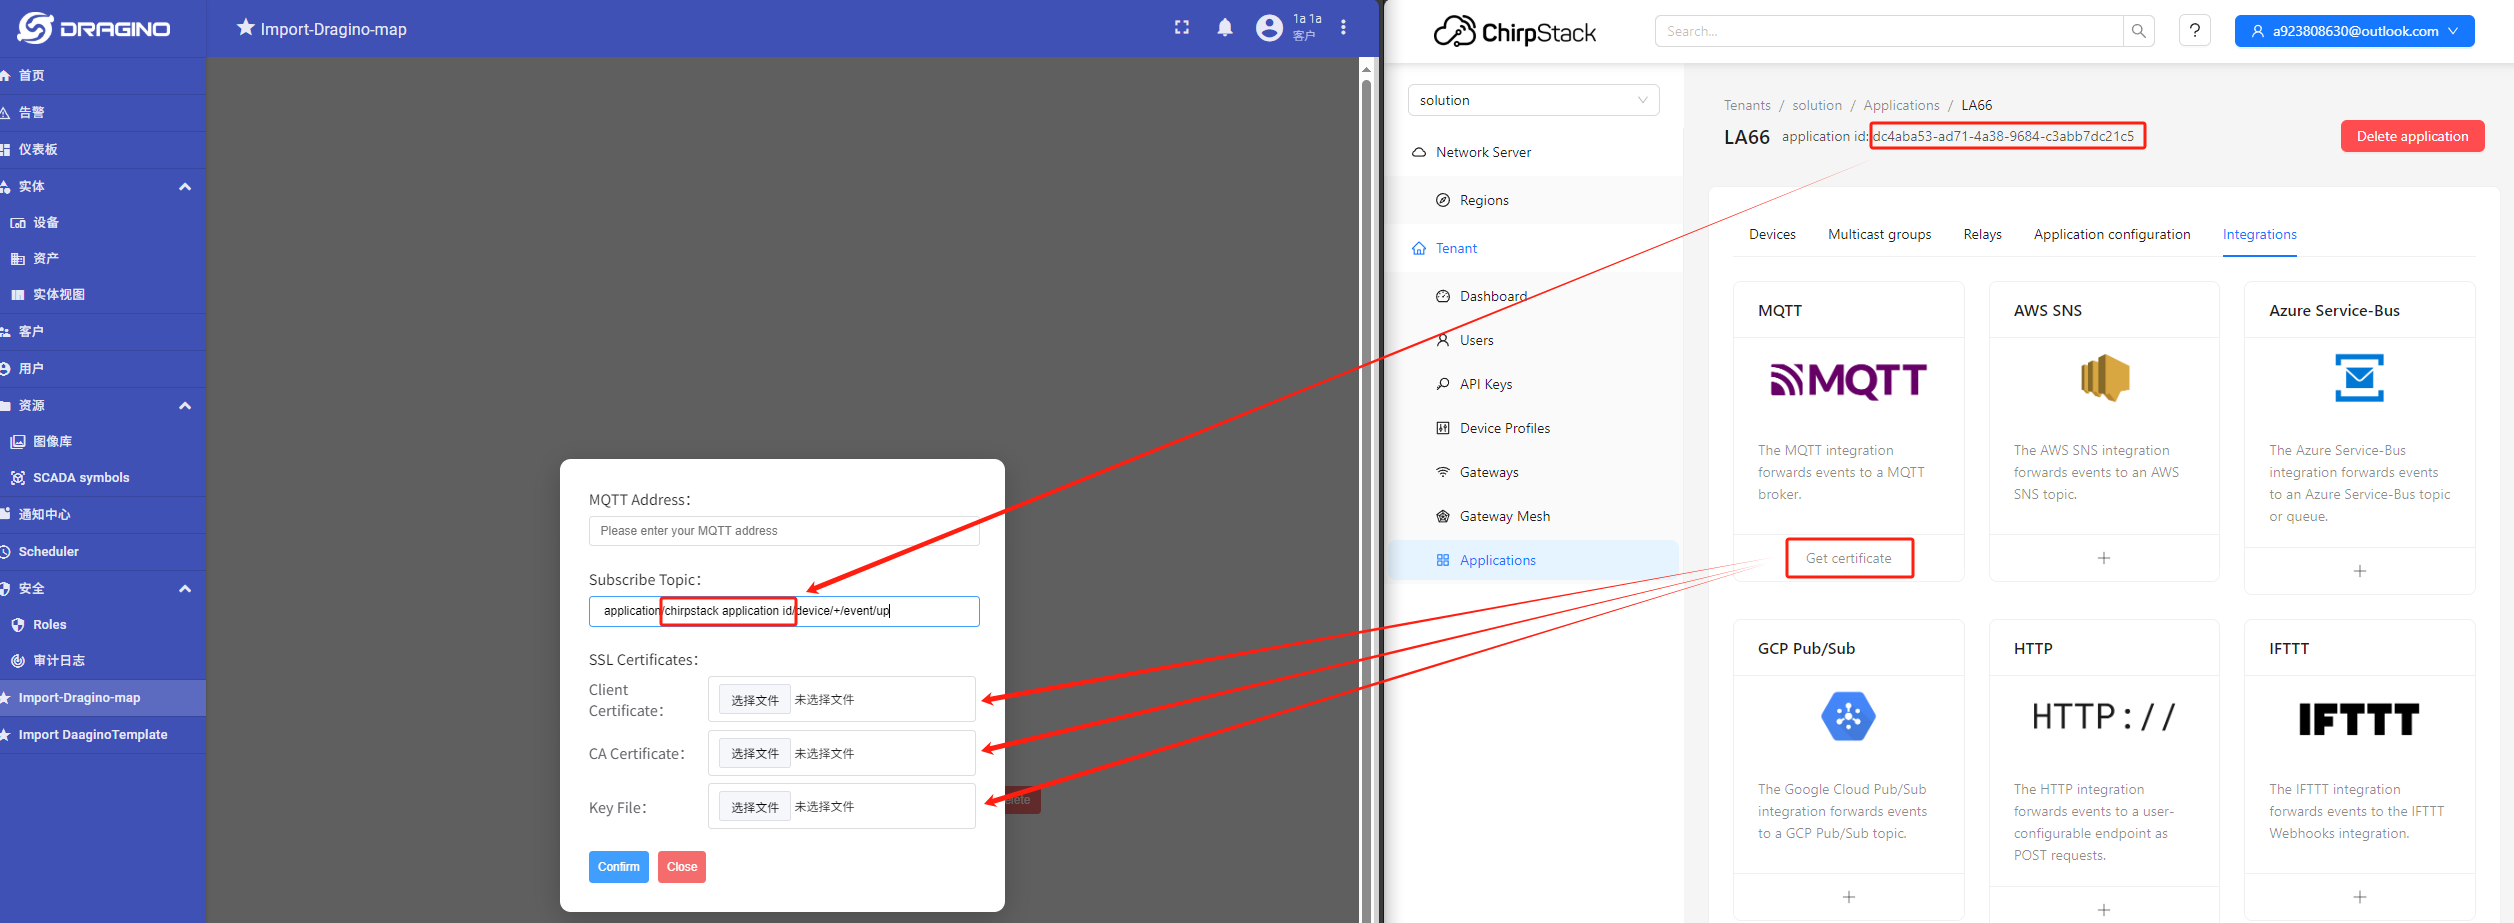
2.6.2 Example of ChirpStack
**MQTT Address: **The MQTT server address or the cloud server address which you using.
**Subscribe Topic: **The default for Topic is: application/chirpstack application id/device/+/event/up(Replace"chirpstack application id" with the one which is actually used)
**SSL Certificates: ** Copy the contents of the certificates and paste them into the linked file below, a total of three certificates are required(Integrated Certificate File demo Download: Demo.pem)
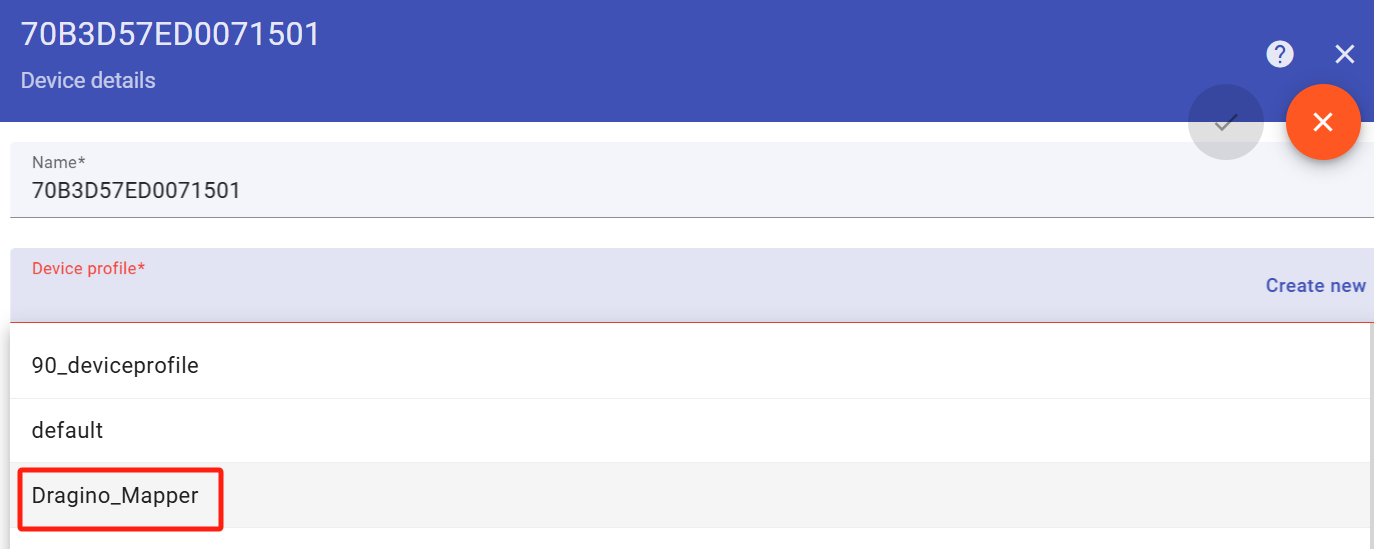
2.6.3 Check: Whether the device is connected to the platform through LNS
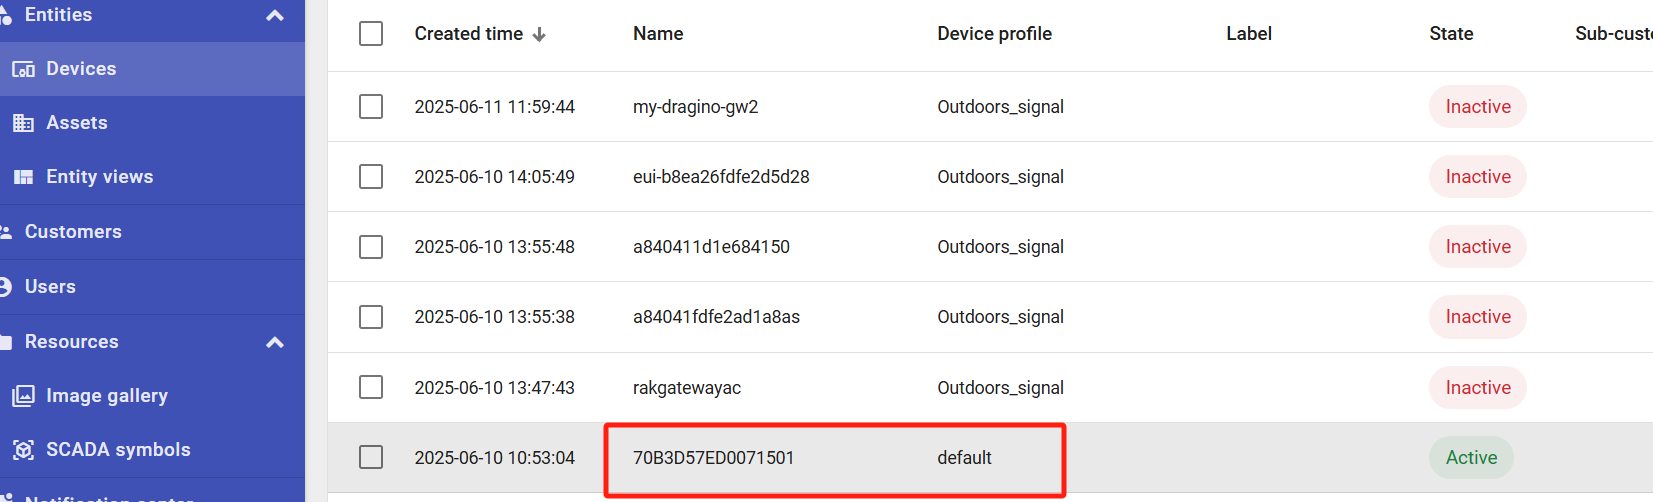
Whether the device profile is Dragino_Mapper? Modifyit if not.
3. How To Use?
3.1 Outdoor_Mapper dashboard
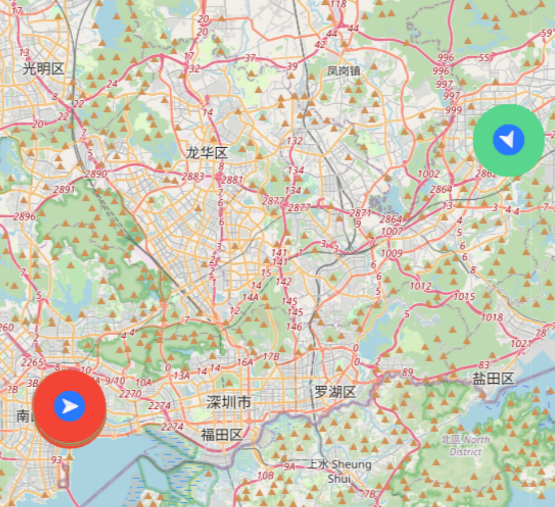
Outdoors_signal supports viewing both the signal coverage of a single gateway and the combined coverage of all gateways.
It is recommended that you watch the video together with this instruction to facilitate your actual operation.Outdoor_Mapper
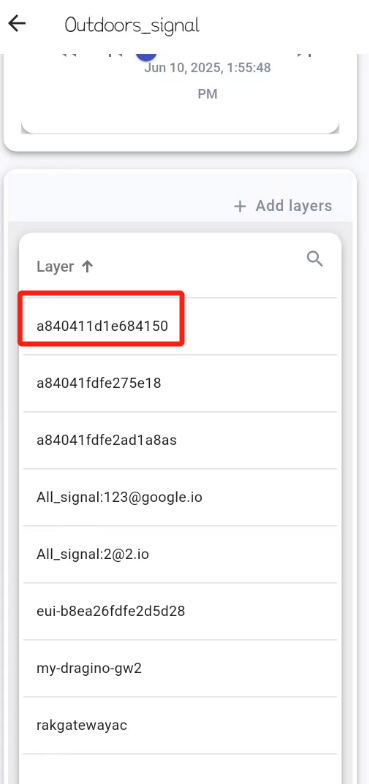
3.1.1 Create the gateway layer.
This solution is pre-configured. Under normal circumstances, when the device successfully uploads information through gateways, it will automatically generate the corresponding assets and put them in the Layer.
The layer will be named after the gateway's IMEI, and you can set a label. At the same time, there will be a dashboard that collects all gateway signals and displays them in an overlay named after the user's registered email address.(Such like :All_signal:$[customer_email])
3.1.2 Measuring
Insert the LA66 USB LoRaWAN Adapter into phone or tablet. Data will be uploaded every 7 seconds based on the tablet's location. Simply move the tablet to measure signal strength from different places.
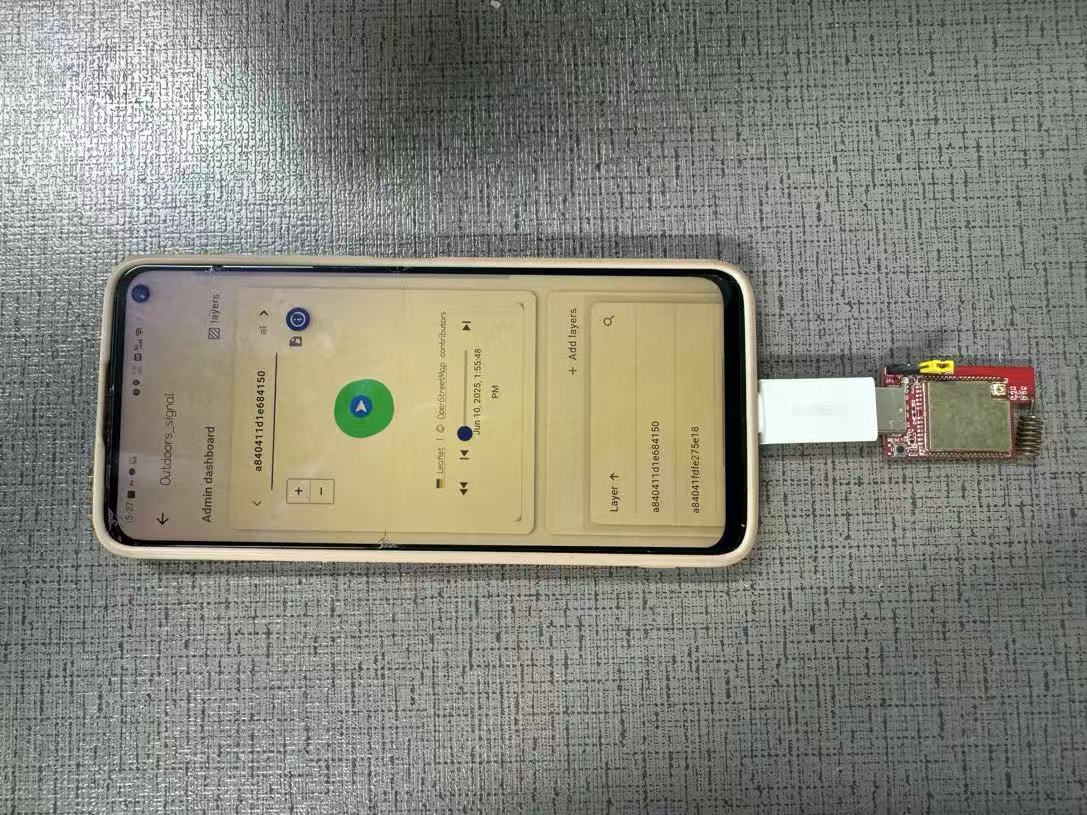
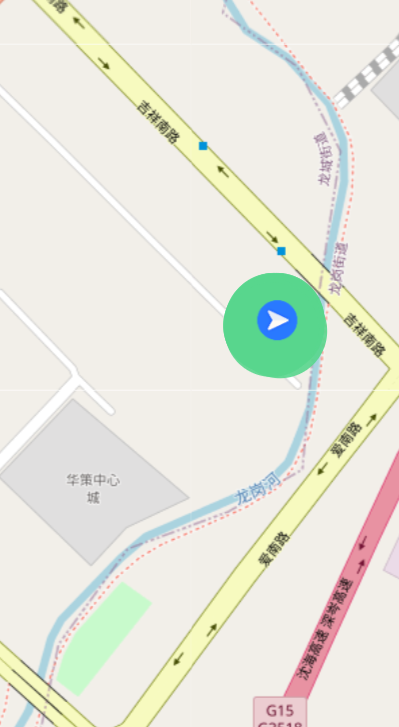
When the gateway received the first set of data, the current gateway will appear in the left-side list of the gateway interface. When received the second set of data, the current signal strength will be displayed on the right-side map.
The measured data will be displayed in translucent dots of different colors, green represents a good signal, and red represents a poor signal.
3.1.3 End measurement
Don't forget to unplug LA66 USB LoRaWAN Adapter after finishing the measurement.
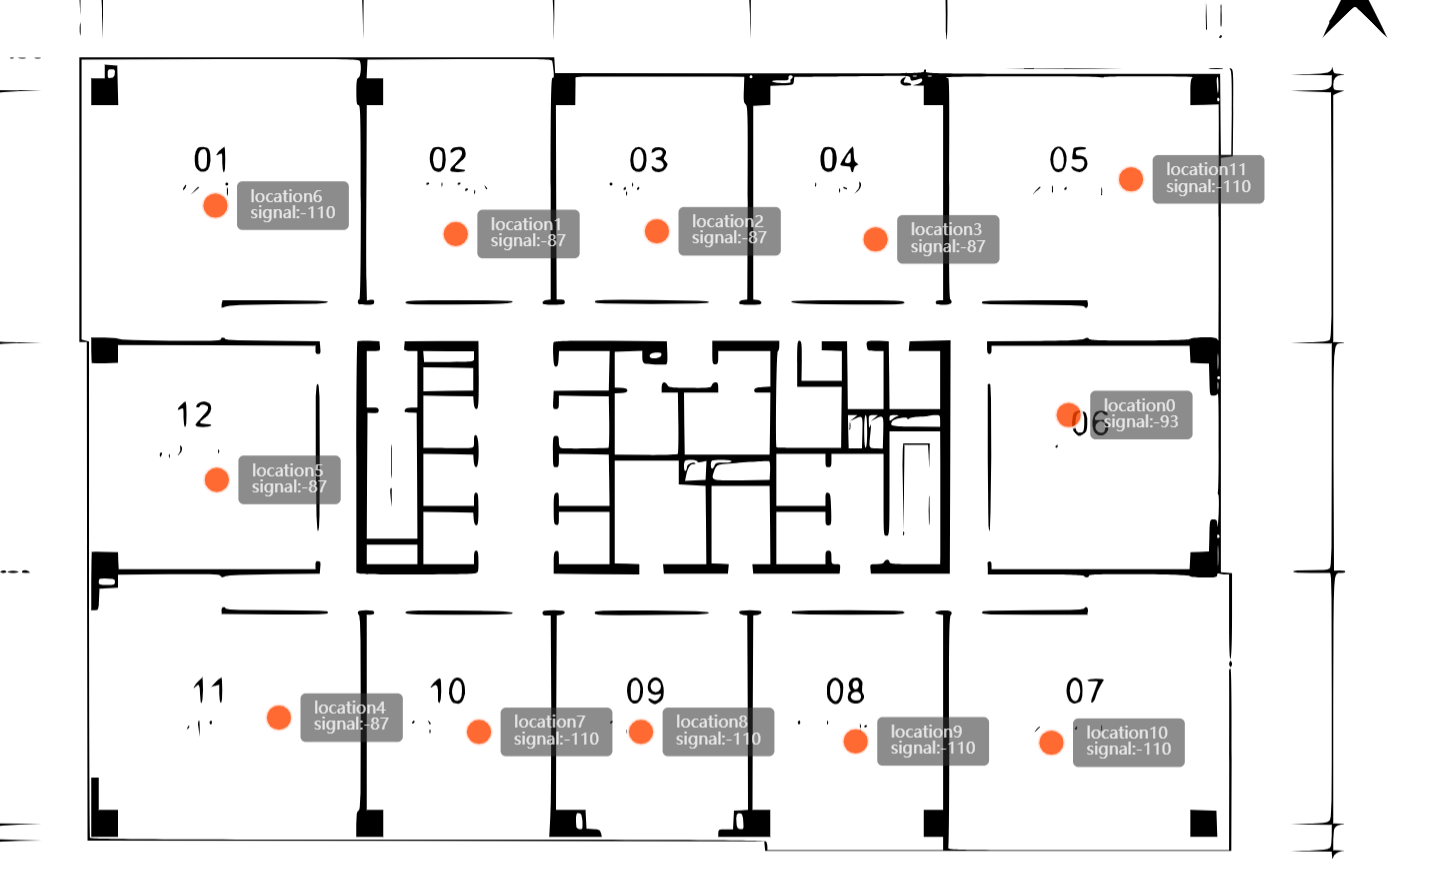
3.2 Indoors_Mapper dashboard
Indoors_signal supports measuring and marking the signal strength of all locations on the indoor floor plan.
It is recommended that you watch the video together with this instruction to facilitate your actual operation.Indoors_Mapper

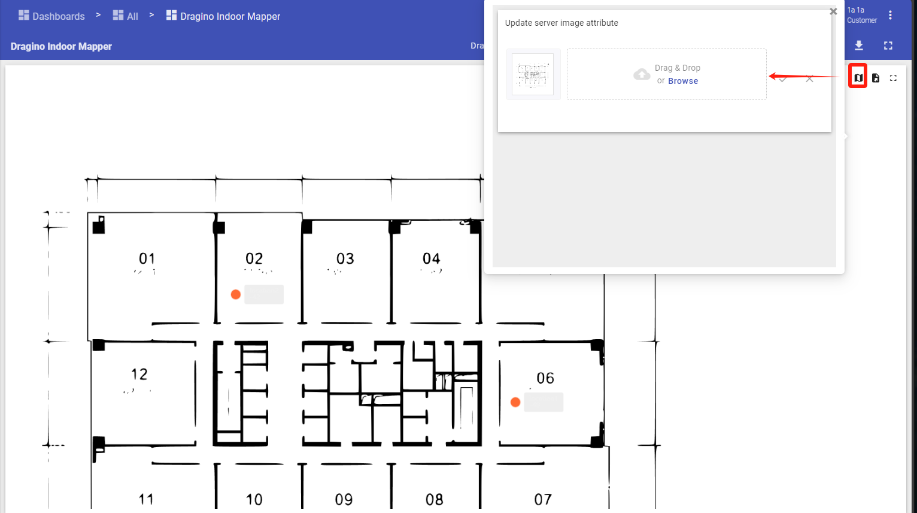
3.2.1 Import the map
Drag the map image here and click √ to import.(Only supports SVG format)
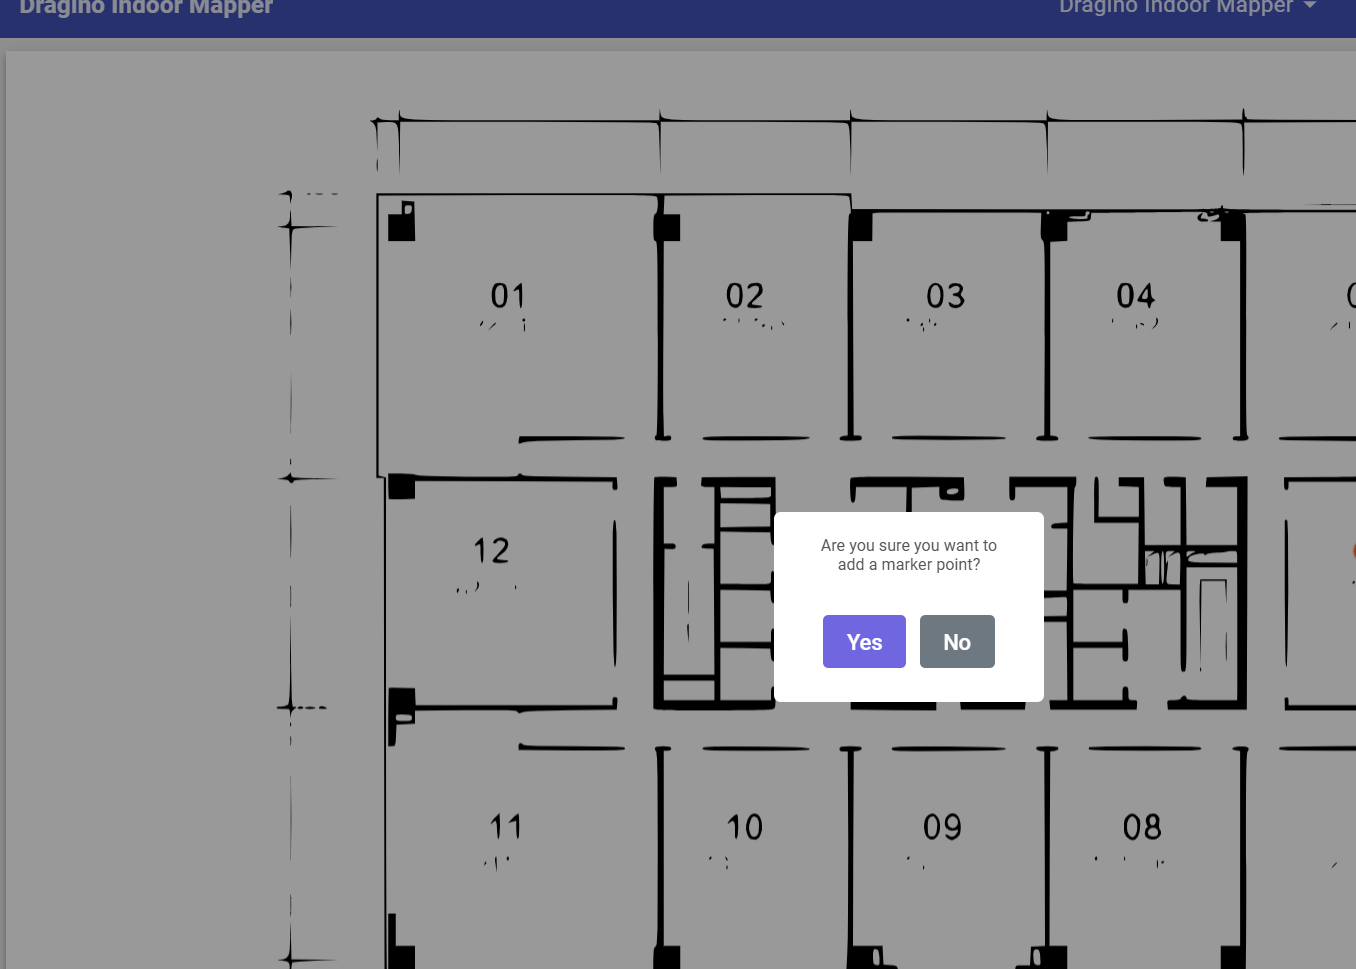
You can place the LA66 device in each room and click on the location on the image to create a new marker to view the signal strength at each location.
Note: After you mark the first location, when you need to go to the second location, create a new mark first, and then go to the second location.
Because LA66 will update to the latest point every time it sends.
If you go to point No. 2 first, and then create mark No. 2, the information of mark No. 1 will be updated to the signal information of the current location.
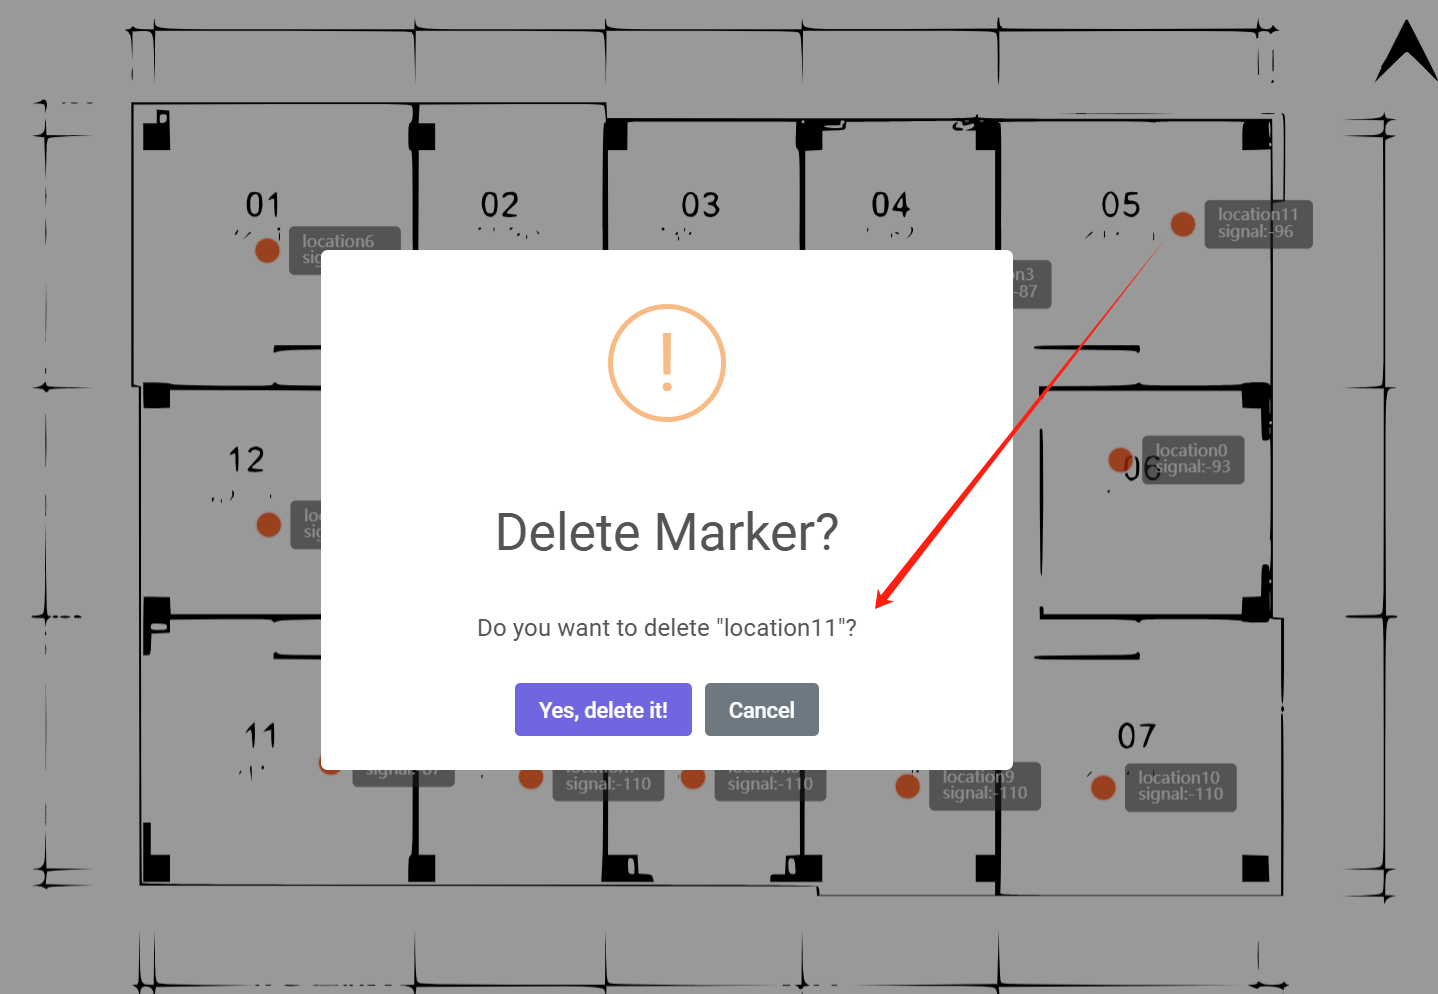
3.2.2 Delete point
Click the marking points, then click yes.
3.2.3 End measurement
Don't forget to unplug LA66 USB LoRaWAN Adapter after finishing the measurement.
4. Use of Tablet
For added convenience, you can use a tablet to access the platform.
- **Download APP: **https://www.dropbox.com/scl/fo/qdiwkpcxc03qu2r2w0g46/AKqR2FByUdkoWZPZh-diYfQ?rlkey=t1a1kwlvr93c1459mz9jifers&st=kji4rdg0&dl=0
::: like-container