MQTT TLS Certificate Configuration for -NB/-CB
1. Overview
This document describes how to write TLS certificates to Dragino NB/CB series devices for secure MQTT connection (e.g., connecting to ThingsEye platform via TLS).
This feature is available starting from the following protocol stack versions:
- NB-IoT Series (BC660K):Stack version 006 and above
- LTE-M Series (BG95-M2/M3):Stack version 004 and above
With these stack versions, TLS certificates can be written directly using standard AT commands within the working firmware. Previously, this required a dedicated firmware tool.
Applicable Device Models:
- -NB, -NS, -NB2, -N series (NB-IoT, BC660K module)
- -CB, -CS, -CB2, -C series (LTE-M, BG95-M2/M3 module)
2. Upload TLS Certificates to ThingsEye Platform (Example)
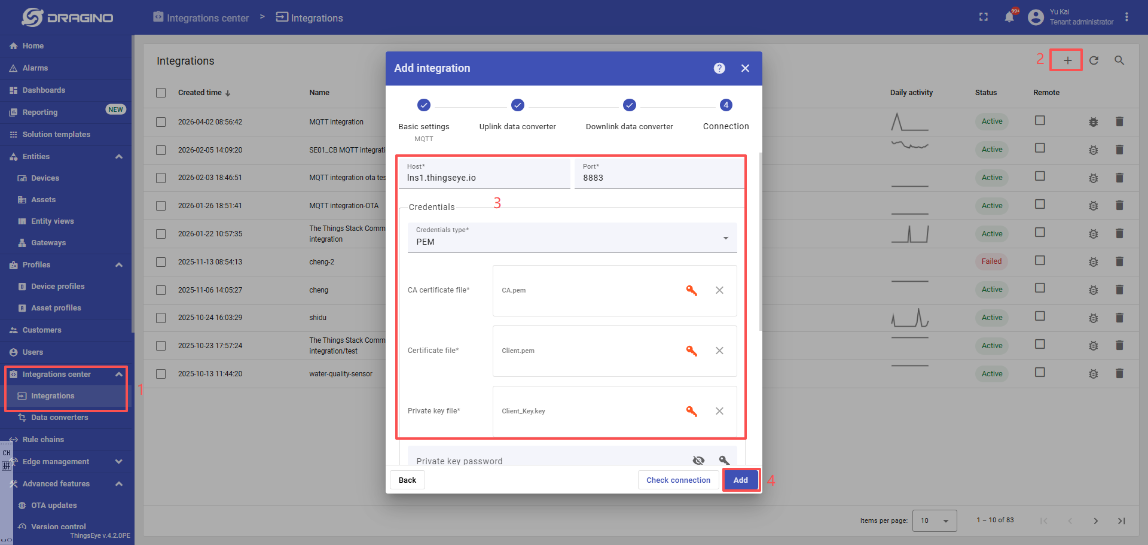
- After logging in to the TE platform, click "Integration Center" in the menu bar on the left side of the home page.
- Click the "+" icon in the top-right corner of the "Integrations" interface to add an MQTT integration.
- During the setup process, upload the TLS certificates to the platform one by one.
- Click "Add" to complete the process.
3. Write TLS Certificates to Dragino NB/CB Device
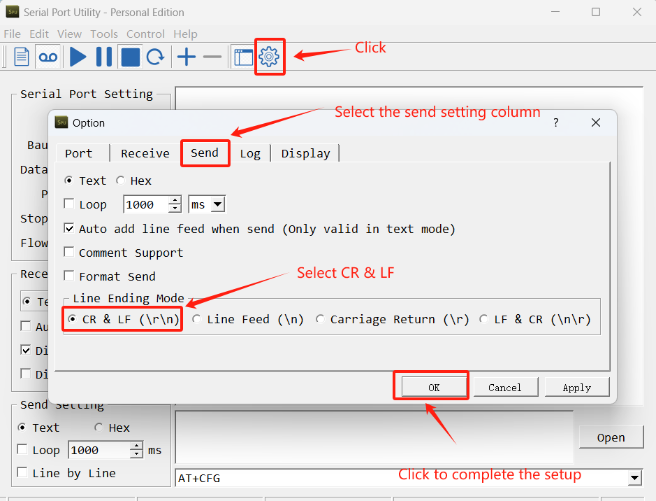
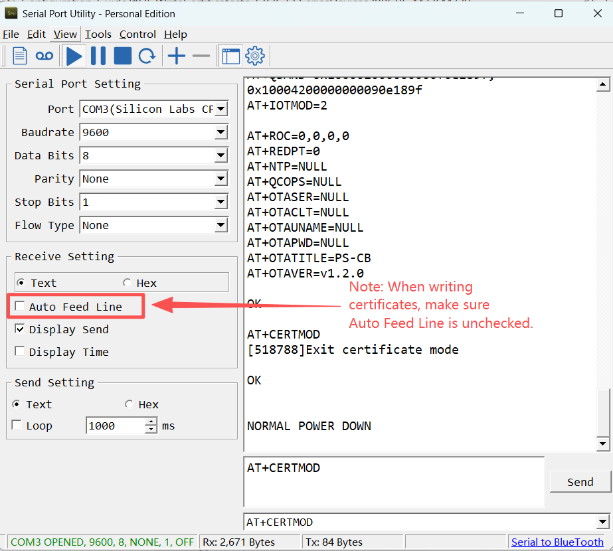
Note: To avoid certificate writing failures, ensure your serial port tool is configured to automatically append a newline character (CR/LF) when sending commands. Certificates written without a terminating newline will be invalid.
Using the Serial Port Utility as an example:
4. Write Certificates to -NB/-NS Series Devices (BC660K)
- Certificates can only be written when the device is idle (not transmitting). Writing during an active uplink may cause the operation to be interrupted or fail. So before writing certificates, wait for the device to enter sleep mode automatically after completing its normal data transmission. Alternatively, press the ACT button five times in quick succession to force the device into deep sleep mode immediately.
- The serial port must be unlocked before writing certificates. To unlock, send the password: directly enter the 6-character AT+PIN (e.g., 123456).
4.1 Configure CA Certificate
Send the AT command AT+CACERT via serial port tool. After sending, wait for the device to display "Please enter CA certificate", then send the certificate content line by line.
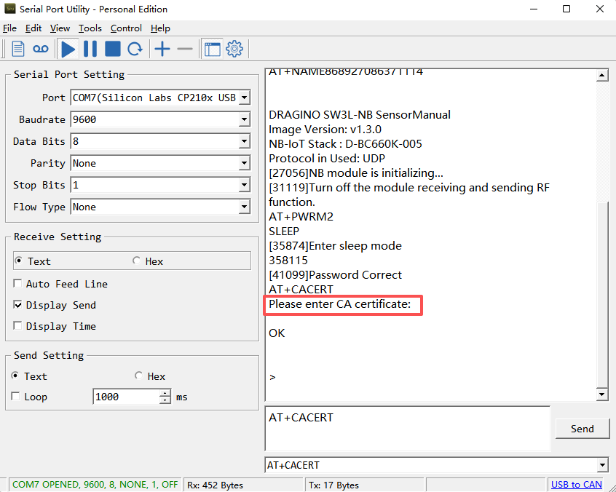
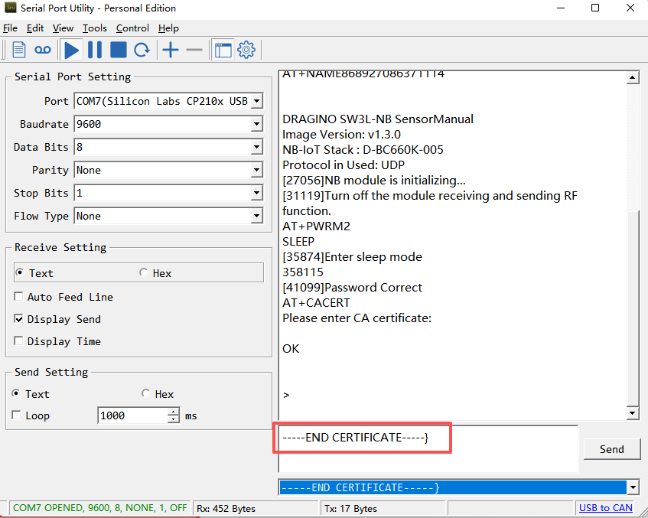
- Certificate content must be sent line by line. Sending the entire file at once will result in only the first line being recognized, causing the write to fail.
- After each line is sent, the device will echo back the same line as confirmation.
- When sending the last line of the certificate file, you must append a closing curly brace "}" after the final character. This signals the device that the transmission is complete.
After successful execution, as shown in the following figure.
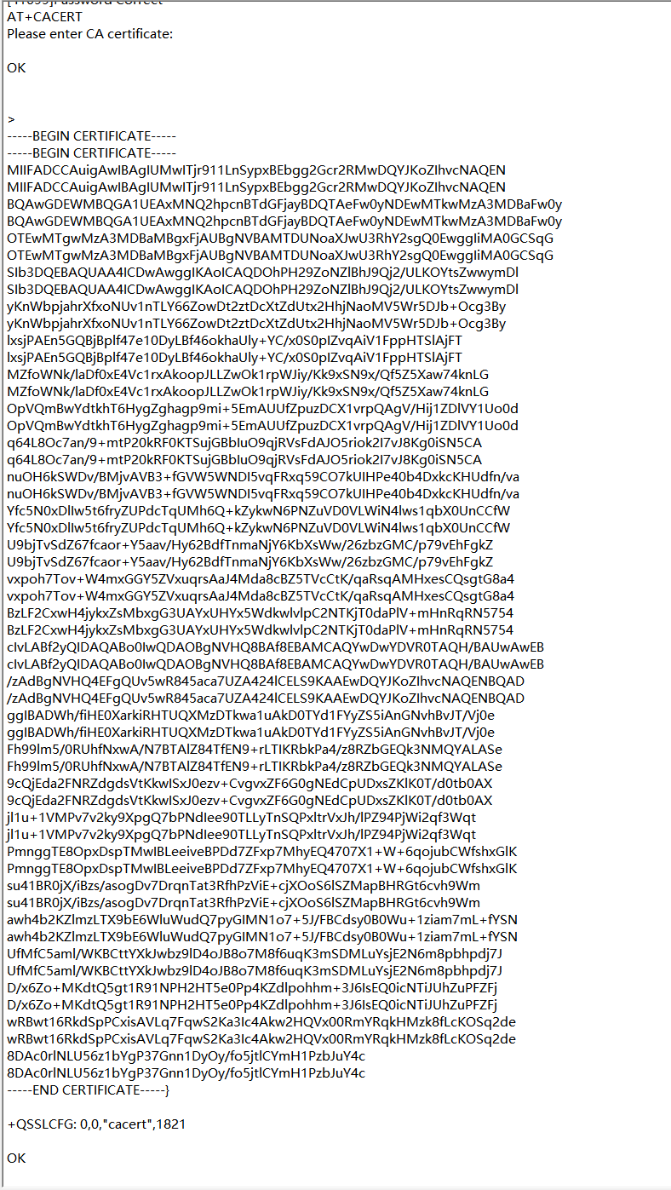
The device will respond with:
+QSSLCFG: 0,0,"cacert",<total_chars>
Where <total_chars> = Total characters in the certificate file + Number of line breaks.
Example: If the certificate file has 1792 characters and 29 line breaks, the response will show 1821 characters.
4.2 Configure Client Certificate
Send the AT command AT+CLICERT via serial port tool. After sending, wait for the device to display "Please enter client certificate", then send the certificate content line by line.
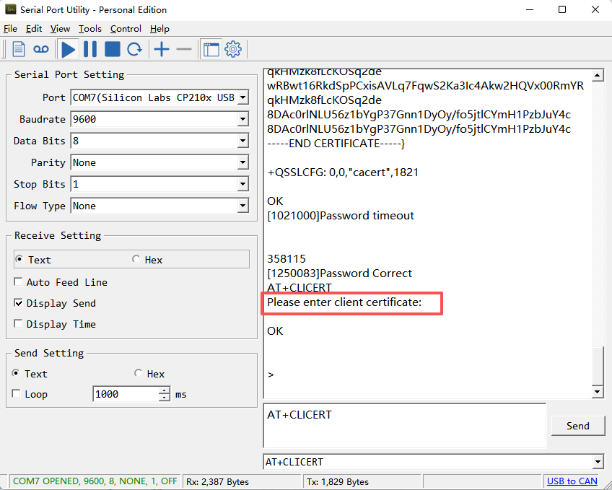
- Certificate content must be sent line by line. Sending the entire file at once will result in only the first line being recognized, causing the write to fail.
- After each line is sent, the device will echo back the same line as confirmation.
- When sending the last line of the certificate file, you must append a closing curly brace "}" after the final character. This signals the device that the transmission is complete.
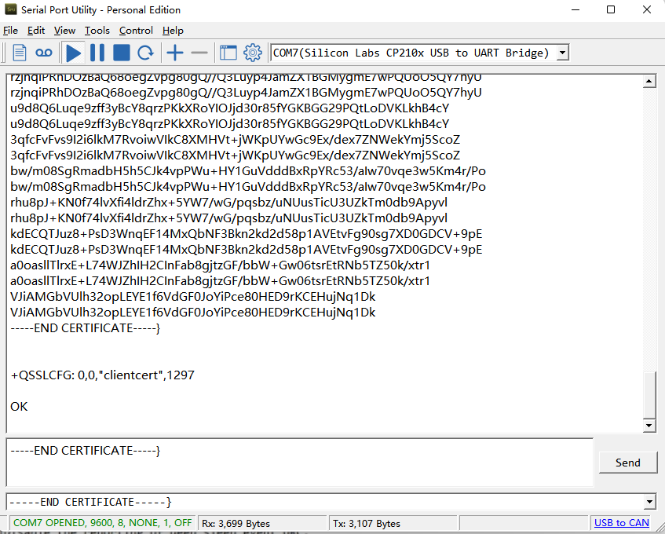
After successful execution, as shown in the following figure.
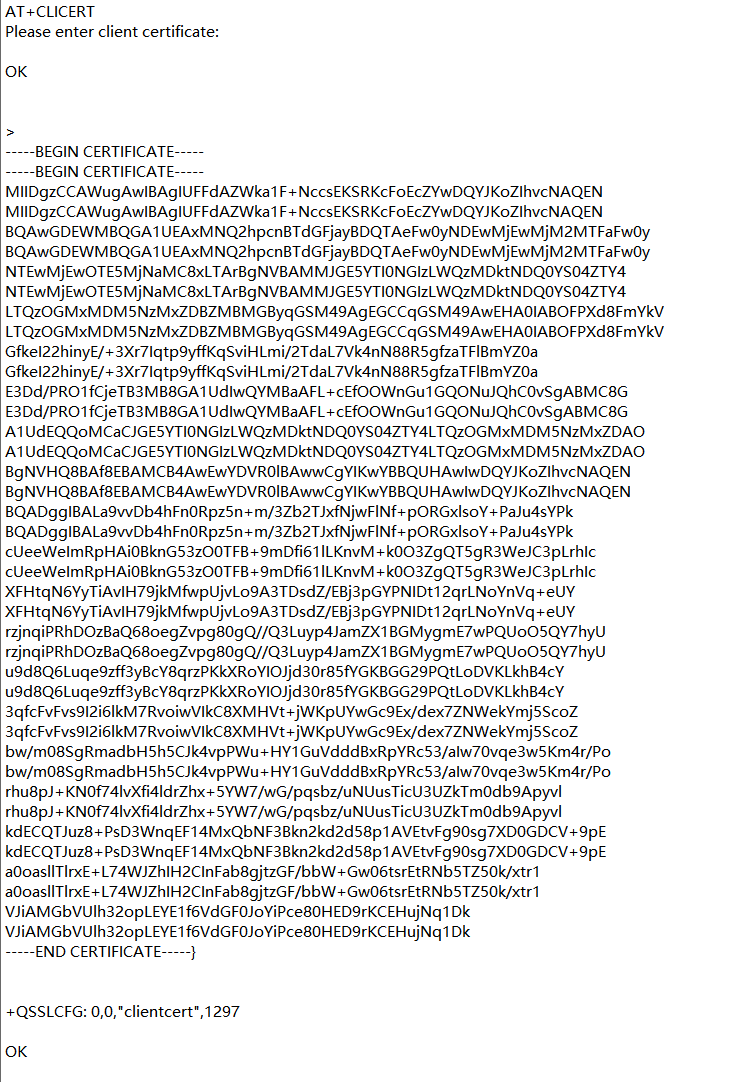
The device will respond with:
+QSSLCFG: 0,0,"clientcert",<total_chars>
Where <total_chars> = Total characters in the certificate file + Number of line breaks.
Example: If the certificate file has 1276 characters and 21 line breaks, the response will show 1297 characters.
4.3 Configure Client Private Key
Send the AT command AT+CLIKEY via serial port tool. After sending, wait for the device to display "Please enter client private key", then send the certificate content line by line.
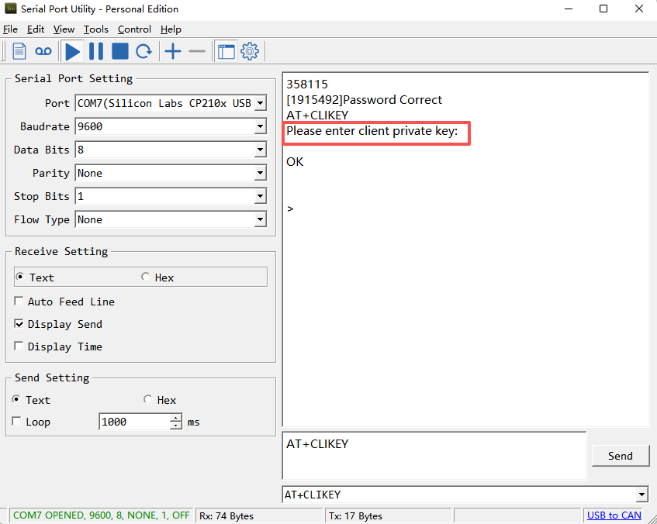
- Certificate content must be sent line by line. Sending the entire file at once will result in only the first line being recognized, causing the write to fail.
- After each line is sent, the device will echo back the same line as confirmation.
- When sending the last line of the certificate file, you must append a closing curly brace "}" after the final character. This signals the device that the transmission is complete.
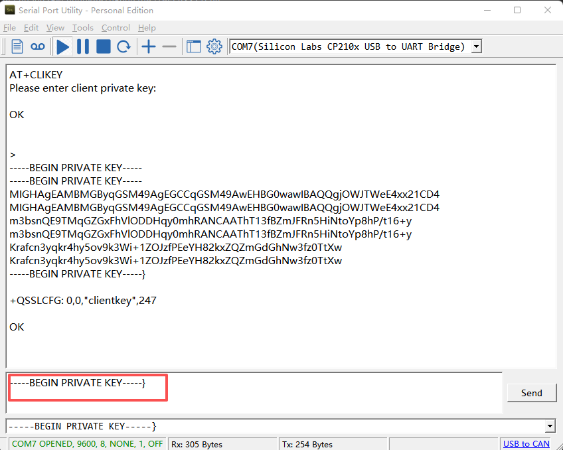
After successful execution, as shown in the following figure.
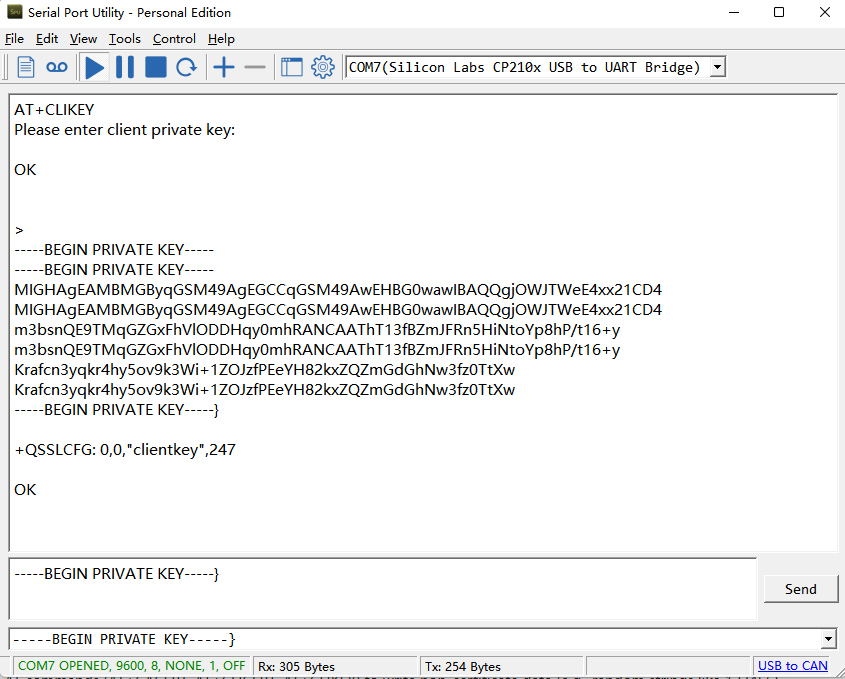
The device will respond with:
+QSSLCFG: 0,0,"clientkey",<total_chars>
Where <total_chars> = Total characters in the certificate file + Number of line breaks.
Example: If the certificate file has 241 characters and 6 line breaks, the response will show 247 characters.
4.4 Clear Certificates by Overwriting
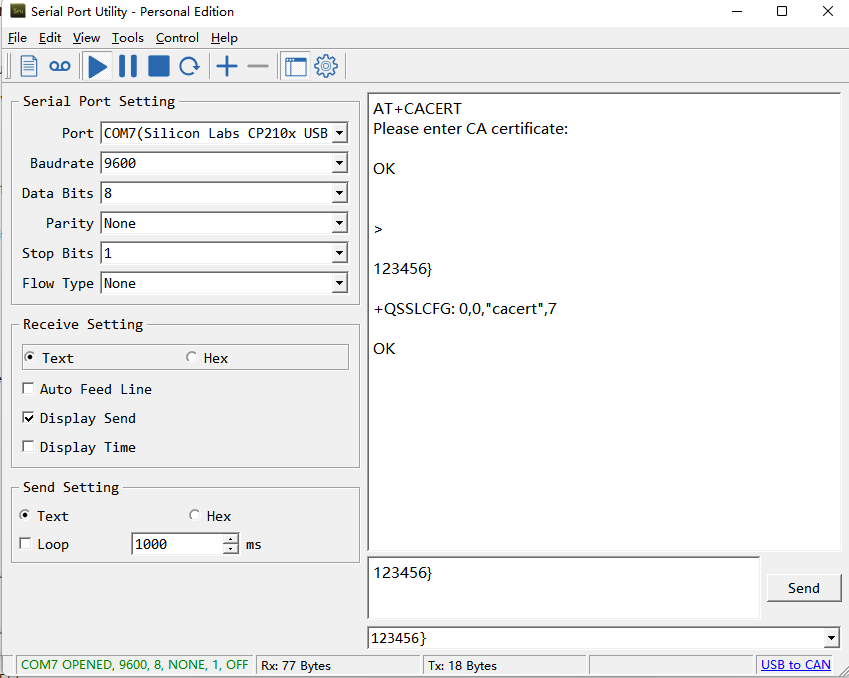
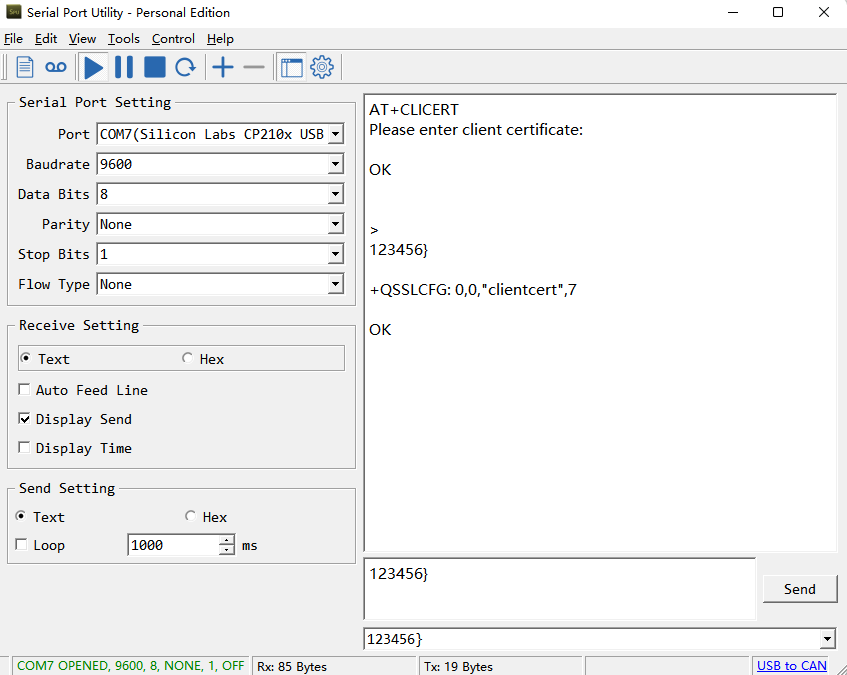
The -NB/-NS modules (BC660K) do not support direct certificate deletion via AT commands or firmware updates. To remove existing certificates, overwrite them with dummy data.
Steps:
- Use the standard write commands (AT+CACERT, AT+CLICERT, AT+CLIKEY) to enter certificate writing mode.
- Instead of real certificate data, write a dummy string (e.g., "123456").
① Example - Delete CA certificate:
② Example - Delete client certificate:
③ Example - Delete client private key:
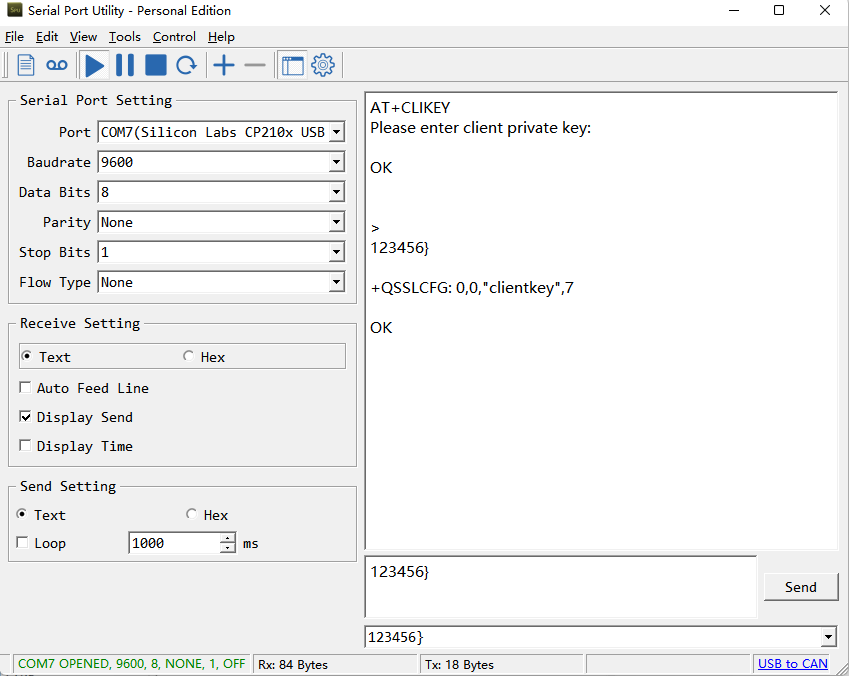
If you receive a "Failure" response, retry the operation or check the module connection.
5. Write Certificates to -CB/-CS Series Devices (BG95-M2/M3)
- Certificates can only be written when the device is idle (not transmitting). Writing during an active uplink may cause the operation to be interrupted or fail. So before writing certificates, wait for the device to enter sleep mode automatically after completing its normal data transmission. Alternatively, press the ACT button five times in quick succession to force the device into deep sleep mode immediately.
- The serial port must be unlocked before writing certificates. To unlock, send the password: directly enter the 6-character AT+PIN (e.g., 123456).
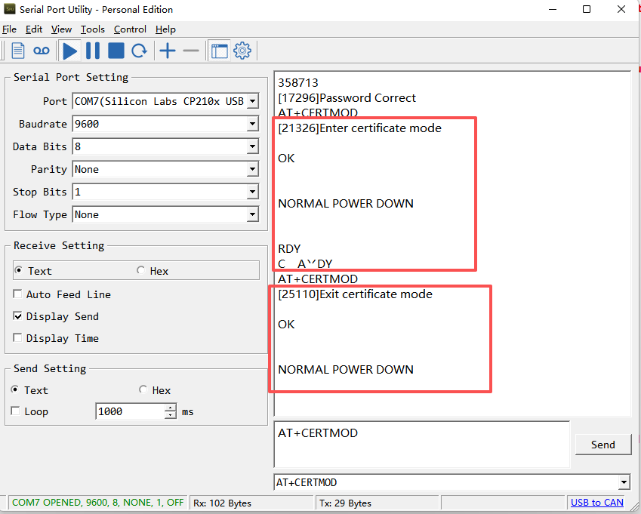
- You must send "AT+CERTMOD" first to enter certificate writing mode. Without this command, the device will not respond to write commands.
- After completing certificate writing, send "AT+CERTMOD" again to exit certificate writing mode. Otherwise, the device will remain in a high-power consumption state.
- If you encounter "ERROR -107" during the write process, delete the existing TLS certificates from the node first, then retry the write operation.
5.1 Configure CA Certificate
Note: You can choose either CA1 or CA3 certificate.
1. Send the AT command AT+QFUPL="cacert.pem",<size>,100 via serial port tool.
2. After sending, wait for the device to display "CONNECT", then send the certificate content line by line.
Parameter <size> description: Total characters in the certificate file + Total number of line breaks.
Example:
If the certificate file has 1792 characters and 29 line breaks, then <size> = 1792 + 29 = 1821.
The write command would be: AT+QFUPL="cacert.pem",1821,100
After successful execution, as shown in the following figure.
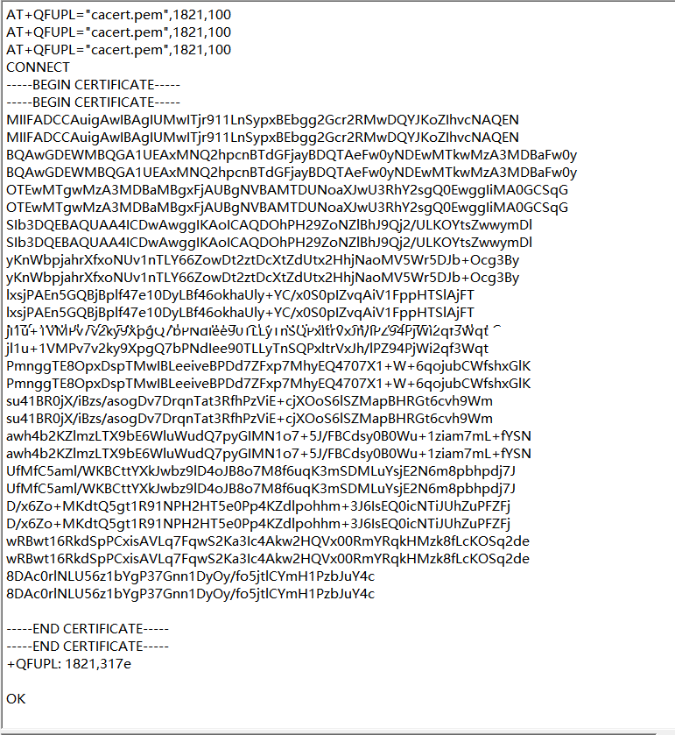
The device will respond with:
"+QFUPL: <total_chars>,<checksum>"
Parameter Description:
- <total_chars>: Total number of characters written, matches the "size" value specified in the command.
- <checksum>: Checksum automatically calculated by the device.
5.2 Configure Client Certificate
1. Send the AT command AT+QFUPL="client.pem",<size>,100 via serial port tool.
2. After sending, wait for the device to display "CONNECT", then send the certificate content line by line.
Parameter <size> description: Total characters in the certificate file + Total number of line breaks.
Example:
If the certificate file has 1276 characters and 21 line breaks, then <size> = 1276 + 21 = 1297.
The write command would be: AT+QFUPL="client.pem",1297,100
After successful execution, as shown in the following figure.
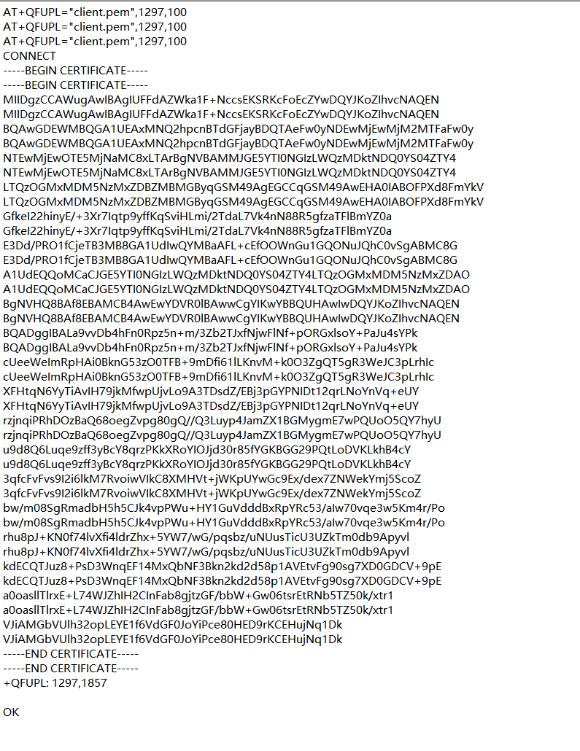
The device will respond with:
+QFUPL: <total_chars>,<checksum>Parameter Description:
- <total_chars>: Total number of characters written, matches the "size" value specified in the command.
- <checksum>: Checksum automatically calculated by the device.
5.3 Configure Client Private Key
1. Send the AT command AT+QFUPL="user_key.pem",<size>,100 via serial port tool.
2. After sending, wait for the device to display "CONNECT", then send the certificate content line by line.
Parameter <size> description: Total characters in the certificate file + Total number of line breaks.
Example:
If the certificate file has 241 characters and 5 line breaks, then <size> = 241 + 5 = 246.
The write command would be: AT+QFUPL="user_key.pem",246,100
After successful execution, as shown in the following figure.
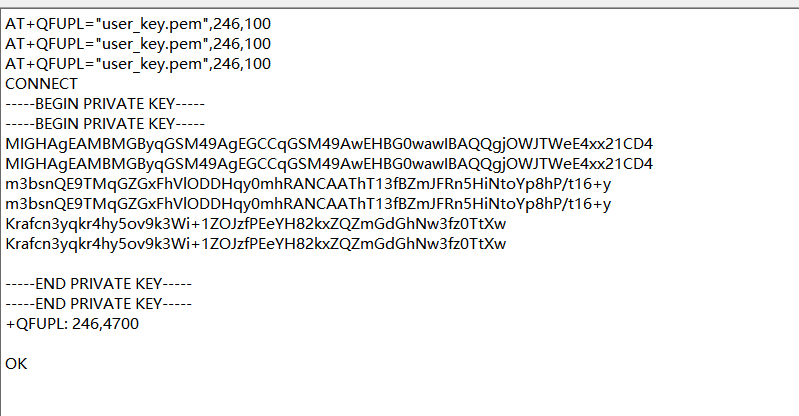
The device will respond with:
+QFUPL: <total_chars>,<checksum>Parameter Description:
- <total_chars>: Total number of characters written, matches the "size" value specified in the command.
- <checksum>: Checksum automatically calculated by the device.
5.4 Delete or Replace Certificates
If you have written an incorrect certificate or need to replace an existing certificate, use the following commands to delete the current certificates first:
AT+QFDEL="cacert.pem"
AT+QFDEL="client.pem"
AT+QFDEL="user_key.pem"
- When there is no certificate on the device, a deletion error will be displayed.
- When the device already has a certificate, using the command to configure the certificate again will display a configuration error.
6. Configure Device to Connect to ThingsEye
6.1 Set Data Format
AT+PRO=3,5 (MQTT JSON format uplink)
6.2 Set Server Address
AT+SERVADDR=lns1.thingseye.io,8883
6.3 Set MQTT Topics
ThingsEye does not restrict topic names, so you can set any topic.
AT+SUBTOPIC= <any_topic>
AT+PUBTOPIC= <any_topic>
6.4 Set TLS Mode
AT+TLSMOD=1,2
The AT+TLSMOD command configures the TLS authentication mode:
- AT+TLSMOD=1,0 - No authentication
- AT+TLSMOD=1,1 - Server authentication only
- AT+TLSMOD=1,2 - Server and client authentication (recommended for AWS/ThingsEye)
6.5 Restart Device
After completing all configurations, restart the device using one of the following methods:
- Send the AT command: ATZ
- Press the ACT button for more than 3 seconds
The device will reboot and apply all configuration changes.
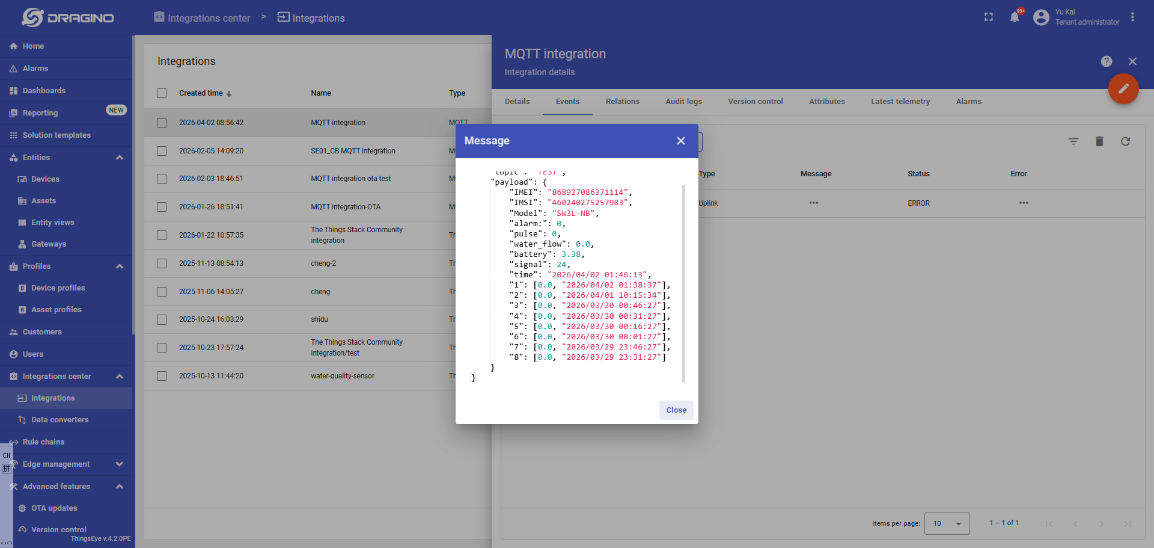
7. Verify Data on ThingsEye
7.1 Find MQTT Test Client
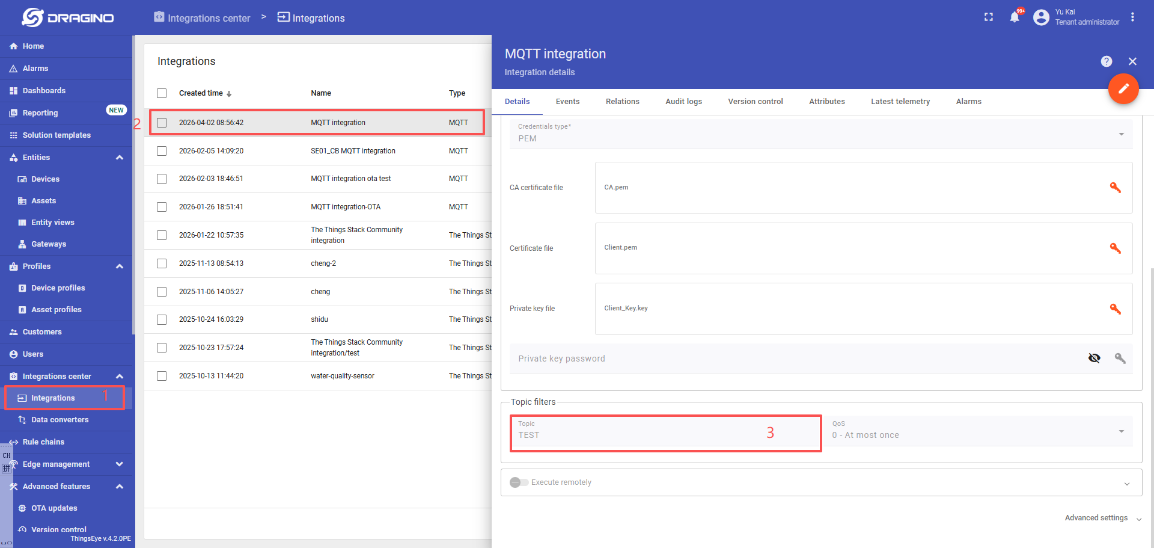
In the MQTT test client, enter the topic you configured with AT+PUBTOPIC. If you have forgotten your topic, you can use # as a wildcard to subscribe to all topics.
7.2 View Subscribed Data
After subscribing, you will see the device uplink data in the Subscriptions panel.