AIS01-FB – NB-IoT/LTE-M AI Image Recognition End Node
1. Introduction
1.1 What is AIS01-FB
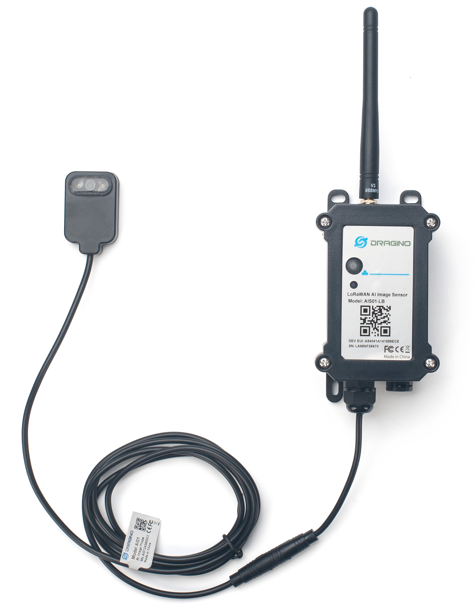
AIS01-FB is an NB-IoT/LTE-M AI Image Recognition End Node. AIS01-FB has a camera and AI processor in the probe. It can take a photo, analyze it to obtain a digital reading and upload the reading to an IoT server via an NB-IoT/CAT-M1 network.
AIS01-FB is pre-trained to support image recognition for water meters, gas meters and electricity meters. It can be trained to support image recognition for other applications.
AIS01-FB can send the recognized digital reading as well as the original photo via NB-IoT/CAT-M1.
AIS01-FB is available with an optional pre-installed SIM card and a preconfigured IoT server connection for easier setup.
AIS01-FB supports BLE configuration and Over-the-Air Update for easier configuration and maintenance.
AIS01-FB is powered by an 8500mAh Li/SOCl2 battery and is designed for long-term use. Actual battery life depends on network conditions, reporting intervals and image-upload frequency.
1.2 Features
- NB-IOT Bands: B1/B2/B3/B4/B5/B8/B12/B13/B18/B19/ B20/B25/B28/B66/B71/B85
- LTE-M/Cat-M Bands: B1/B2/B3/B4/B5/B8/B12/B13/B18/B19/ B20/B25/B26/B27/B28/B66/B85
- Low power consumption
- AI Image Recognition Sensor.
- Send image to IoT server
- Recognize digits from Image and send data to IoT server
- Trained for common reading for Water Meter, Gas Meter, Power Meter
- Multiple samples in one uplink
- Support Interrupt uplink
- Support Bluetooth v5.1 configuration
- GNSS for Location Report
- Uplink via MQTT, MQTTs, TCP or UDP
- Periodic uplinks
- Downlink configuration
- 8500mAh Li/SOCl2 Battery
1.3 Specification
Common DC Characteristics:
- Supply Voltage: Built-in Battery , 3.0v ~ 3.6v
- Operating Temperature: -40 ~ 85°C
Camera:
- Mono: black & white
- Angle: 110°
- Image size: 64kb
- Image resolution: 640x480
- Power Consumption: 206.1mW
- Supply Voltage: DC5V
- Idle Mode: 6uA
- Take Photo: 41.22 mA and 3171 ms
- Cable Length: 150cm
- Dimension: 46.2x29x13.8 mm
I/O Interface:
- Battery output (3.0v ~ 3.6v depends on battery)
- +5v controllable output
- 3 x Interrupt or Digital IN/OUT pins
- 3 x one-wire interfaces
- 1 x UART Interface
- 1 x I2C Interface
NB-IoT Spec:
NB-IoT Module: nRF9151-NGFF
Support Bands:
- B1 @H-FDD: 2100MHz
- B2 @H-FDD: 1900MHz
- B3 @H-FDD: 1800MHz
- B4 @H-FDD: 2100MHz
- B5 @H-FDD: 860MHz
- B8 @H-FDD: 900MHz
- B12 @H-FDD: 720MHz
- B13 @H-FDD: 740MHz
- B17 @H-FDD: 730MHz
- B18 @H-FDD: 870MHz
- B19 @H-FDD: 870MHz
- B20 @H-FDD: 790MHz
- B25 @H-FDD: 1900MHz
- B26 @H-FDD: 876MHz
- B28 @H-FDD: 750MHz
- B65 @H-FDD: 2155MHz
- B66 @H-FDD: 2000MHz
- B85 @H-FDD: 700MHz
Battery:
- Li/SOCl2 non-rechargeable battery
- Capacity: 8500mAh
- Self-Discharge: <1% / Year @ 25°C
- Max continuous current: 130mA
- Max boost current: 2A, 1 second
Power Consumption:
- Sleep Mode: 17uA @ 3.3v
- Max transmit current: 350mA @ 3.3v
1.4 Sleep mode and working mode
Deep Sleep Mode: The sensor does not perform normal cellular reporting. This mode is used for storage and shipping to save battery life.
Working Mode: In this mode, the sensor connects to the NB-IoT/CAT-M1 network and sends sensor data to the server. Between sampling, transmission and reception, it enters a low-power idle state.
1.5 Button & LEDs
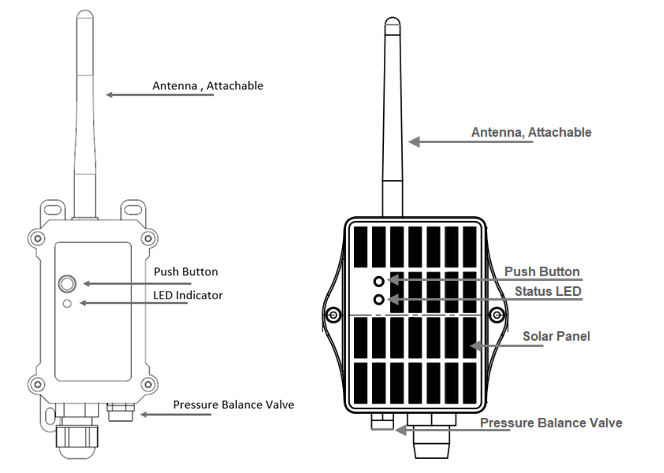
| Behavior on ACT | Function | Action |
|---|---|---|
 1~3s | Send an uplink | If sensor is already Joined to NB-IoT/CAT-M1 network, sensor will send an uplink packet, blue led will blink once. Meanwhile, BLE module will be active and user can connect via BLE to configure device. |
| >3s | Active Device | Green led will fast blink 5 times, device will enter OTA mode for 12 seconds. And then start to attach NB-IoT/CAT-M1 network. Once sensor is active, BLE module will be active and user can connect via BLE to configure device, no matter if device attach NB-IoT/CAT-M1 network or not. |
 x5 | Deactivate Device | Red led will solid on for 5 seconds. Means device is in Deep Sleep Mode. |
1.6 BLE connection
AIS01-FB supports BLE remote configuration.
BLE can be used to configure sensor parameters or view console output. BLE is activated in the following cases:
- Press button to send an uplink
- Press the button to activate the device.
- Device power-on or reset.
If no BLE connection is established within 60 seconds, the sensor shuts down the BLE module to enter low-power mode.
1.7 Pin Definitions
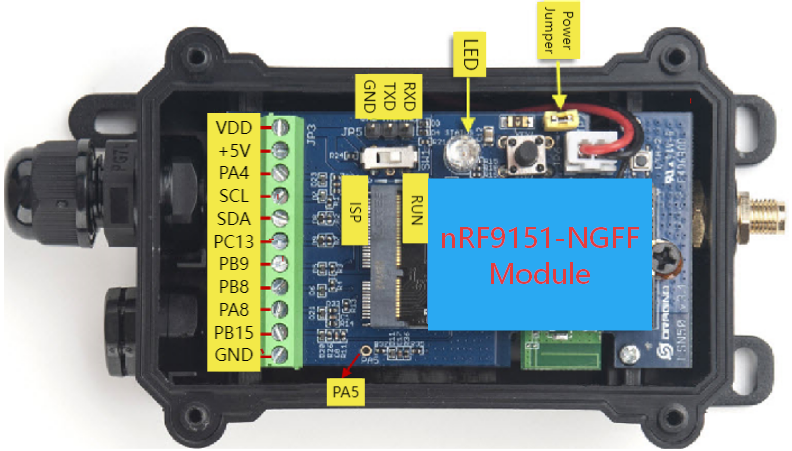
AIS01-FB uses the motherboard shown below.
1.7.1 Jumper JP2
Fit this jumper to power on the device.
1.7.2 BOOT MODE / SW1
1) ISP: upgrade mode, device won't have any signal in this mode. but ready for upgrade firmware. LED won't work. Firmware won't run.
2) Flash: work mode, device starts to work and send out console output for further debug
1.7.3 Reset Button
Press to reboot the device.
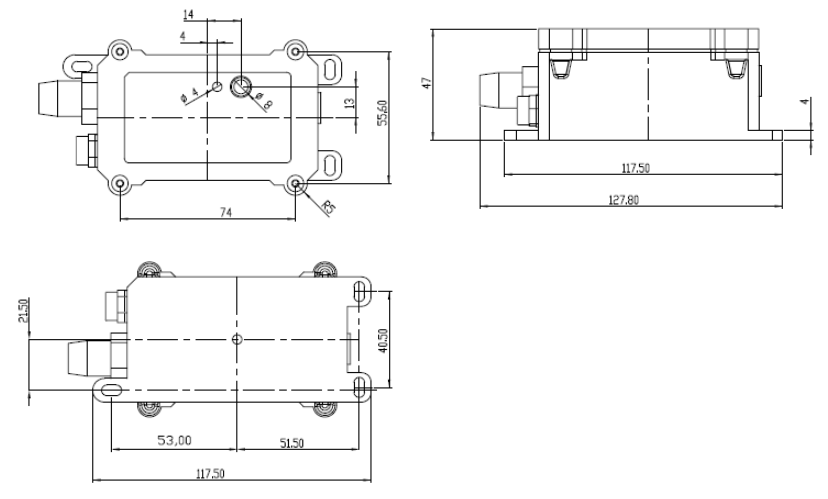
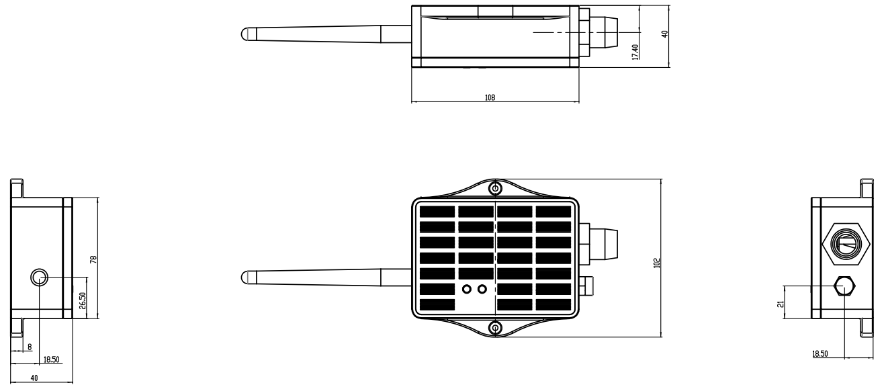
1.8 Mechanical
1.8.1 For FB version
1.8.2 For FS version
2. Use AIS01-FB to communicate with IoT Server
2.1 Send data to IoT server via NB-IoT/CAT-M1 network
AIS01-FB is equipped with an NB-IoT/LTE-M module. Its pre-loaded firmware collects readings from the AI probe and sends them to the IoT server through the cellular network using the configured protocol.
Below shows the network structure:

There are two versions of AIS01-FB: -GE and -1T.
GE Version: This version does not include a SIM card or a preconfigured IoT server connection. Users need to complete the following two steps using AT commands to send data to an IoT server.
-
Install NB-IoT SIM card and configure APN. See instruction of Attach Network.
-
Set up sensor to point to IoT Server. See instruction of Configure to Connect Different Servers.
The table below shows examples of different server connections.
| Servers | Dash Board | Comments |
|---|---|---|
| Node-Red | 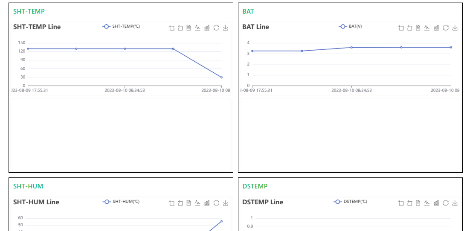 | |
| Tago.IO | ||
| General UDP | Raw Payload. Need Developer to design Dash Board | |
| General MQTT | Raw Payload. Need Developer to design Dash Board | |
| ThingsBoard | 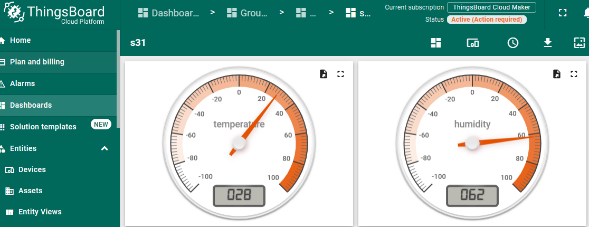 |
1T Version: This version has a pre-installed 1NCE SIM card and is preconfigured to send data to ThingsEye. Select the sensor type in ThingsEye and activate AIS01-FB to view the data. See ThingsEye Configuration Instructions.
2.2 Payload Types
To meet different server requirements, AIS01-FB supports different payload types.
Includes:
- General JSON format payload. (Type=0)
Users can specify the payload type when selecting the connection protocol. Examples:
AT+PRO=2,0 // Use UDP Connection & hex Payload
AT+PRO=2,5 // Use UDP Connection & Json Payload
AT+PRO=3,5 // Use MQTT Connection & Json Payload
2.2.1 General Json Format(Type=0)
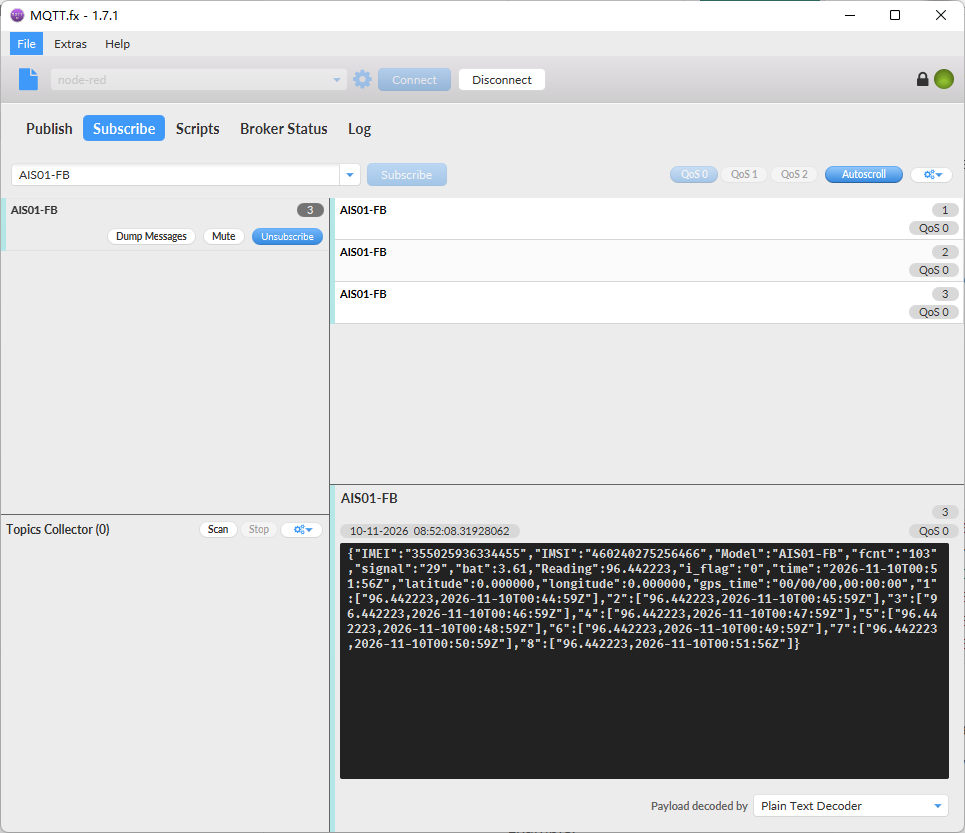
The general JSON format is shown below:
{"IMEI":"355025936334455","IMSI":"460240275256466","Model":"AIS01-FB","fcnt":"103","signal":"29","bat":3.61,"Reading":96.442223,"i_flag":"0","time":"2026-11-10T00:51:56Z","latitude":0.000000,"longitude":0.000000,"gps_time":"00/00/00,00:00:00","1":["96.442223,2026-11-10T00:44:59Z"],"2":["96.442223,2026-11-10T00:45:59Z"],"3":["96.442223,2026-11-10T00:46:59Z"],"4":["96.442223,2026-11-10T00:47:59Z"],"5":["96.442223,2026-11-10T00:48:59Z"],"6":["96.442223,2026-11-10T00:49:59Z"],"7":["96.442223,2026-11-10T00:50:59Z"],"8":["96.442223,2026-11-10T00:51:56Z"]}
Note: from above payload:
-
Reading, i_flag, bat, signal and time describe the current data. Latitude, longitude and gps_time contain the available positioning data.
-
JSON entries 1 ~ 8 contain the historical samples specified by AT+CLOCKLOG=1,65535,1,8 Command. Each entry includes (from left to right): Reading, Sampling time.
Example:
Field Analysis:
Model: AIS01-FB
BAT (Battery Info):
Ex1: 3.61V
Ex2: 3.284V
Signal Strength:
NB-IoT Network signal Strength.
Ex1: 29
0 -113dBm or less
1 -111dBm
2...30 -109dBm... -53dBm
31 -51dBm or greater
99 Not known or not detectable
i_flag:
This data field shows if this packet is generated by interrupt or not.
Example:
0 : Normal uplink packet.
1 : Interrupt Uplink Packet.
Reading:
Reading is the meter value recognized by the AI probe. In the JSON payload, use this numeric value directly; no HEX conversion is required.
Example:
"Reading":96.442223 means the recognized reading is 96.442223. The unit and decimal position depend on the meter and calibration.
TimeStamp & GPS Timestamp
Example: 2026-11-10T00:51:56Z
Latitude:
Example: 22.706450
Longitude:
Example: 114.242300
2.3 Image data
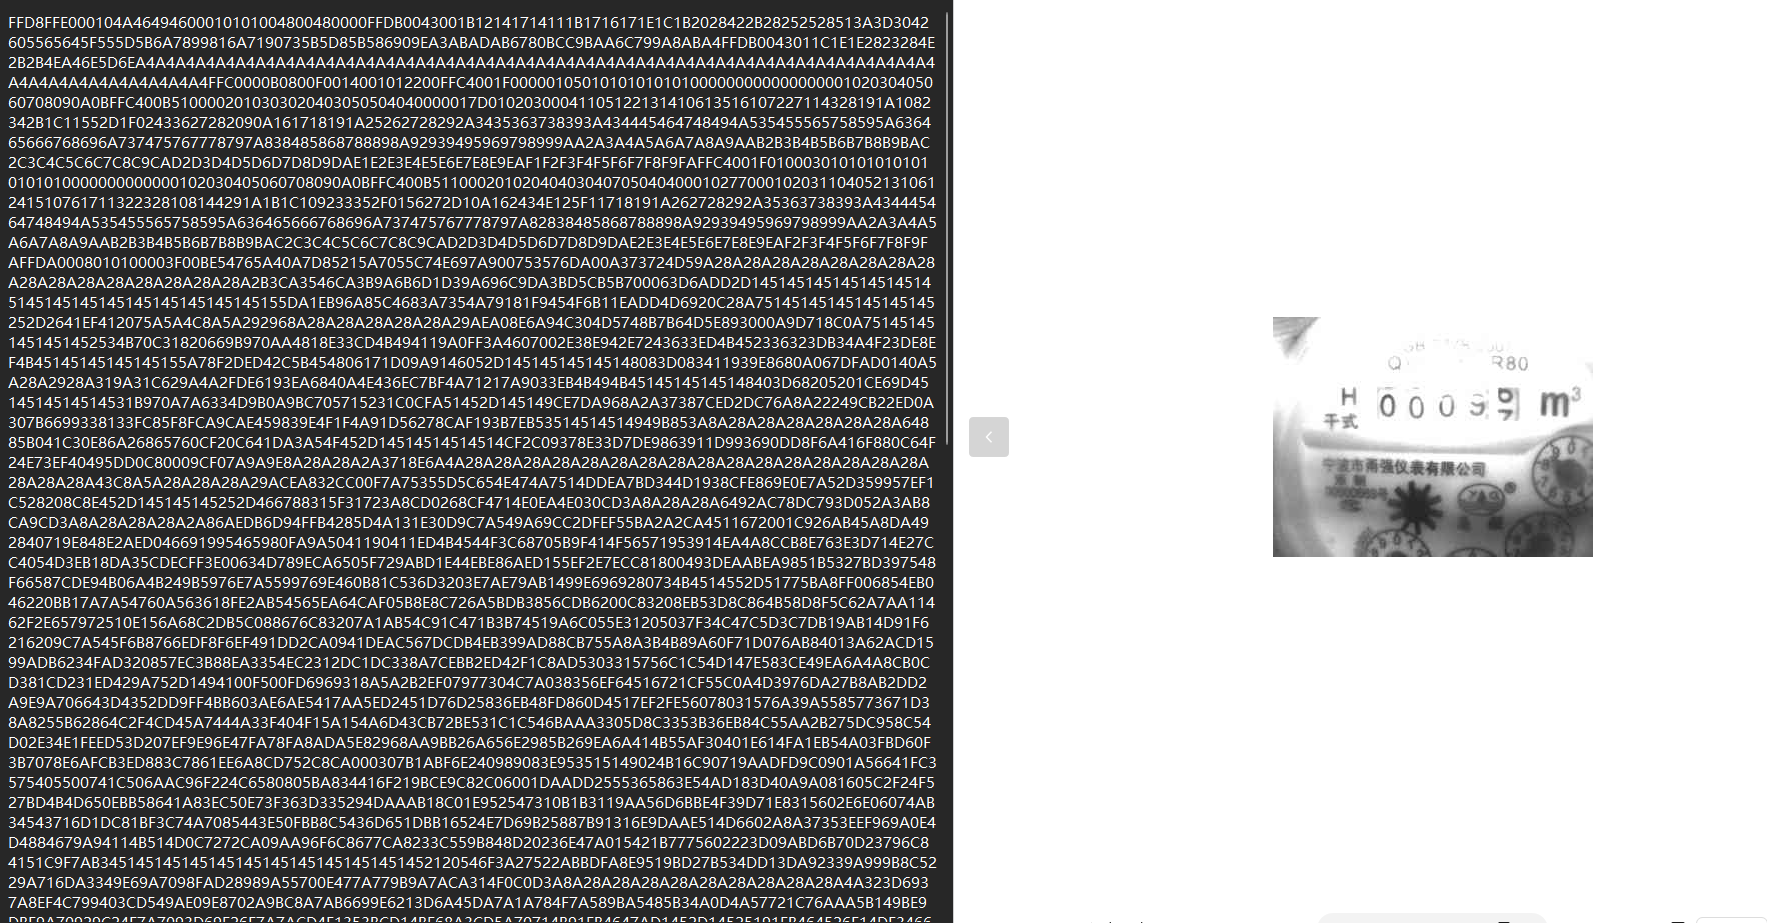
Remove the packet prefix and probe header before extracting the image data. In the example below, the JPEG data starts at FFD8.
Example: Payload: P1C05A0158070000FFD8FFE000104A46494600010101004800480000FFDB0043001B12141714111B1716171E1C1B2028422B28252528513A3D3042605565645F555D5B6A7899816A7190735B5D85B586909E
A3ABADAB6780BCC9BAA6C799A8ABA4FFDB0043011C1E1E2823284E2B2B4EA46E5D6EA4A4A4A4A4A4A4A4A4A4A4A4A4A4A4A4A4A4A4A4A4A4A4A4A4A4A4A4A4A4A4A4A4A4A4A4A4A4A4A4A4A4A4A
4A4A4A4A4A4A4FFC0000B080040010001012200FFC4001F0000010501010101010100000000000000000102030405060708090A0BFFC400B5100002010303020403050504040000017D0102030004110512213
1410613516107227114328191A1082342B1C11552D1F02433627282090A161718191A25262728292A3435363738393A434445464748494A535455565758595A636465666768696A737475767778797A838485
868788898A92939495969798999AA2A3A4A5A6A7A8A9AAB2B3B4B5B6B7B8B9BAC2C3C4C5C6C7C8C9CAD2D3D4D5D6D7D8D9DAE1E2E3E4E5E6E7E8E9EAF1F2F3F4F5F6F7F8F9FAFFC4001F0100030101010
101010101010000000000000102030405060708090A0BFFC400B51100020102040403040705040400010277000102031104052131061241510761711322328108144291A1B1C109233352F0156272D10A16243
4E125F11718191A262728292A35363738393A43444546
Image data=FFD8FFE000104A46494600010101004800480000FFDB0043001B12141714111B1716171E1C1B2028422B28252528513A3D3042605565645F555D5B6A7899816A7190735B5D85B586909EA3ABADAB678
0BCC9BAA6C799A8ABA4FFDB0043011C1E1E2823284E2B2B4EA46E5D6EA4A4A4A4A4A4A4A4A4A4A4A4A4A4A4A4A4A4A4A4A4A4A4A4A4A4A4A4A4A4A4A4A4A4A4A4A4A4A4A4A4A4A4A4A4A4A4A4A4
A4FFC0000B080040010001012200FFC4001F0000010501010101010100000000000000000102030405060708090A0BFFC400B5100002010303020403050504040000017D0102030004110512213141061351610
7227114328191A1082342B1C11552D1F02433627282090A161718191A25262728292A3435363738393A434445464748494A535455565758595A636465666768696A737475767778797A838485868788898A92
939495969798999AA2A3A4A5A6A7A8A9AAB2B3B4B5B6B7B8B9BAC2C3C4C5C6C7C8C9CAD2D3D4D5D6D7D8D9DAE1E2E3E4E5E6E7E8E9EAF1F2F3F4F5F6F7F8F9FAFFC4001F01000301010101010101010100
00000000000102030405060708090A0BFFC400B51100020102040403040705040400010277000102031104052131061241510761711322328108144291A1B1C109233352F0156272D10A162434E125F11718191
A262728292A35363738393A43444546
2.3.1 Image data reception instructions
Image data is split into multiple uplink packets. The number of packets depends on the image size and the effective image-data capacity of each packet.
Example:
P1C05A0138120000FFD8FFE000104A46494600010101004800480000FFDB0043001B12141714111B1716171E1C1B2028422B28252528513A3D3042605565645F555D5B6A7899816A7190735B5D85B586909EA3ABADAB6780BCC9BAA6C799A8ABA4FFDB0043011C1E1E2823284E2B2B4EA46E5D6EA4A4A4A4A4A4A4A4A4A4A4A4A4A4A4A4A4A4A4A4A4A4A4A4A4A4A4A4A4A4A4A4A4A4A4A4A4A4A4A4A4A4A4A4A4A4A4A4A4A4FFC0000B0800F0014001012200FFC4001F0000010501010101010100000000000000000102030405060708090A0BFFC400B5100002010303020403050504040000017D01020300041105122131410613516107227114328191A1082342B1C11552D1F02433627282090A161718191A25262728292A3435363738393A434445464748494A535455565758595A636465666768696A737475767778797A838485868788898A92939495969798999AA2A3A4A5A6A7A8A9AAB2B3B4B5B6B7B8B9BAC2C3C4C5C6C7C8C9CAD2D3D4D5D6D7D8D9DAE1E2E3E4E5E6E7E8E9EAF1F2F3F4F5F6F7F8F9FAFFC4001F0100030101010101010101010000000000000102030405060708090A0BFFC400B51100020102040403040705040400010277000102031104052131061241510761711322328108144291A1B1C109233352F0156272D10A162434E125F11718191A262728292A35363738393A43444546
2.3.2 Combined image
Remove the packet prefixes and headers according to the actual packet format, then combine the image data in page order. Convert the combined HEX data to a binary image using WinHex. For the detailed procedure, see: Combined image
Below is the text of the integrated data and the image of the converted data:
3. Configure AIS01-FB
3.1 Configure Methods
AIS01-FB supports the following configuration methods:
- AT Command via Bluetooth Connection (Recommended): BLE Configure Instruction.
- AT Command via UART Connection : See UART Connection.
3.2 Commands for AIS01-FB
The following commands are used to configure AIS01-FB:
3.2.1 Set Transmit Interval Time
Feature: Change the AIS01-FB transmit interval (unit: seconds).
AT Command: AT+TDC
| Command Example | Function | Response |
|---|---|---|
| AT+TDC=? | Show current transmit Interval | 30 OK the interval is 30 seconds |
| AT+TDC=60 | Set Transmit Interval | OK Set transmit interval to 60 seconds |
Downlink Command: 0x01
Format: Command Code (0x01) followed by 3 bytes time value.
If the downlink payload=0100003C, it means set the END Node's Transmit Interval to 0x00003C=60(S), while type code is 01.
- Example 1: Downlink Payload: 0100001E // Set Transmit Interval (TDC) = 30 seconds
- Example 2: Downlink Payload: 0100003C // Set Transmit Interval (TDC) = 60 seconds
3.2.2 Set Interrupt Mode
Feature: Set the external interrupt trigger mode.
AT Command: AT+INTMOD
| Command Example | Function | Response |
|---|---|---|
| AT+INTMOD=? | Show current interrupt mode | 0 OK the mode is 0 =Disable Interrupt |
| AT+INTMOD=2 | Set Interrupt Mode 0: Disable Interrupt 1: Trigger by rising and falling edge 2: Trigger by falling edge 3: Trigger by rising edge | OK |
Downlink Command: 0x06
Format: Command Code (0x06) followed by 3 bytes.
This means that the interrupt mode of the end node is set to 0x000003=3 (rising edge trigger), and the type code is 06.
- Example 1: Downlink Payload: 06000000 --> AT+INTMOD=0
- Example 2: Downlink Payload: 06000003 --> AT+INTMOD=3
3.2.3 Setting up automatic image upload data
Feature: Automatically upload image data after each uplink packet
AT Command: AT+IMAGE
| Command Example | Function | Response |
|---|---|---|
| AT+IMAGE=1 | Enable automatic uploading of image data | 1 OK |
| AT+IMAGE=0 | Disable automatic uploading of image data | 0 OK |
Downlink Command: 0x0A
0X0A 01 // Same as AT+IMAGE=1
0x0A 00 // Same as AT+IMAGE=0
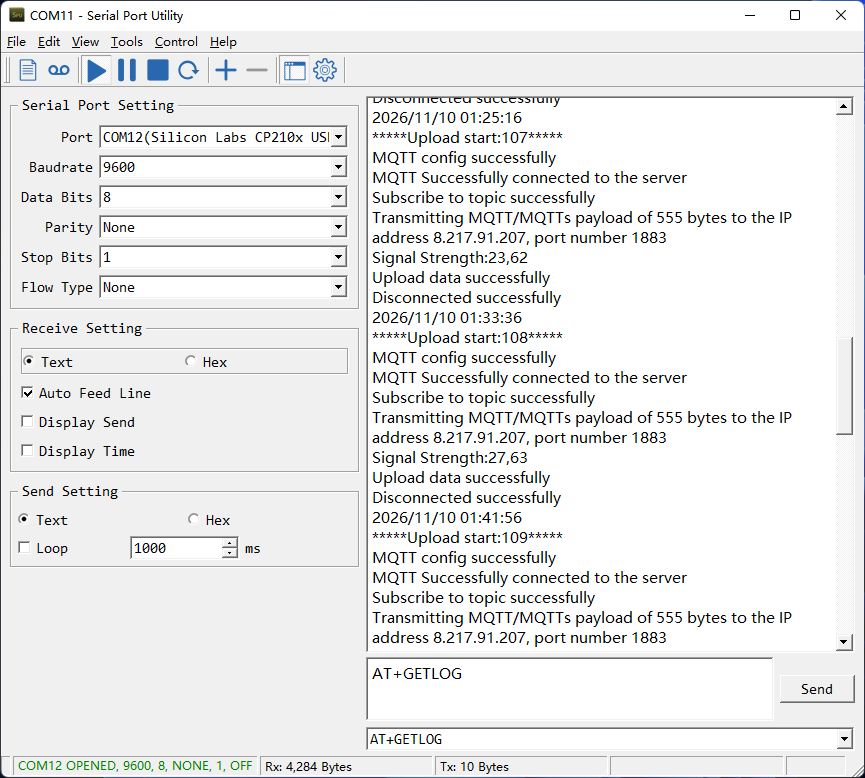
3.2.4 Uplink log query
Feature: This command can be used to query upstream logs of data packets.
AT Command: AT+GETLOG
Downlink Command:
No downlink commands for feature
3.2.5 Print last few data entries
Feature: Print the last few data entries
AT command: AT+PLDTA
| Command Example | Response |
|---|---|
| AT+PLDTA=5 Print last 5 entries | 0001 2026/11/10 02:32:57 3594 Reading=21699.667969 alarm:false 0002 2026/11/10 02:33:48 3594 Reading=21699.667969 alarm:false 0003 2026/11/10 02:35:22 3571 Reading=21699.613281 alarm:false 0004 2026/11/10 02:36:22 3586 Reading=21699.667969 alarm:false 0005 2026/11/10 02:37:22 3586 Reading=91719.664062 alarm:false OK |
Downlink Command:
No downlink commands for feature
3.2.6 Print data entries by page
Feature: Print the sector data from start page to stop page.
AT command: AT+PDTA
| Command Example | Response |
|---|---|
| AT+PDTA=1,1 Print page 1 to 1 | E8000 2026/11/9 14:29:42 3602 Reading=96.442223 alarm:false E8010 2026/11/9 14:30:42 3606 Reading=96.442223 alarm:false E8020 2026/11/9 14:31:42 3606 Reading=96.442223 alarm:false E8030 2026/11/9 14:32:42 3606 Reading=96.442223 alarm:false E8040 2026/11/9 14:33:42 3606 Reading=96.442223 alarm:false E8050 2026/11/9 14:34:42 3606 Reading=96.442223 alarm:false E8060 2026/11/9 14:35:10 3606 Reading=96.442223 alarm:false E8070 2026/11/9 14:35:42 3606 Reading=96.442223 alarm:false OK |
Downlink Command:
No downlink commands for feature
3.2.7 Clear Flash Record
Feature: Clear flash storage for data log feature.
AT command: AT+CLRDTA
| Command Example | Function | Response |
|---|---|---|
| AT+CLRDTA | Clear data records | Clear all stored sensor data... Start Tx events OK |
Downlink Command: 0x32
- Example: 0x32 00 // Same as AT+CLRDTA
3.2.8 Debug mode
Feature: Since the serial communication feature of the NRF9151 module requires activation, this command is intended for users who need to use the serial port for extended periods of time.
AT command: AT+DEBUG
| Command Example | Function |
|---|---|
| AT+DEBUG=1 | Enter debugging mode |
| AT+DEBUG=0 | Exit debugging mode,Serial port function disabled |
1. This feature remains active for only 5 minutes; it will automatically turn off after 5 minutes.
2. Keeping the serial port open continuously increases power consumption in sleep mode; the continuous current is 900 μA.
3.2.9 Set the TLS mode
Refer to this link (Connect via the MQTT protocol and send data to the server) to use TLS mode.
AT Command: AT+TLSMOD
Example 1: AT+TLSMOD=0,0 //Disable TLS Mode.
Example 2: AT+TLSMOD=1,0 //No authentication
                 AT+TLSMOD=1,1   //Perform server authentication

                 AT+TLSMOD=1,2   //Perform server and client authentication if requested by the remote server
Downlink command: 0x09
Format: Command Code (0x09) followed by 2 bytes.
Example1: Downlink Payload: 09 00 00//AT+TLSMOD=0,0
Example2: Downlink Payload: 09 01 02//AT+TLSMOD=1,2
3.2.10 Set GTIME open time
Extend the time to turn on GNSS. The automatic GPS location time is extended when the node is activated.
AT Command: AT+GTIME
Example: AT+GTIME=30 // Set the GPS positioning time to 30 seconds
Downlink command: 0x10
Format: Command Code (0x10) followed by 2 bytes.
Example: Downlink Payload: 10 00 1E // AT+GTIME=30
3.2.11 Turn on/off GPS
AT Command: AT+QGPS
- Ex1: AT+QGPS=0 // Turn off GPS
- Ex2: AT+QGPS=1 // Turn on GPS
Downlink command: 0x11
Format: Command Code (0x11) followed by 1 byte.
Example: Downlink Payload: 11 01 // AT+QGPS=1
3.2.12 Set QGPS positioning interval
Feature: Set GPS positioning interval (unit: hour).
When GPS is enabled, the node automatically locates and uplinks at each QGTDC interval after activation.
AT Command: AT+QGTDC
Example: AT+QGTDC=24 // Set the GPS positioning interval to 24h.
Downlink command: 0x12
Format: Command Code (0x12) followed by 3 bytes.
Example: 24 hours: 24(D)=0x18(H)
Downlink Payload: 12 00 00 18 // AT+QGTDC=24
3.2.13 Configure Network Category to be Searched for under LTE RAT.
By default, the NB-IoT network is turned off, and only the LTE-M network is enabled. If a user needs to use the NB-IoT network, they must enable it themselves.
AT command: AT+IOTMOD=a,b,c
a: 0: Disable eMTC; 1: Enable eMTC
b: 0: Disable NB-IoT; 1: Enable NB-IoT
c: Priority: If both network categories are enabled simultaneously (a=1 and b=1), the device will give priority to the configured category.
- 0: No specific priority. The module will automatically select the network based on local signal quality and availability (e.g., it will camp on LTE-M if the signal is better).
- 1: Give priority to the eMTC (LTE-M) network.
- 2: Give priority to the NB-IoT network.
Examples:
- Ext1:
AT+IOTMOD=1,1,2----> Both eMTC and NB-IoT are enabled, with priority given to the NB-IoT network. - Ext2:
AT+IOTMOD=1,1,0----> Both eMTC and NB-IoT are enabled, with no specific priority. The module automatically selects the network based on signal quality.
3.2.14 Factory data reset
Reset Parameters to Factory Default
AT command:
- AT+FDR// Reset Parameters to Factory Default.
3.2.15 Set the search network time
Feature: Get or set the network-search time (unit: seconds).
AT Command: AT+SFNT
Example: AT+SFNT=60 //Set the search time to 60 seconds.
Downlink command: 0x0B
Format: Command Code (0x0B) followed by 4 byte.
Example: Downlink Payload: 0B 00 00 3C//AT+SFNT=60
3.2.16 Set the QoS level
This command is used to set the QoS level of MQTT.
AT command:
- AT+MQOS=xx// 0~2
Downlink command: 0x07
Format: Command Code (0x07) followed by 1 byte.
Ex1: Downlink payload: 0x0700 //AT+MQOS=0
Ex2: Downlink payload: 0x0701 //AT+MQOS=1
3.2.17 Reset
Feature: Trigger a reset of the MCU.
AT Command: ATZ
Downlink Commands: 0x04FF
3.2.18 Set the receiving time
Feature: Extend the receiving time
AT Command: AT+RXDL
Example: AT+RXDL=1000 // Set the receiving time delay to 1000ms
Downlink Commands: 0x03
Format: Command Code (0x03) followed by 3 bytes.
Example: Downlink Payload: 03 00 03 E8//AT+RXDL=1000
4. AT Commands Set
AT+<CMD>? : Help on <CMD>
AT+<CMD> : Run <CMD>
AT+<CMD>=<value> : Set the value
AT+<CMD>=? : Get the value
General Commands
AT+MODEL : Get module information
AT+CFGMOD : Working mode selection
AT+DEUI : Get or set the Device ID
AT+PWORD : Get or set the System password
AT+CFG : Print all settings
AT+SERVADDR: Get or Set the Server address
AT+PRO : Get or set the communication protocol (2:UDP,3:MQTT,4:TCP)
AT+SLEEP : Set the sleep mode
AT+IOTMOD: Configure Network Category to be Searched for under LTE RAT
AT+UDPMOD: Get or set UDP working mode
AT+SFNT: Get or set search for network time
AT+QCOPS: Get or set operator code
APN
AT+APN : Get or set the APN
AT+AUNAME : Get or set the APN username
AT+APWD : Get or set the APN password
MQTT Management
AT+CLIENT : Get or Set the MQTT clientID
AT+UNAME : Get or Set the MQTT Username
AT+PWD : Get or Set the MQTT password
AT+PUBTOPIC: Get or set MQTT publishing topic
AT+SUBTOPIC: Get or set MQTT subscription topic
AT+TLSMOD : Get or Set the TLS mode
AT+MQOS : Set the QoS level of MQTT
GPS
AT+GTIME : Extend the time to turn on GNSS
AT+QGPS : Turn off and on GPS
AT+QGTDC : Get or set GPS positioning interval in units of h
Information
ATZ : Trigger a reset of the MCU
AT+FDR : Reset Parameters to Factory Default
AT+TDC : Get or set the application data transmission interval in s
AT+INTMOD : Get or Set the trigger interrupt mode (0:input,1:falling or rising,2:falling,3:rising)
AT+5VT : Get or Set extend the time of 5V power
AT+IMAGE : The next data packet will upload an image
AT+RXDL : Get or Set the receiving time
AT+GETSENSORVALUE : Returns the current sensor measurement
AT+PDTA: Print the sector data from start page to stop page
AT+PLDTA: Print the last few sets of data
AT+CLRDTA: Clear the storage, record position back to 1st
AT+CLOCKLOG: Get or set historical sampling parameters
AT+LDATA : Get the last upload data
AT+REDPT: Get or Set the function of reconnecting the network to send data
AT+DEBUG: Get or Set the debug mode
AT+GETLOG : Print serial port logs
AT+UPGRADE : OTA upgrade.
5. Clock logging
When deploying multiple end nodes in the field, users may want them to sample data at the same time and upload the samples together for analysis. The clock logging feature can be used for this purpose.
We can use this command to set the start time of data recording and the time interval to meet the requirements of the specific collection time of data.
- AT Command: AT+CLOCKLOG=a,b,c,d
a: 0: Disable Clock logging. 1: Enable Clock Logging
b: Specify First sampling start second: range (0 ~ 3599, 65535) // Note: If parameter b is set to 65535, the log period starts after the node accesses the network and sends packets.
c: Specify the sampling interval: range (0 ~ 255 minutes)
d: How many entries should be uplink on every TDC (max 32)
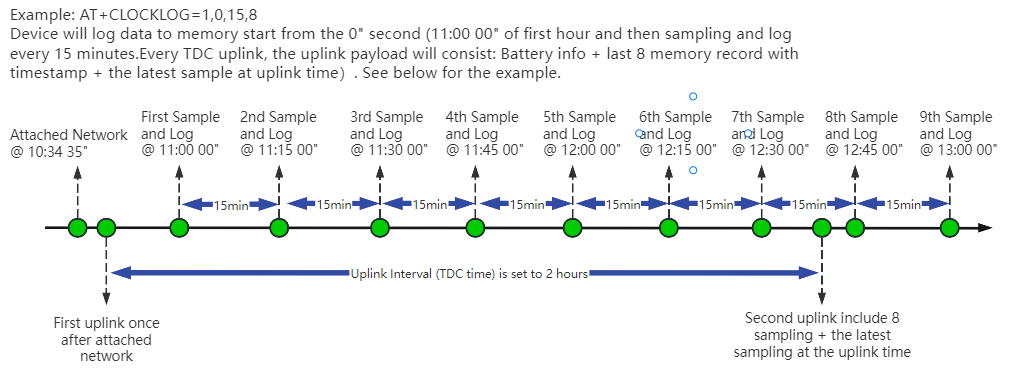
Example:
AT+CLOCKLOG=1,65535,1,8
After the node sends the first packet, data is recorded to the memory at intervals of 1 minute. For each TDC uplink, the uplink load will include: battery information + the last 8 memory records (payload + timestamp).
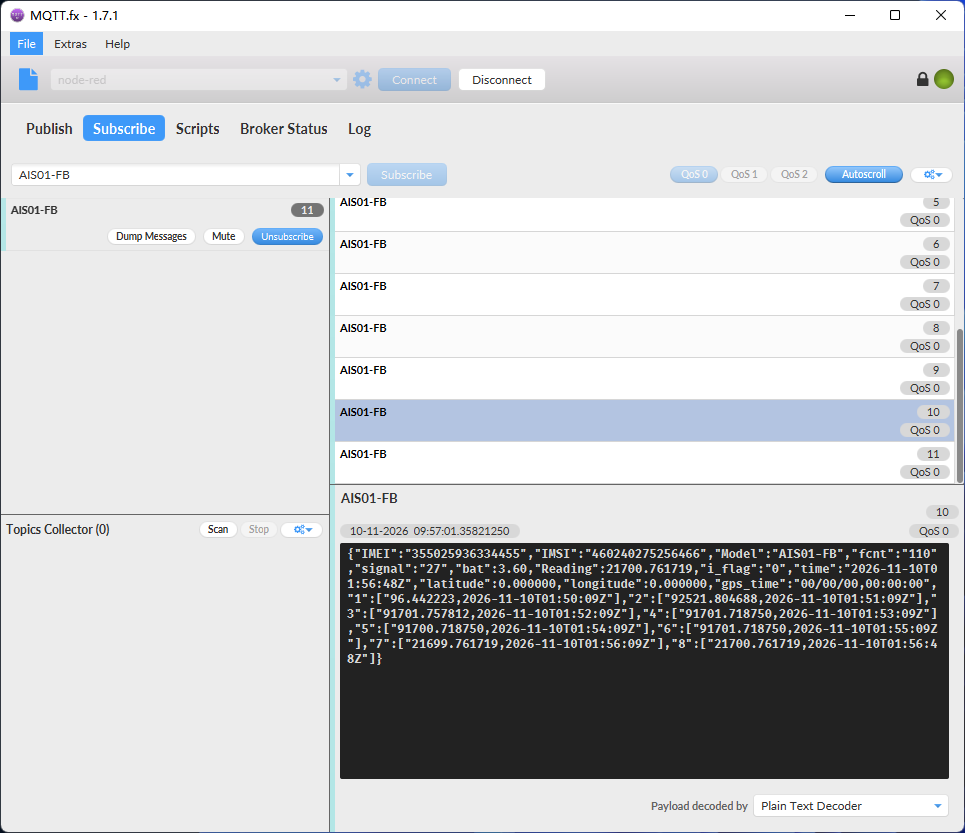
Note: Users need to synchronize the server time before configuring this command. If the server time is not synchronized before this command is configured, the command takes effect only after the node is reset.
6. Battery & Power Consumption
AIS01-FB uses an ER26500 + SPC1520 non-rechargeable battery pack. See the link below for battery information and replacement guidance.
Battery Information and Power Consumption Analysis
7. Case Study
7.1 Send Image to server to check different situation
Example 1: Users can use cameras to monitor whether the trash can is overflowing

Example 2: Users can use the camera to check whether the fire hydrant is in a safe and closed state.

8. OTA Firmware update
Users can update AIS01-FB firmware to:
- Change Frequency band/ region.
- Update with new features.
- Fix bugs.
Firmware and changelog can be downloaded from : Firmware download link
Methods to Update Firmware:
- (Recommended way) OTA firmware update via wireless: OTA Upgrade for NB-IoT / LTE-M End Node
- Update through UART TTL interface: Instruction.
9. FAQ
9.1 How can I access the NRF9151-NGFF AT Commands?
AIS01-FB uses the nRF9151-NGFF module. Access to modem AT commands depends on the interface supported by the installed firmware.
See NRF9151-NGFF AT Command set
9.2 General Manual for -FB , -FS models
Users can follow the instructions in this link to see how to configure to connect to different servers.
9.3 Why is there no LED response when I press the button on the solar panel model?
Note: This section applies only to the related AIS01-FS solar-powered model, not the battery-powered AIS01-FB.
If the LED does not light up when you press the button, it may be because the battery has entered protection mode.
Solution: To reactivate the battery, simply expose the solar panel to direct sunlight.
For more details, please refer to: Battery Protection State (Apply to Solar Panel + Li-ion battery)
9.4 Does this device support GPS positioning?
Yes. This device supports GPS function and can report latitude and longitude coordinates in the uplink payload.
For configuration and usage details, please refer to: Add Location Data on Uplink Packet
9.5 Issue with the camera failing to read data
If your camera is running a firmware version earlier than 1.3.4, please check the camera firmware update instructions for the appropriate "Original firmware." For specific update steps, please refer to Update Firmware for the AI Sensors
9.6 Appendix I: Field Installation Photo
Step1:
Find a water meter, install the AIS Sensor on the water meter fixture and install it on the water meter
The following is a comparison of before and after installation:
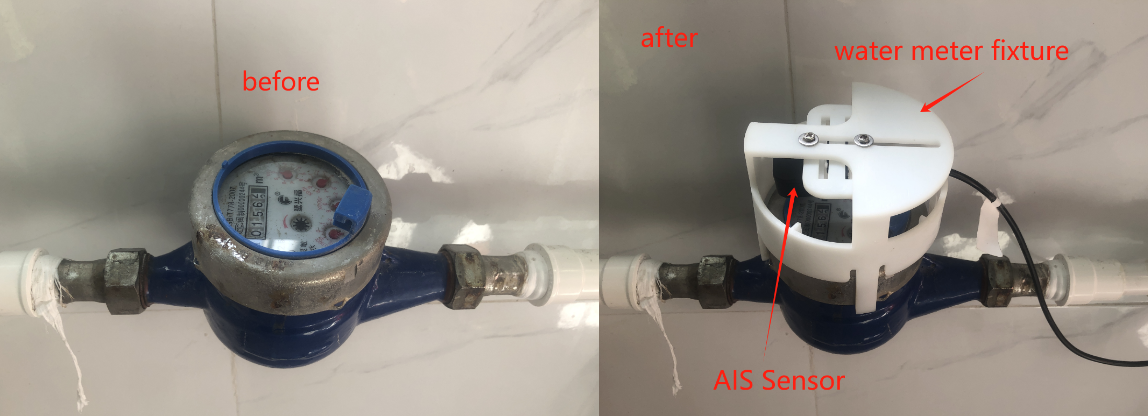
Note: When the ambient brightness is too high, you can use a cover (such as cardboard) to block other light sources (such as the sun, electric lights) to prevent light reflections from causing the AIS sensor to read inaccurate values.
Step2:
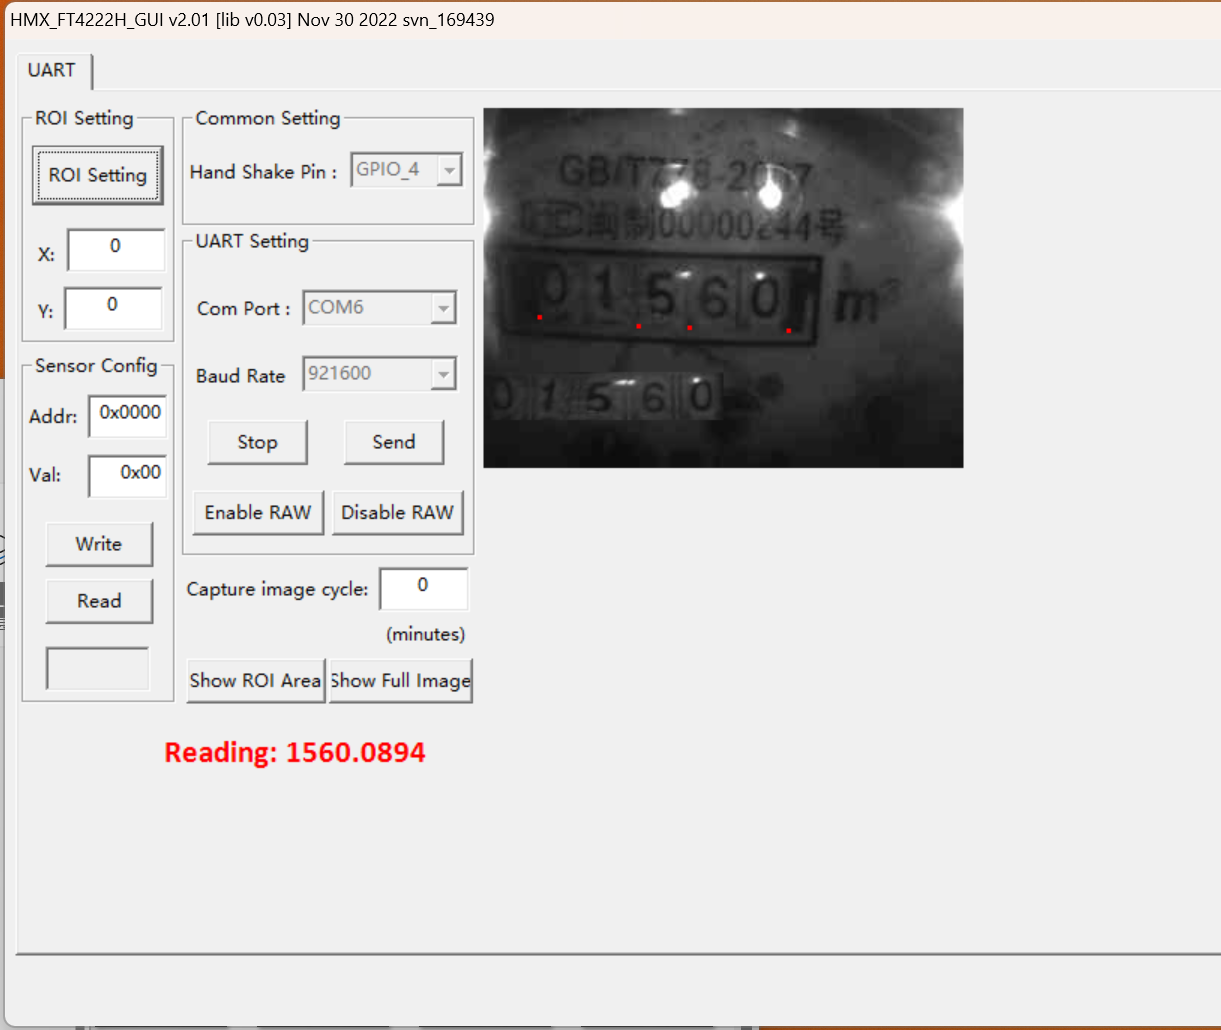
Calibrate the AIS Sensor so that it can accurately read the water meter value.
Step3:
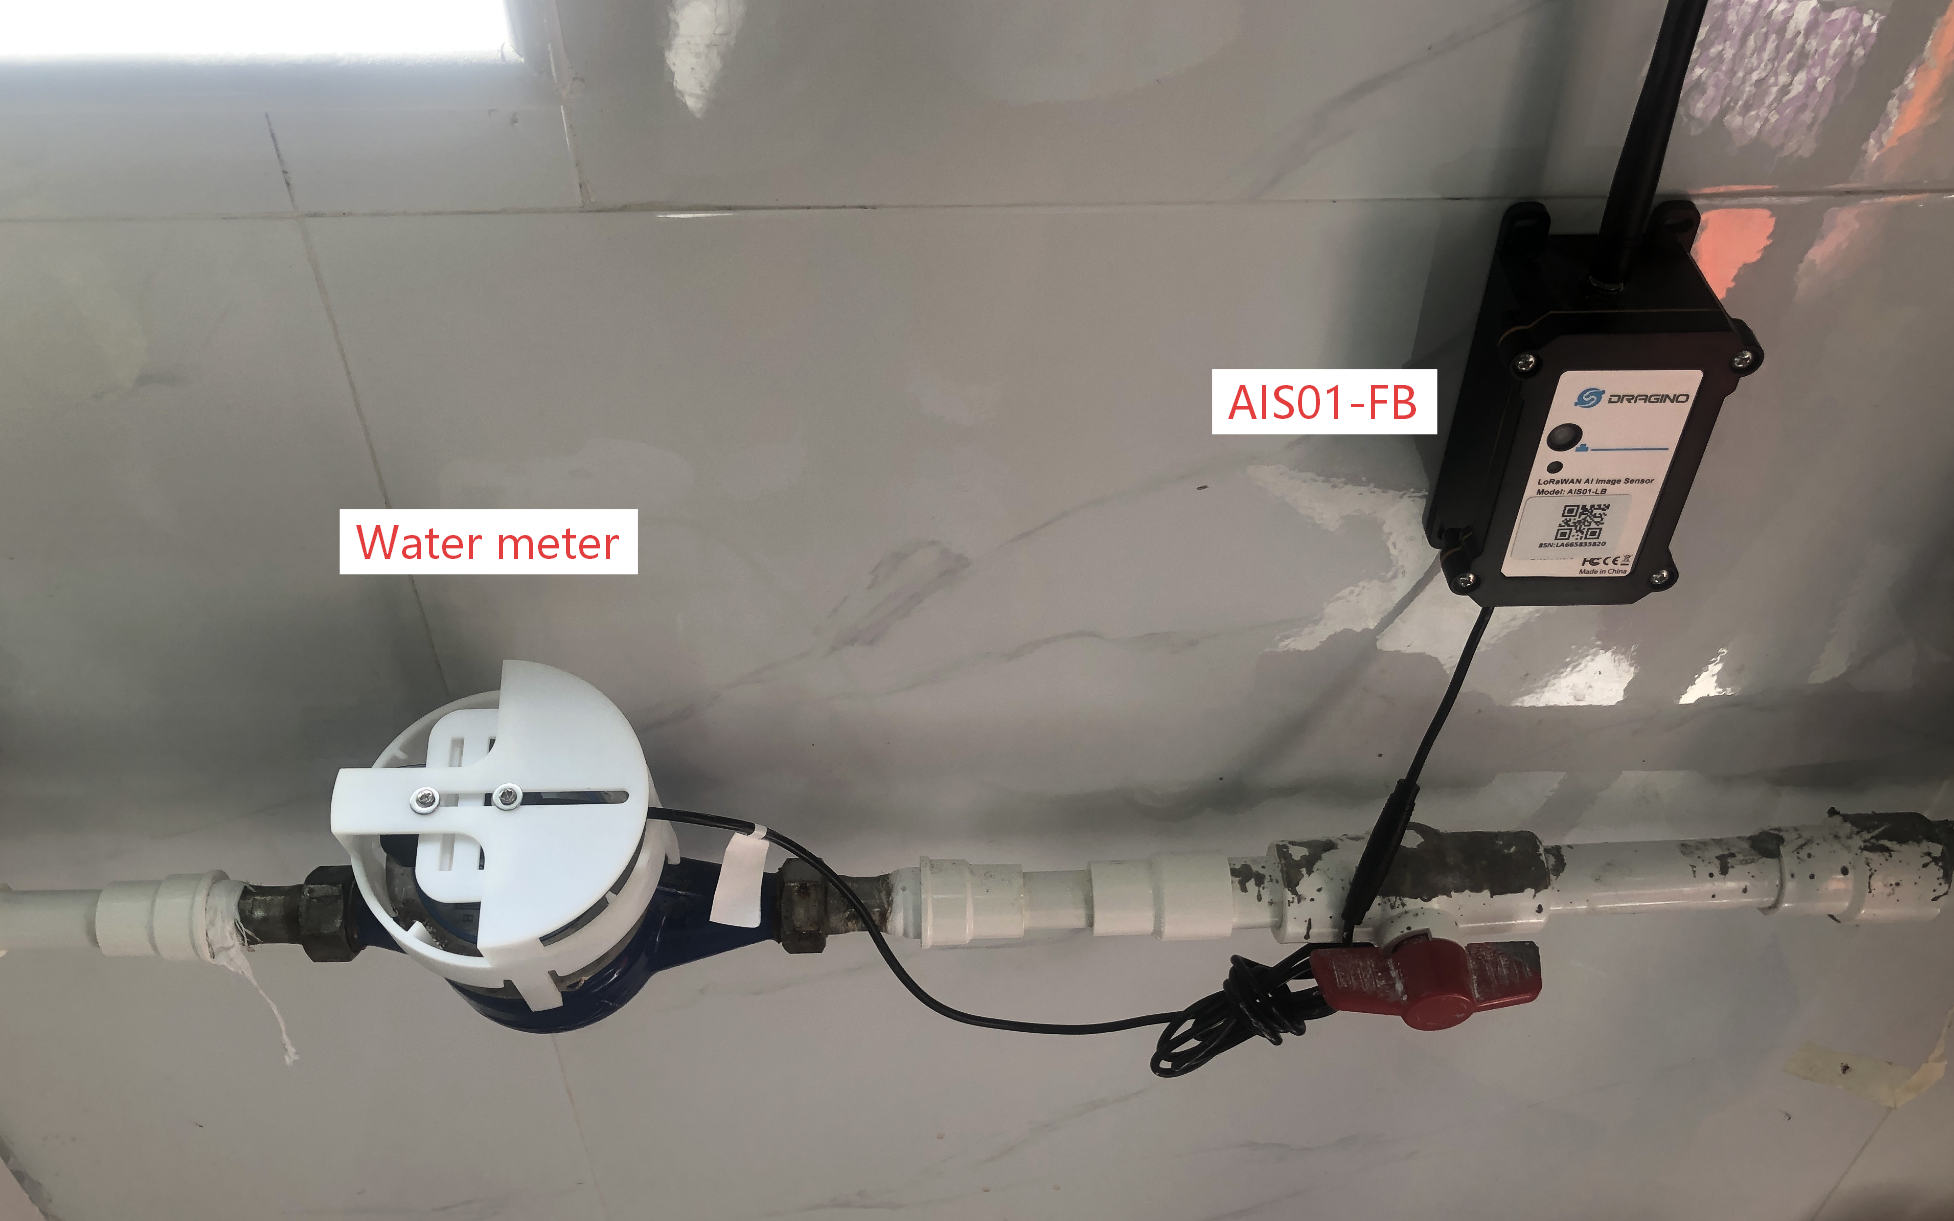
Choose a suitable location to install AIS01-FB. The overall installation is shown below.
Get image data
When AT+IMAGE=1 is sent on the platform, the device will execute the command to send image data packet after sending the next data packet.
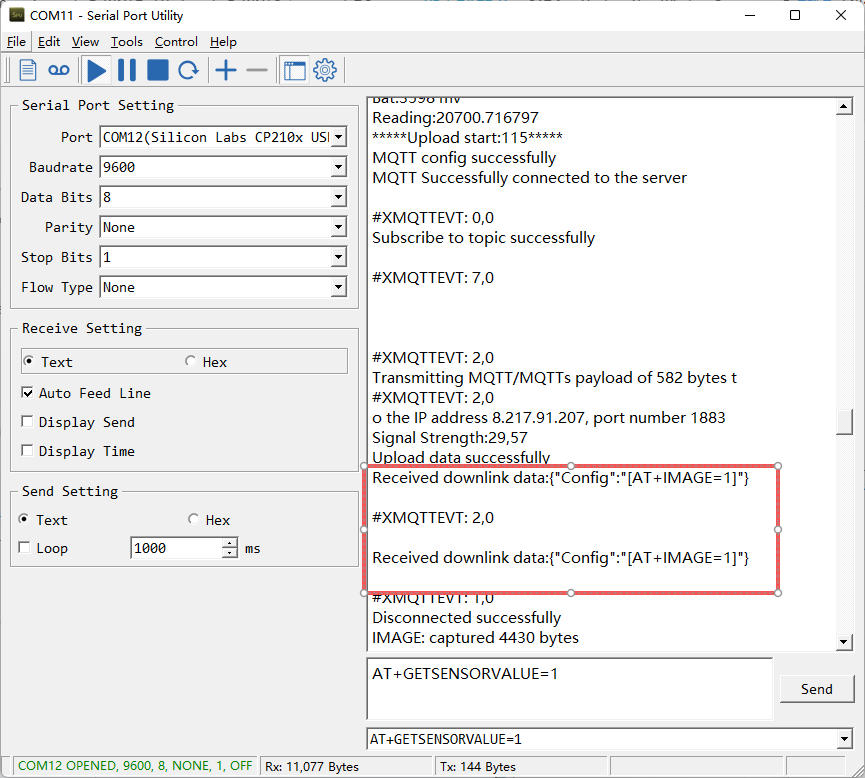
According to the method in 2.3.2, the combined data is converted into binary to obtain the following jpg image.

10. Order Info
Part Number: AIS01-FB-XX
XX:
-
GE: General version ( Exclude SIM card)
-
1T: with 1NCE* 10 years 500MB SIM card and Pre-configure to ThingsEye server
11. Packing Info
Package Includes:
- AIS01-FB NB-IoT/LTE-M AI Image Recognition End Node
- External antenna x 1
Dimension and weight:
- Device Size: cm
- Device Weight: g
- Package Size / pcs : cm
- Weight / pcs : g
12. Support
-
Support is provided Monday to Friday, from 09:00 to 18:00 GMT+8. Due to different timezones we cannot offer live support. However, your questions will be answered as soon as possible in the before-mentioned schedule.
-
Provide as much information as possible regarding your enquiry (product models, accurately describe your problem and steps to replicate it etc) and send an email to support@dragino.cc