MQTT Forward Instruction
1. Introduction
Dragino LoRa/LoRaWAN gateway support MQTT forwarding. It can forward the sensor data from LoRa network to MQTT server , and vice verse.
1.1 Support Devices
This MQTT forward instruction is for below devices:
- LG01N, OLG01N (Warning: LG01-P LG01-S use another instruction: MQTT for LG01-P/LG01S)
- LG02, OLG02
- MS14 series if installed with the same firmware. (in this case, the MQTT forward will work , but no LoRa support)
- LG308N, DLOS8N, LPS8N
- LPS8V2
1.2 Both the gateway and the end device be configured in ABP mode
MQTT forwarding itself is independent of the activation method. However, in this example the gateway performs payload decryption and downlink frame assembly locally, which requires both the end device and the gateway to use ABP mode.
For detailed procedures, refer to: Communicate with ABP End Node without LoRaWAN Network Server
The MQTT Client Utility used in Dragino is mosquitto_pub and mosquitto_sub. User can add more options to the mqtt commands.
Check out this link for more mosquito-related directives https://mosquitto.org/man/mosquitto_pub-1.html
2. Example to communicate to a simple MQTT server
2.1 Overview
This section is an example to show how to set up LG01-N to communicate with a MQTT server. The MQTT server is a simple utility set up in a local PC. Note: User can set up same server via this instruction.
2.2 Simulate via MQTTX utility
This section uses the public MQTT broker provided by EMQX broker.emqx.io for quick verification, so no local broker is required. The broker is publicly accessible and supports anonymous connections, which makes it suitable for functional testing
Note that it is a shared environment, so use a unique topic prefix to avoid collisions with other users.
2.2.1 Connect to MQTT Broker
MQTTX is a general-purpose MQTT client. We first connect it to the public MQTT broker to confirm that client-to-broker communication works, then configure the gateway with the same parameters to validate the whole data path.
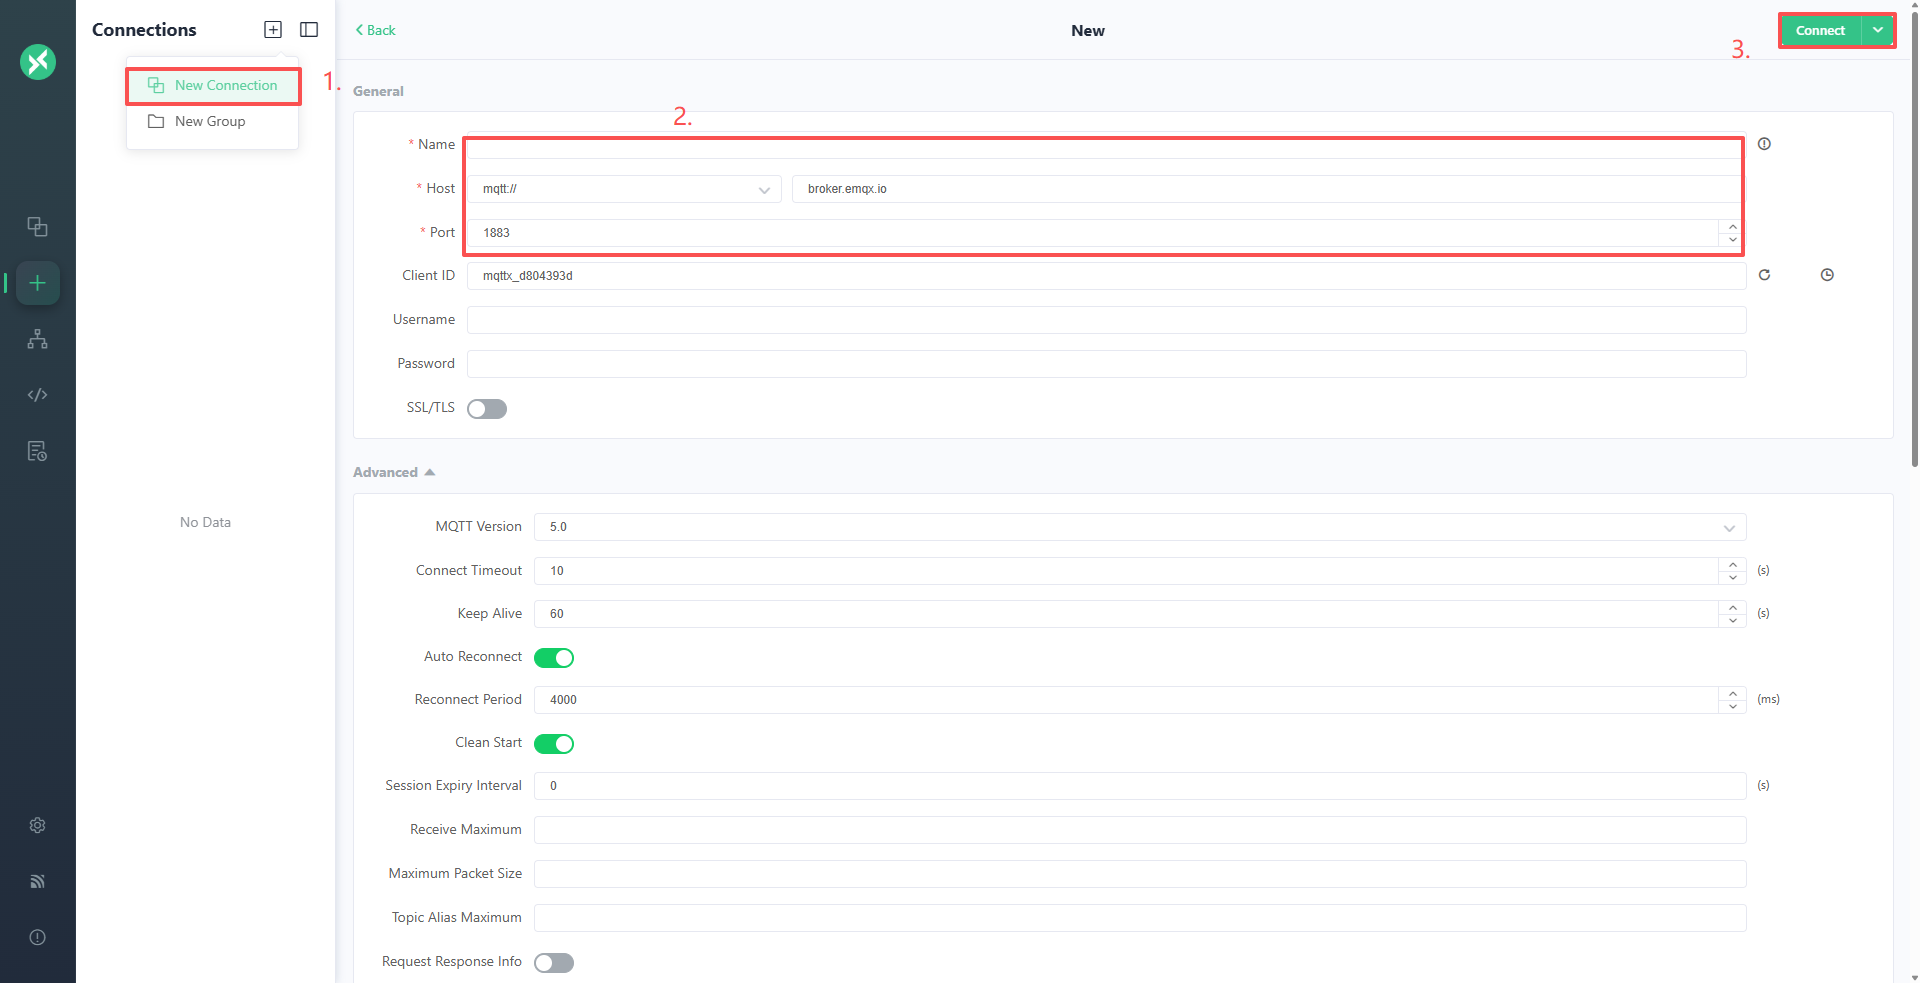
To simulate a downstream, use MQTTX to subscribe a topic, and publish something to this topic. as Below:
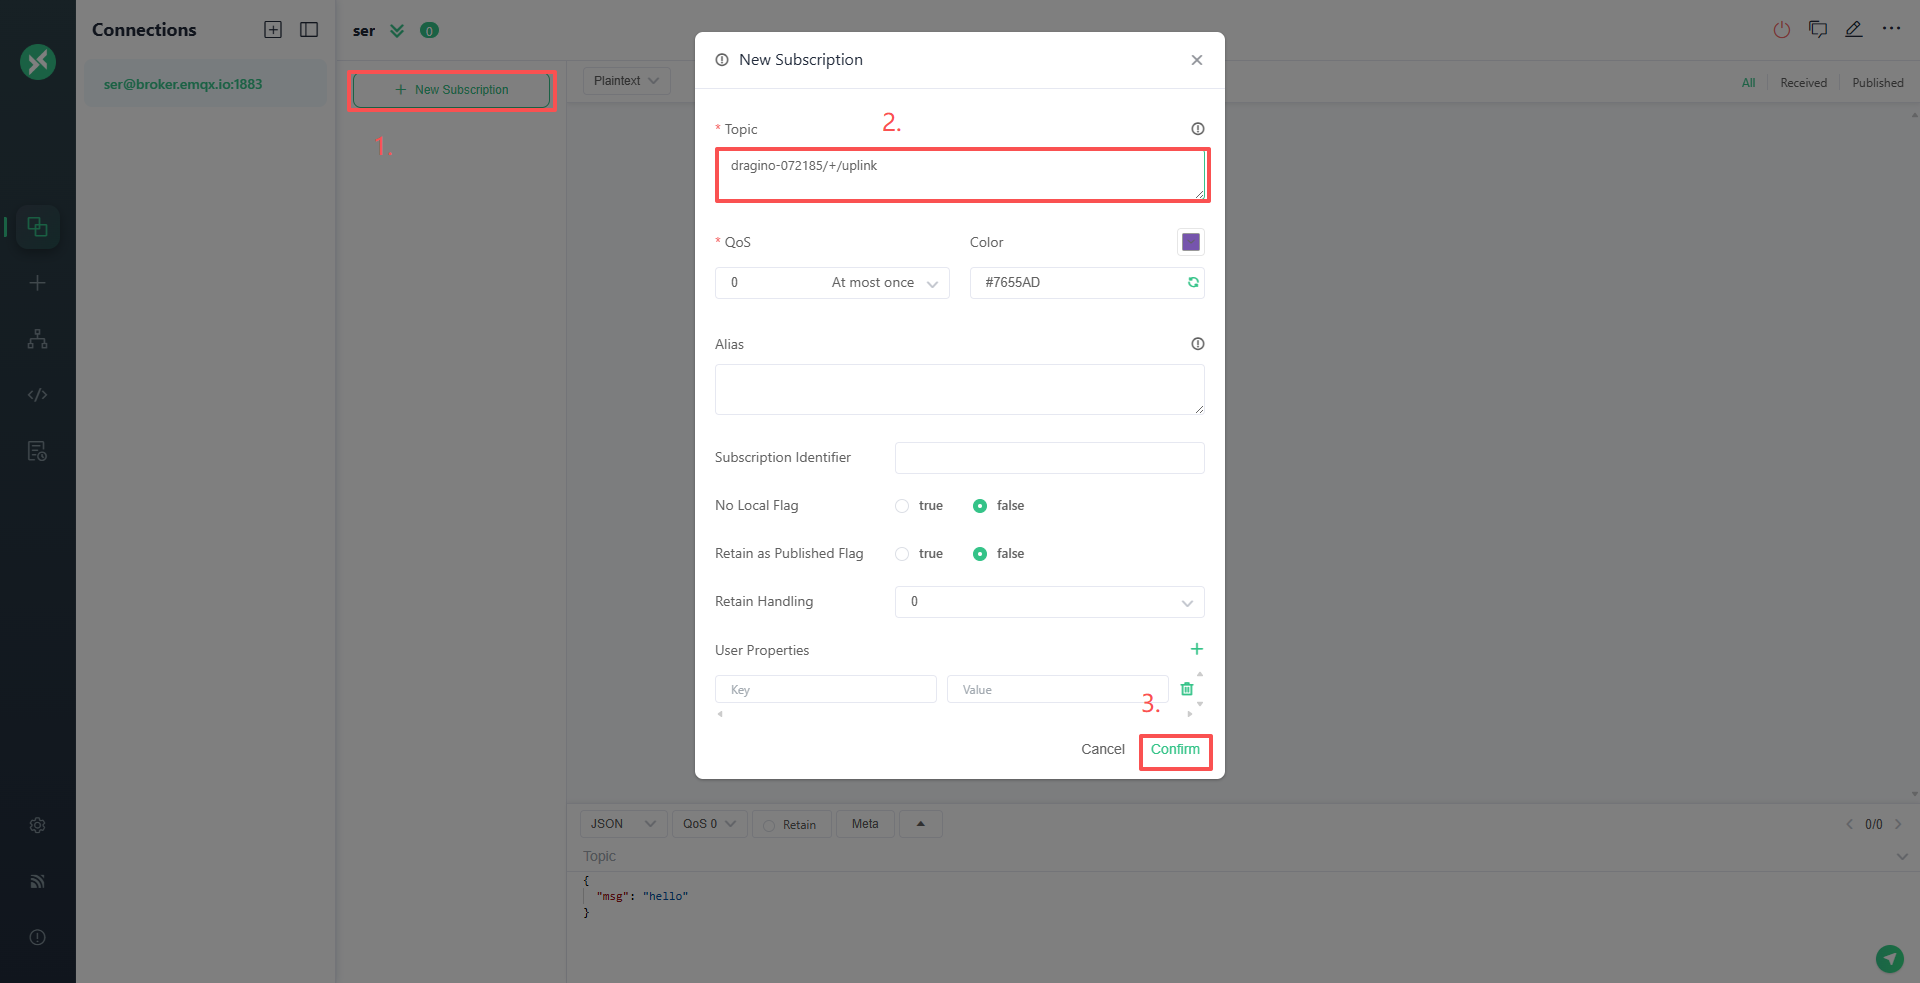
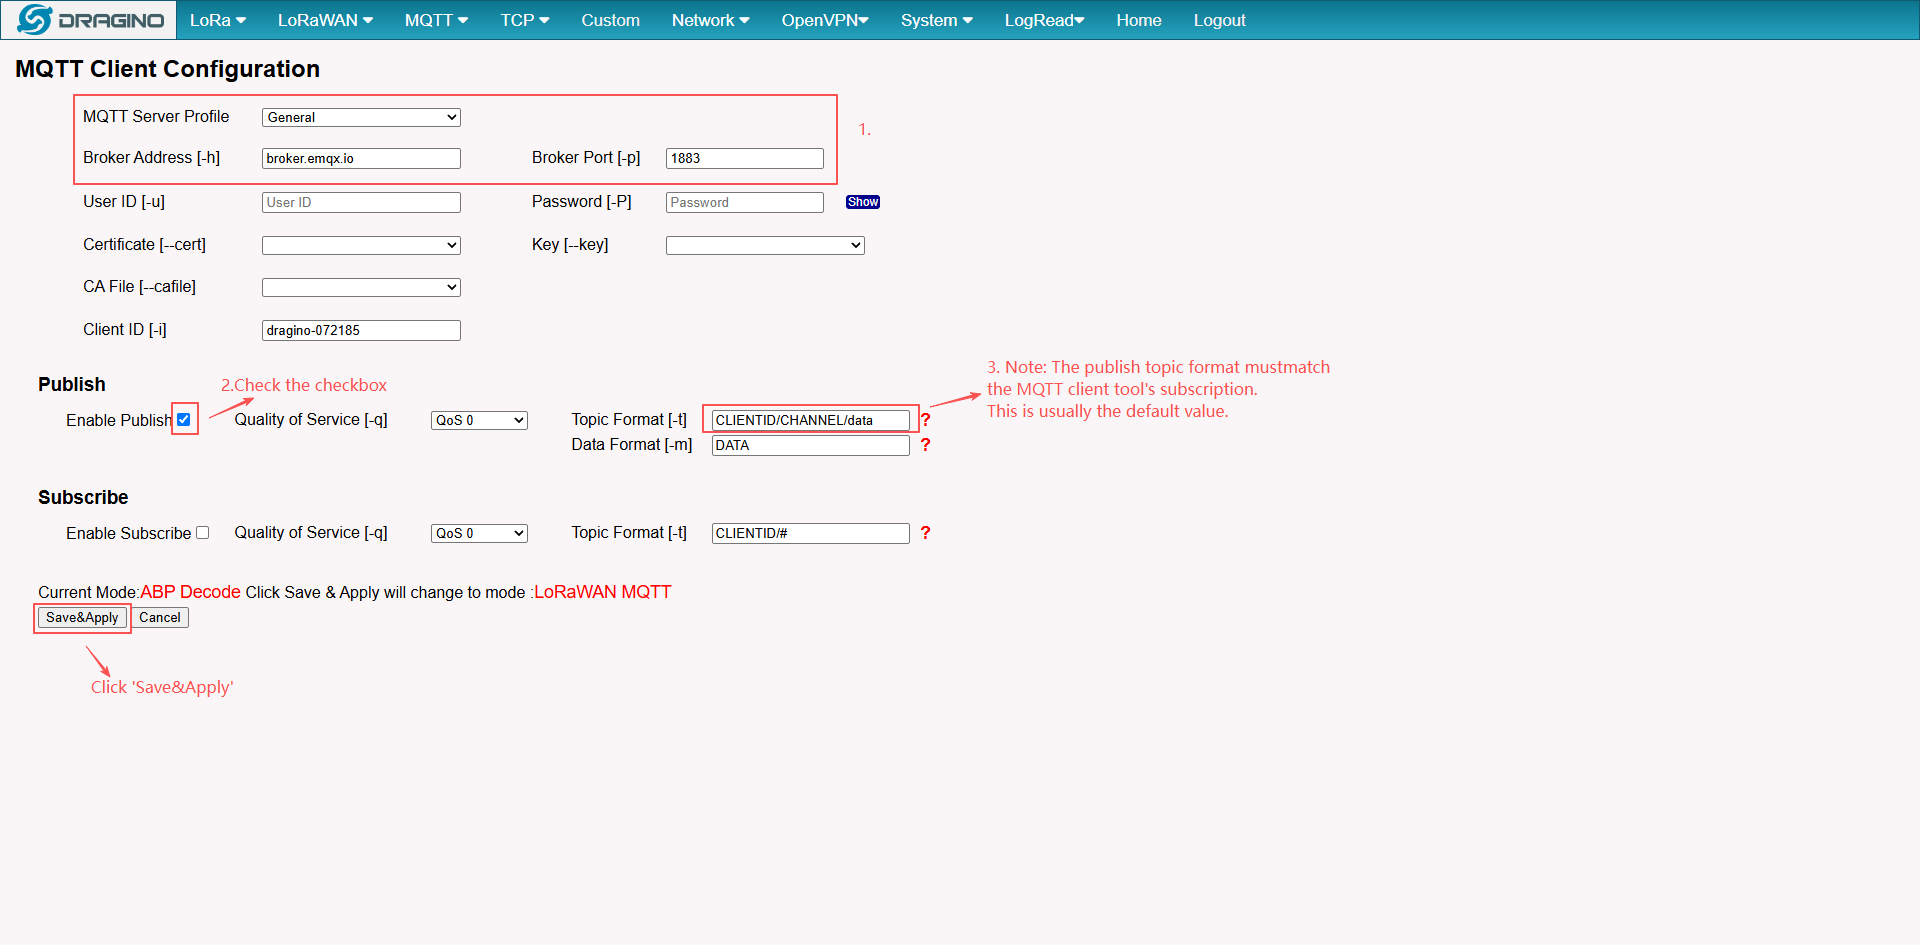
The MQTT topic follows the format:
CLIENTID/CHANNEL/uplinkCLIENTID— the Client ID of the gateway (e.g.dragino-072185)CHANNEL— the device address (DevAddr) of the end node (e.g.260B4FC4)uplink— indicates an uplink (device-to-server) message
For example, a gateway with Client ID dragino-072185 publishes
uplink data from device 260B4FC4 to:
dragino-072185/260B4FC4/uplink
To receive uplink data from all devices in MQTTX, subscribe to:
dragino-072185/+/uplink
In MQTT wildcards, + matches a single topic level, so it matches
any device address. To receive messages from one specific device,
subscribe to the exact topic:
dragino-072185/260B4FC4/uplink
3. Add LoRa support to communicate with remote sensor
In above section, we have configured the UI to support MQTT upstream and downstream. We can simulate via Linux command. In this section, we will guide how to communicate with remote LoRa End Node for upstream and downstream.
3.1 Use LoRa Raw protocol for communication -- For LG01/LG02
We can use LoRa Shield to send LoRa Raw data to Gateway and receive data from gateway.
The example Sketch for LoRa Shield +Arduino is here: LoRa_Shield_Sketch_For_MQTT
And this link is the required library: arduino-LoRa-master. Unzip this library and put in Arduino library location.
What does the Arduino Sketch do? The Arduino Sketch will:
- Upstream: Keep sending a LoRa Message every minutes with this payload :
<4567>tem=xx&hum=yy(Where xx and yy are temperature and humidity value generated randomly). - Downstream: Listening broadcast message from gateway, and print it in console.
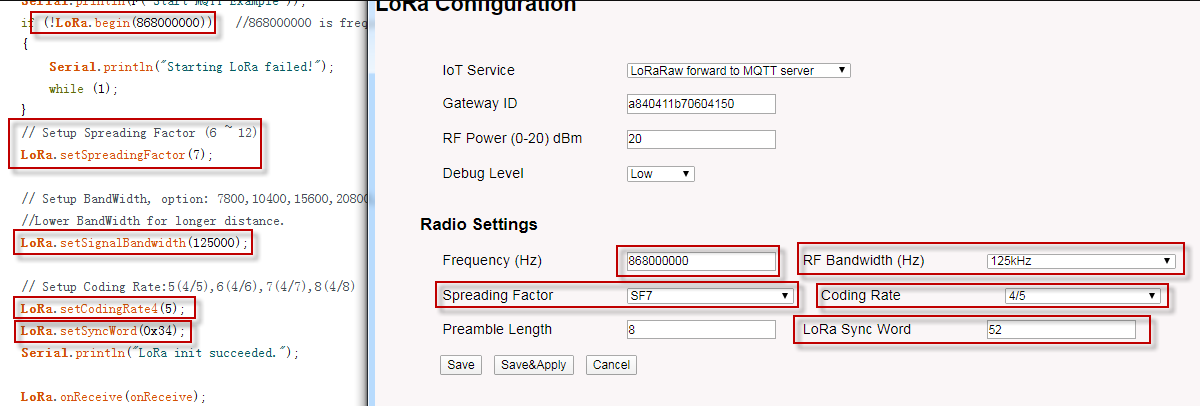
- The LoRa parameter settings in Arduino should match the LoRa settings in gateway, as below:
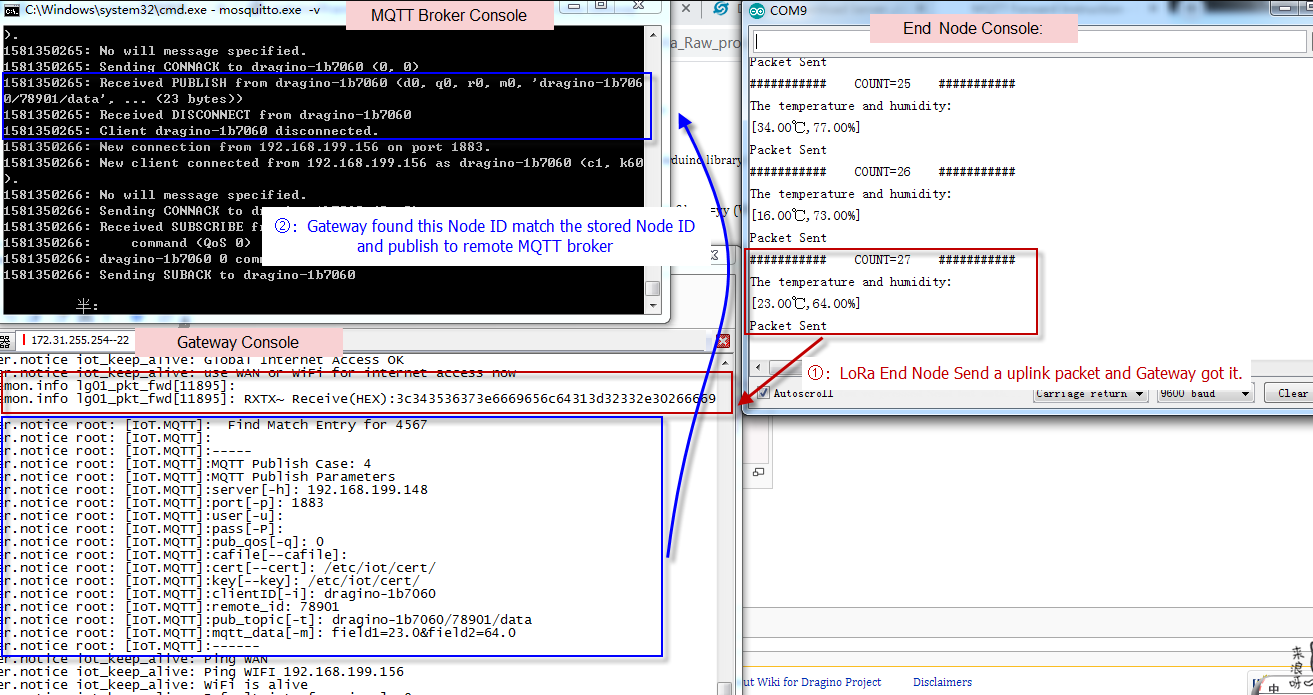
Below is the test result after the Arduino Sketch is running.
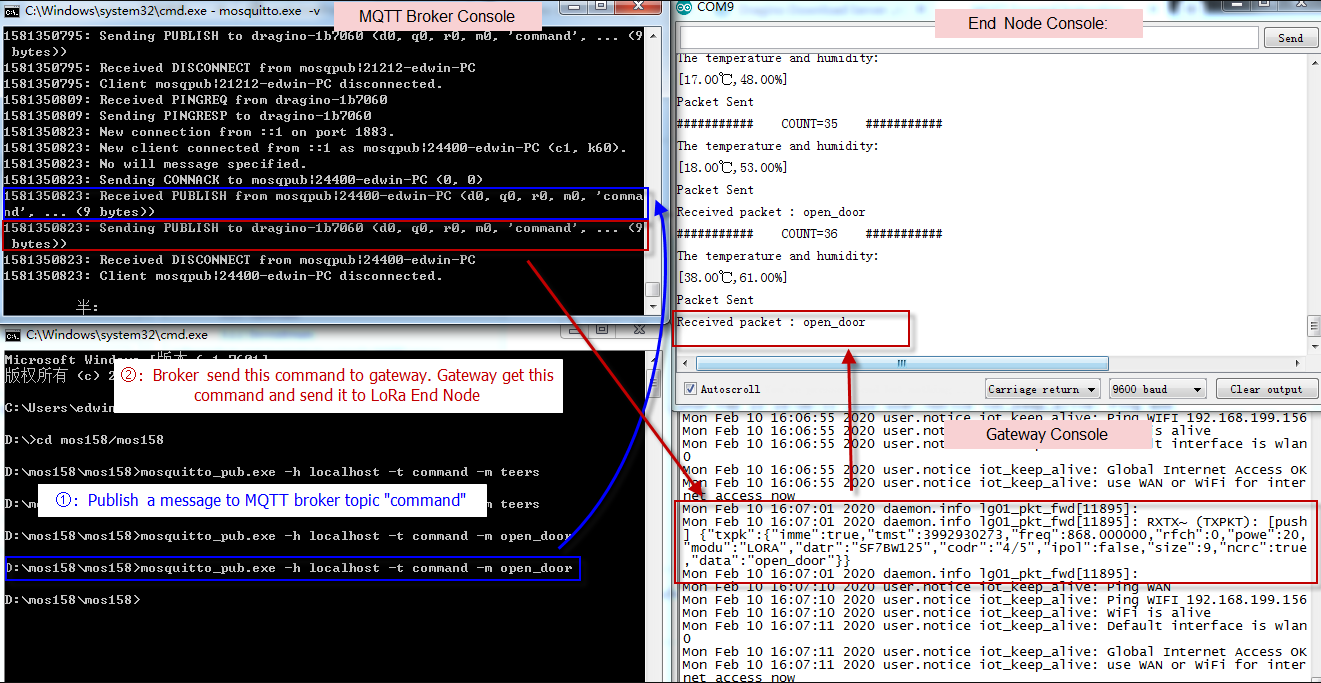
3.2 Use LoRaWAN Protocol for communication -- For LG308/LPS8/DLOS8/LG308N/LPS8N/DLOS8N
Since firmware LG02_LG08--build-v5.3.1585192026-20200326-1109, Dragino LoRaWAN gateways support the communication to LoRaWAN ABP end node locally without the need of LoRaWAN server. This feature allow us to integrate MQTT in the gateway to support LoRaWAN to MQTT forwarding or visa verse.
When use test this feature, please use the version higher then : LG02_LG08--build-v5.4.1593400722-20200629-1120, in this version, the upload format is changed and readable, which is easier for integration.
Video Instruction: https://youtu.be/qJTY441-t90
Step 1: Make sure your Radio settings match the End Node settings.
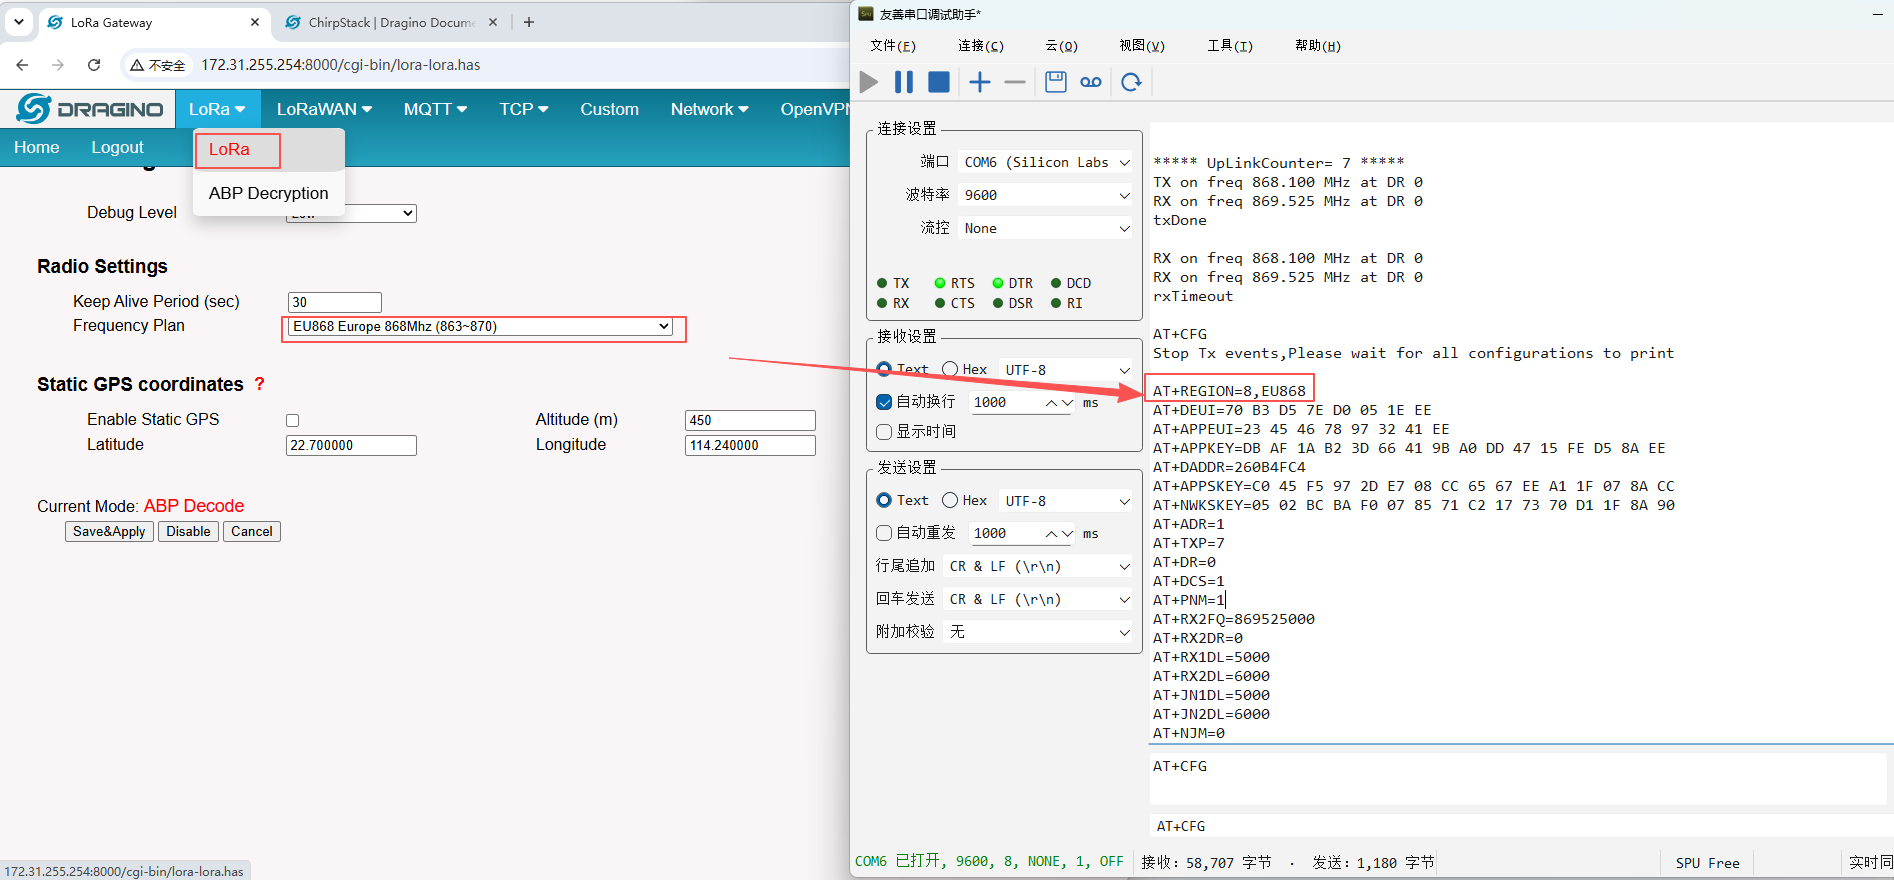
Step 2: Set up publish format and MQTT channel. The LG308 will store the Data from End node in HEX format in the file.
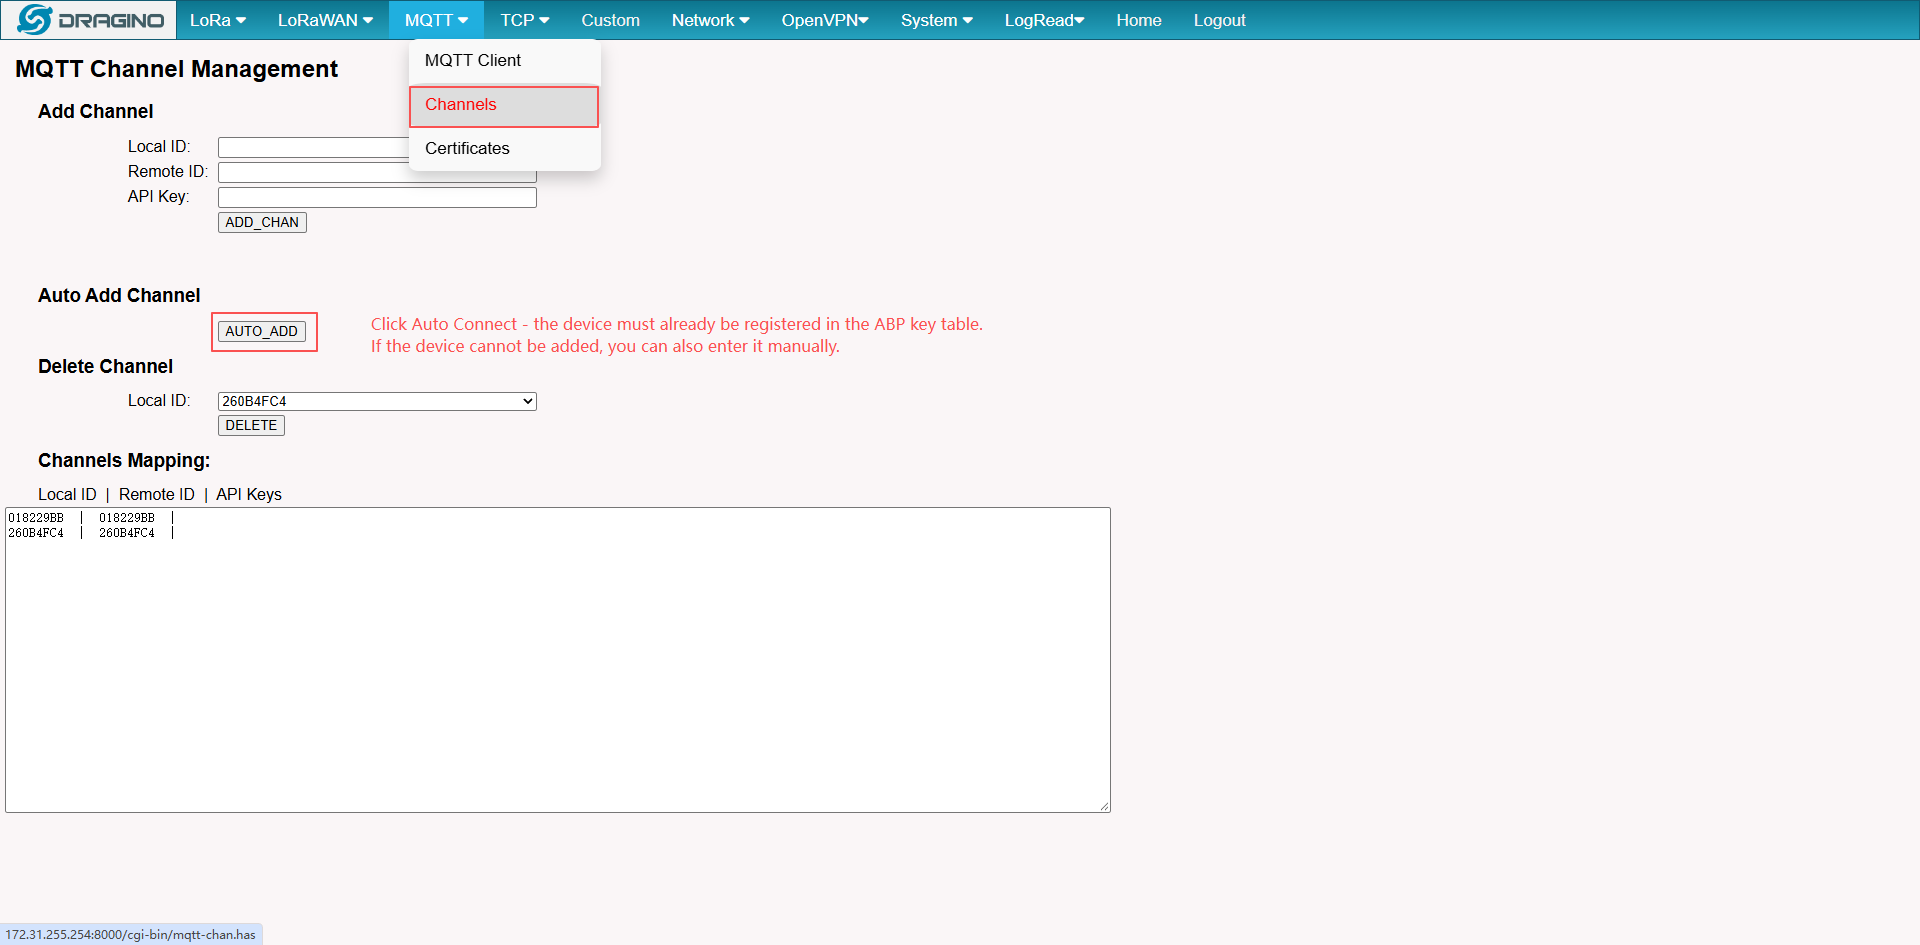
Step 3: Map the Device Address to Remote ID in MQTT server.
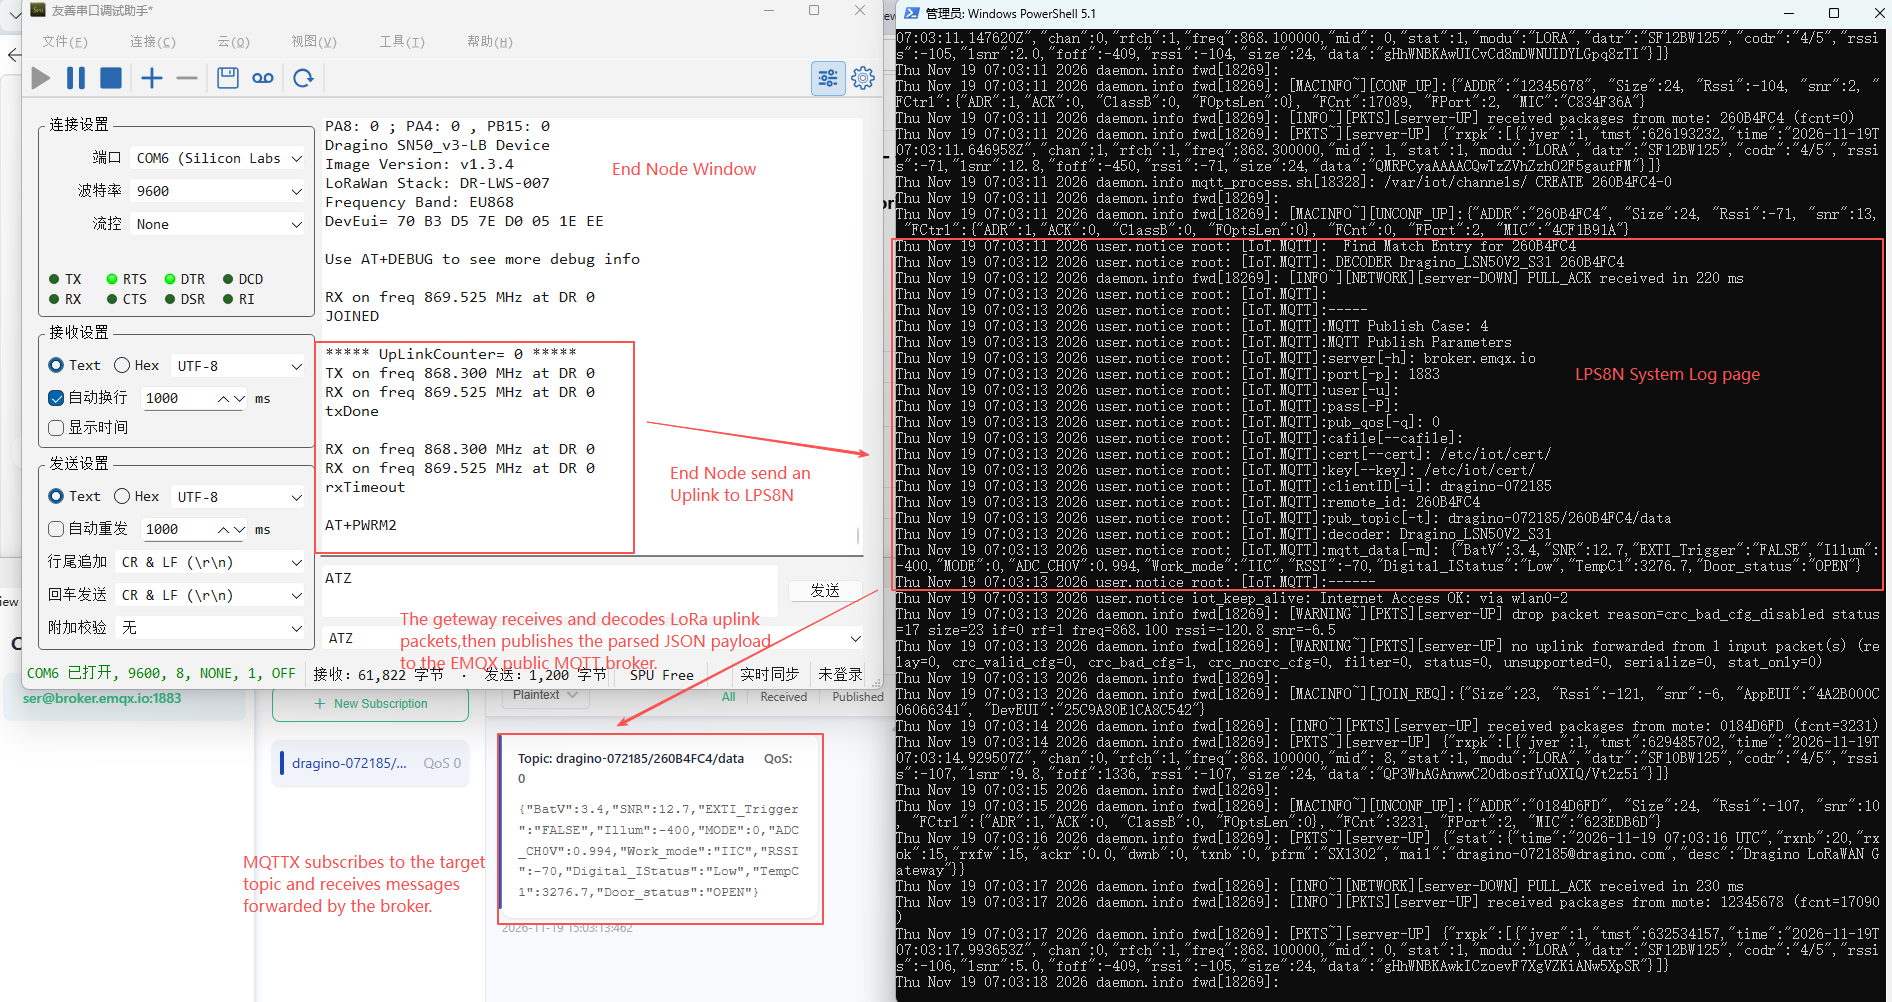
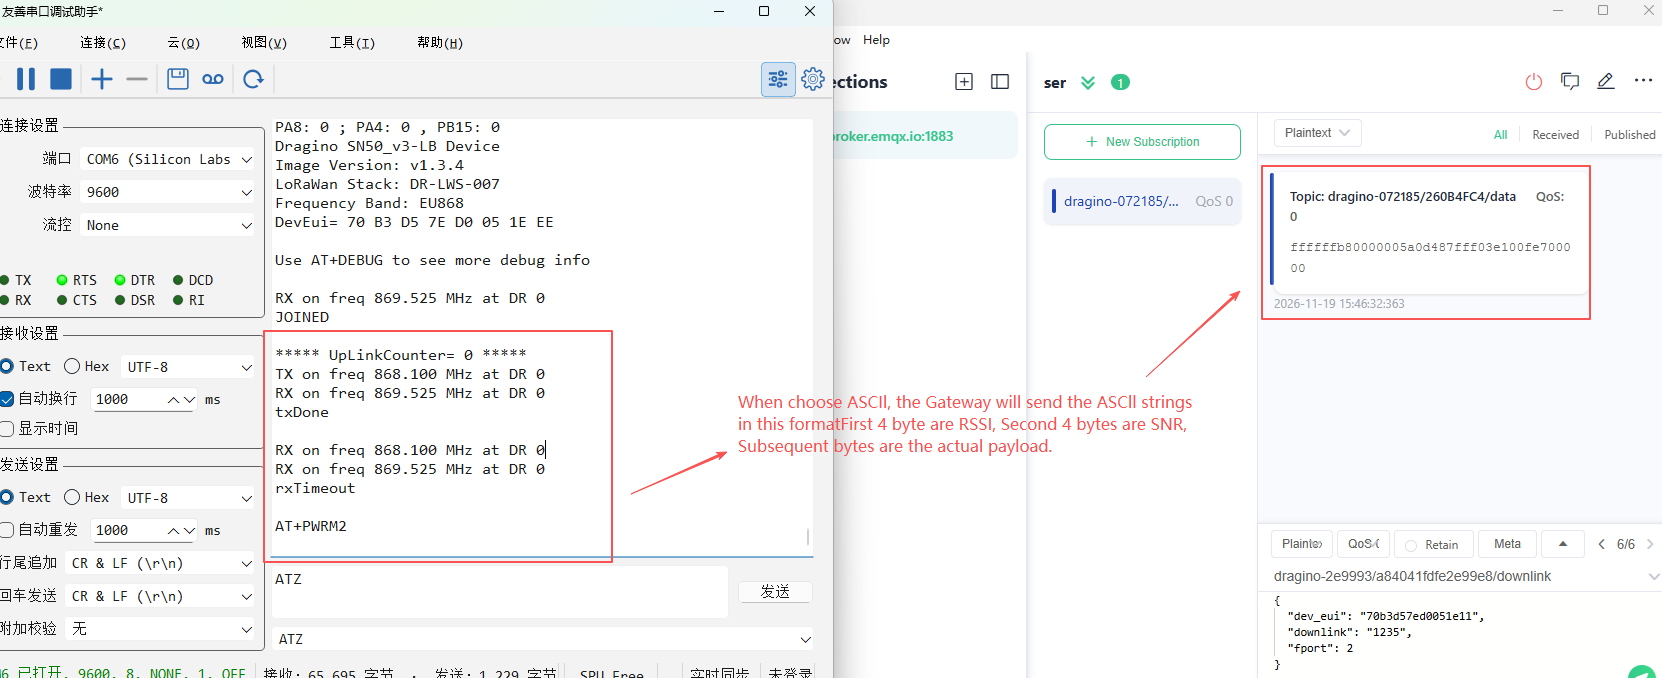
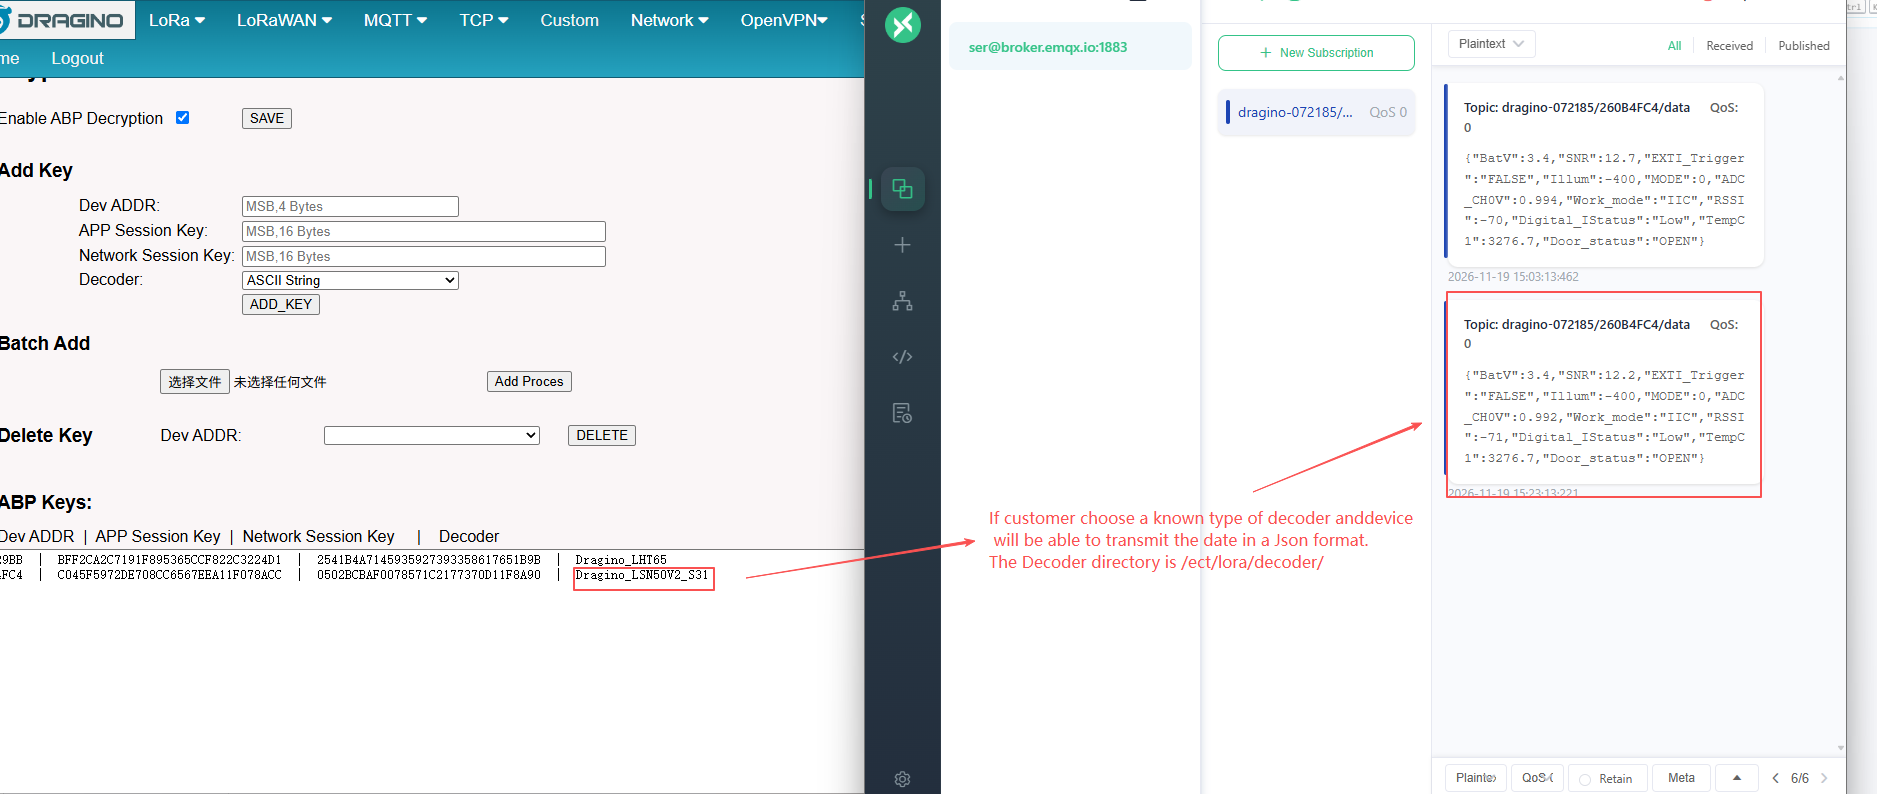
Step 4: Upstream: Save the change, we can see the log info via "sytem log", End Node and MQTT Server
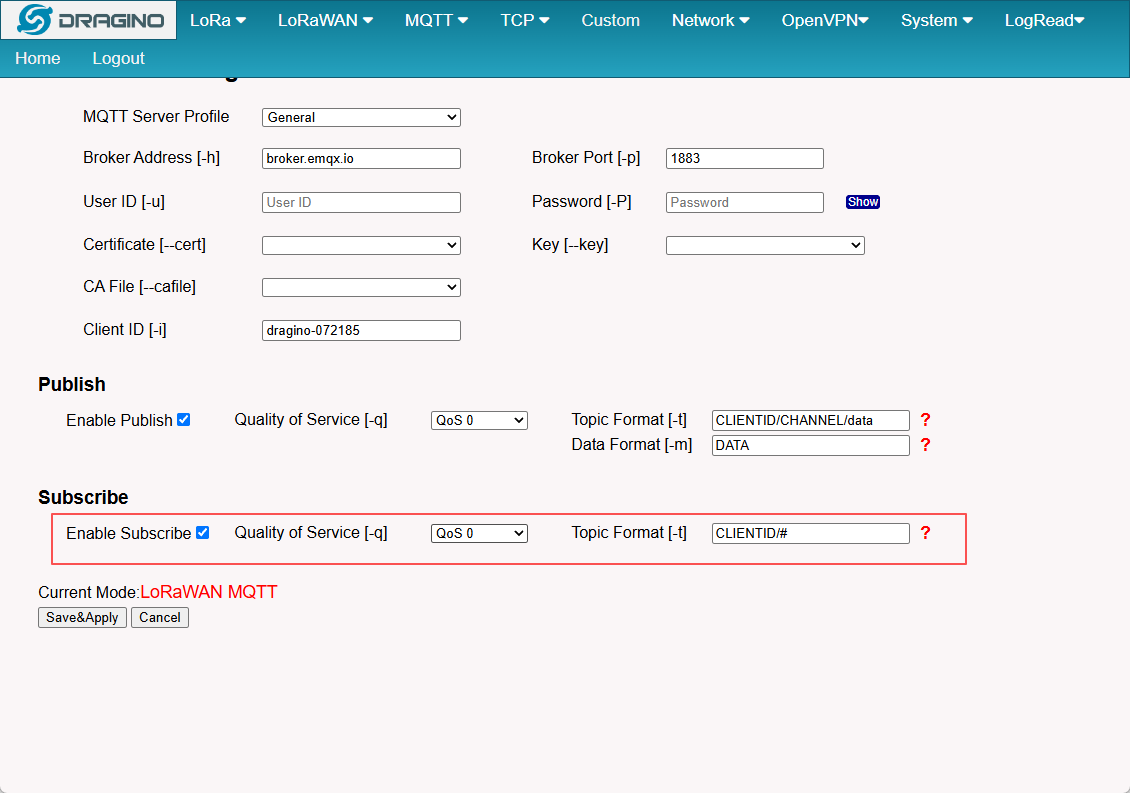
Step 5: Set up subscribe: Subscribe a topci for downstream.
Step 6: Downstream: Save the change, we can see the log info via "sytem log" and End Node.
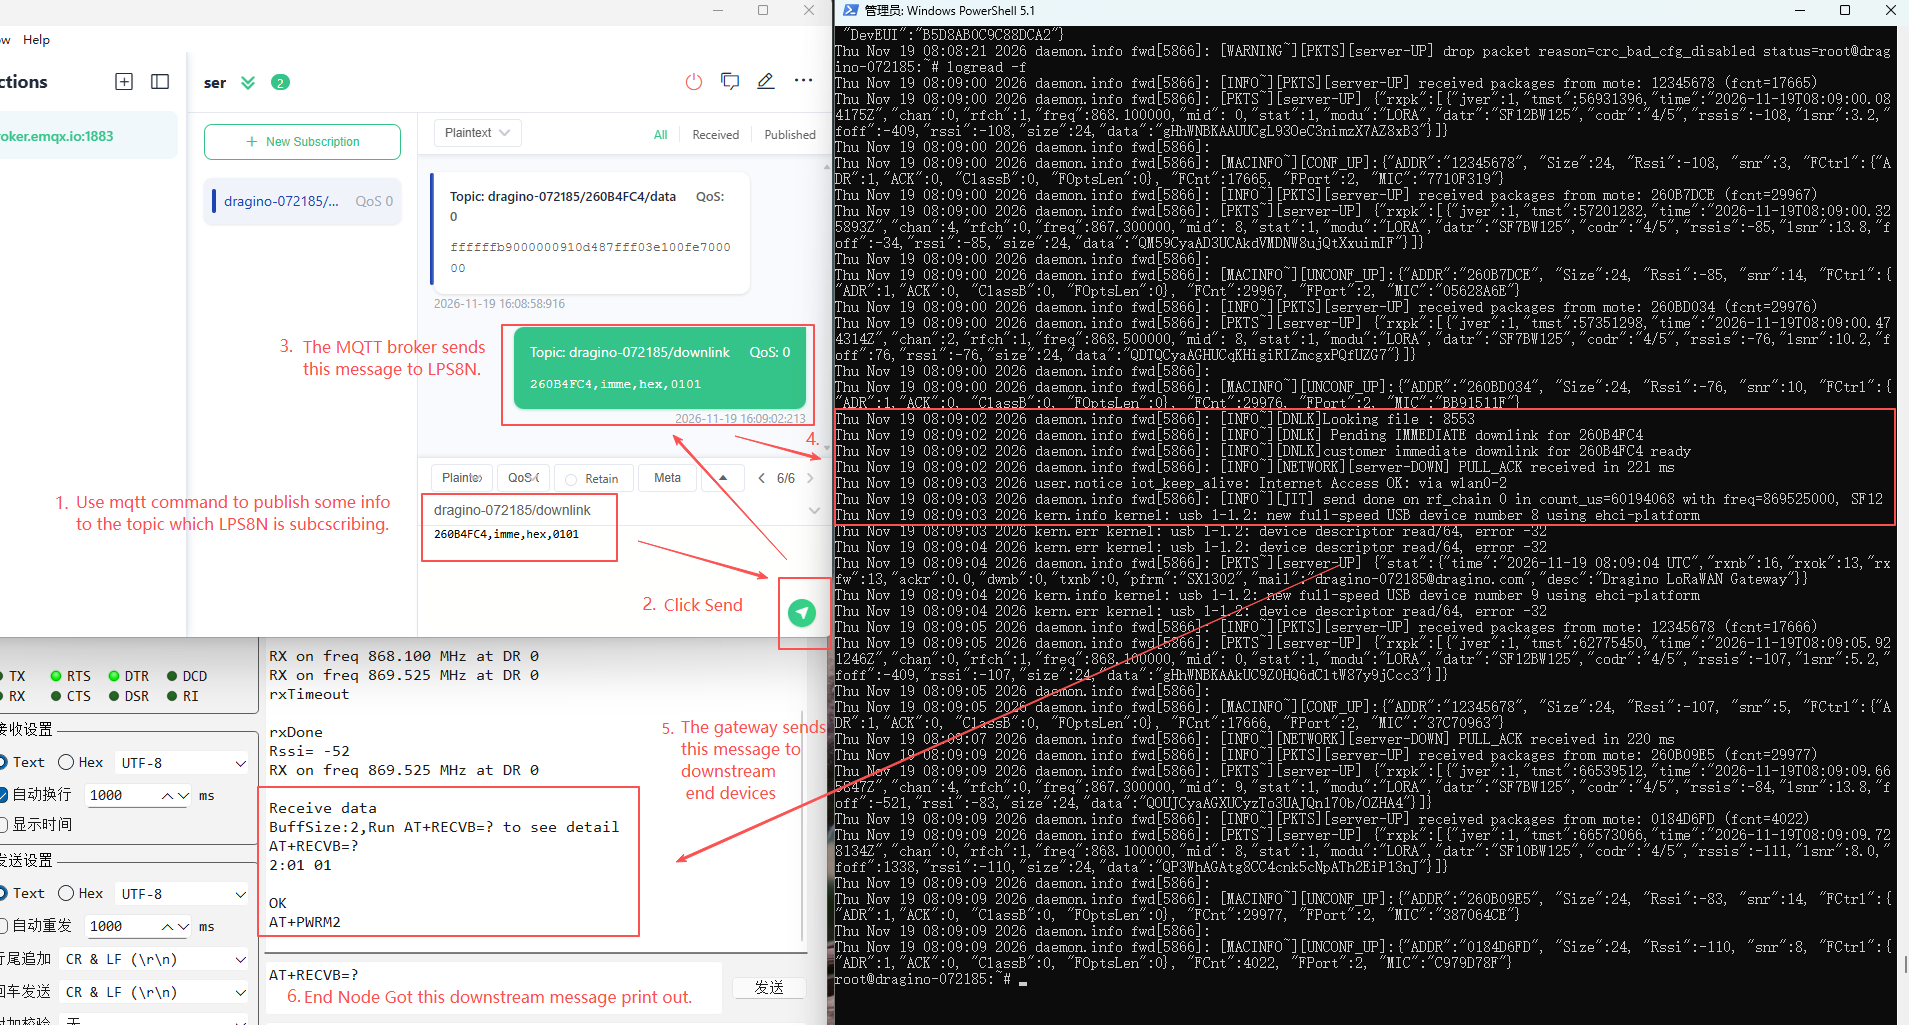
Notice: The text use for Downstream must meet the requirement from Downstream Payload
mosquitto_pub -h $server_address -p $server_port -t $Client_ID -m "dev_addr,imme/time,txt/hex,payload"
mosquitto_pub -h 10.130.2.192 -p 1883 -t dragino-1d25dc/ -m "260211D,time,txt,hello"
mosquitto_pub -h $server_address -p $server_port -t $Client_ID -m "dev_addr,imme/time,txt/hex,payload,txpw,txbw,SF,frequency,rxwindow"
mosquitto_pub -h 10.130.2.192 -p 1883 -t dragino-1d25dc/ -m "260211D,time,txt,hello,20,1,SF12,923300000,2"
Publish Downlink via Command Line
In addition to publishing from the MQTT client UI, a downlink command
can also be published directly from the command line using
mosquitto_pub. This is useful for scripted or quick tests.
Use the following command:
mosquitto_pub.exe -h <broker-address> -t <topic> -m "<downlink-command>"
Where:
-h— the address of the MQTT broker (e.g.10.130.2.34)-t— the topic the gateway subscribes to for downlink (e.g.dragino-072185/downlink)-m— the downlink command, in the format<DevAddr>,<imme|time>,<txt|hex>,<payload>
For example, to send the payload 0101 to device 260B4FC4 and let the
gateway send it after the next uplink:
mosquitto_pub.exe -h 10.130.2.34 -t dragino-072185/downlink -m "260B4FC4,time,hex,0101"
After publishing, the gateway log should show the downlink being processed:
[DNLK] Looking file : ...
[DNLK] Pending IMMEDIATE downlink for 260B4FC4
[DNLK] customer immediate downlink for 260B4FC4 ready
[JIT] send done on rf_chain 0 ... with freq=869525000, SF12
3.3 Use LoRaWAN Protocol for communication -- For LPS8V2
The LPS8v2 gateway features a built-in ChirpStack LoRaWAN server and an MQTT Forwarder. This function allows the gateway to act as a bridge, seamlessly forwarding data from your LoRaWAN end nodes to a specified MQTT broker (either local or cloud-based). It can also receive downlink commands from the MQTT broker and send them back to the end devices.
This section provides a step-by-step guide to configure this feature.
3.3.1 Register End Devices and Gateway
Refer Register Node to Chirpstack and Register Gateway to Chirpstack to know How do register node devices and gateways to the built-in chirpstack server
3.3.2 Verify Sensor Data on the Built-in Server
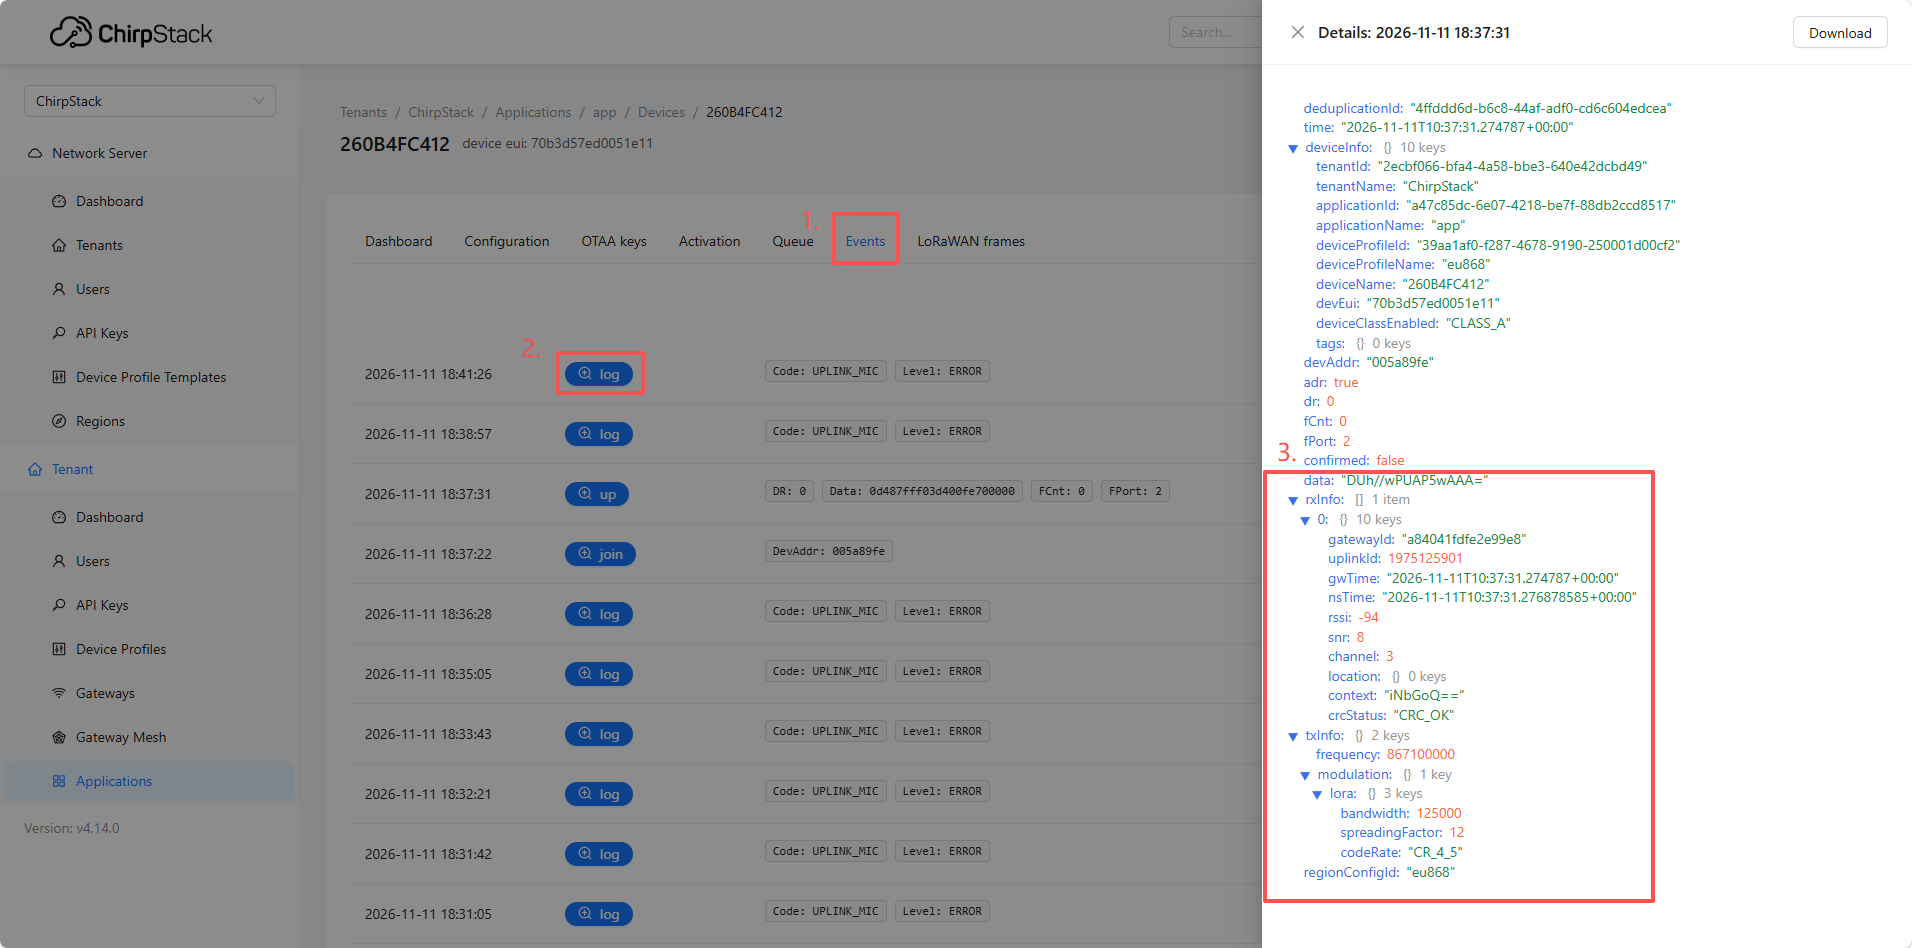
Before configuring the MQTT forwarder, it's highly recommended to confirm that the built-in ChirpStack server is successfully receiving data from your node. This helps isolate whether future issues originate from the LoRa communication link or the MQTT forwarding step.
- Log in to the LPS8v2's built-in ChirpStack Web interface (typically accessible at
http://[Gateway-IP]:8080). - Navigate to Applications ->
[Your Application]->Devices -> Click on your end device. - Click on the Events tab.
- In the event list, you should see uplink events. Click the corresponding +up link to expand and view the detailed JSON data payload. If data appears here, your LoRaWAN communication link is functioning correctly.
3.3.3 Configure the MQTT Forwarder (Uplink)
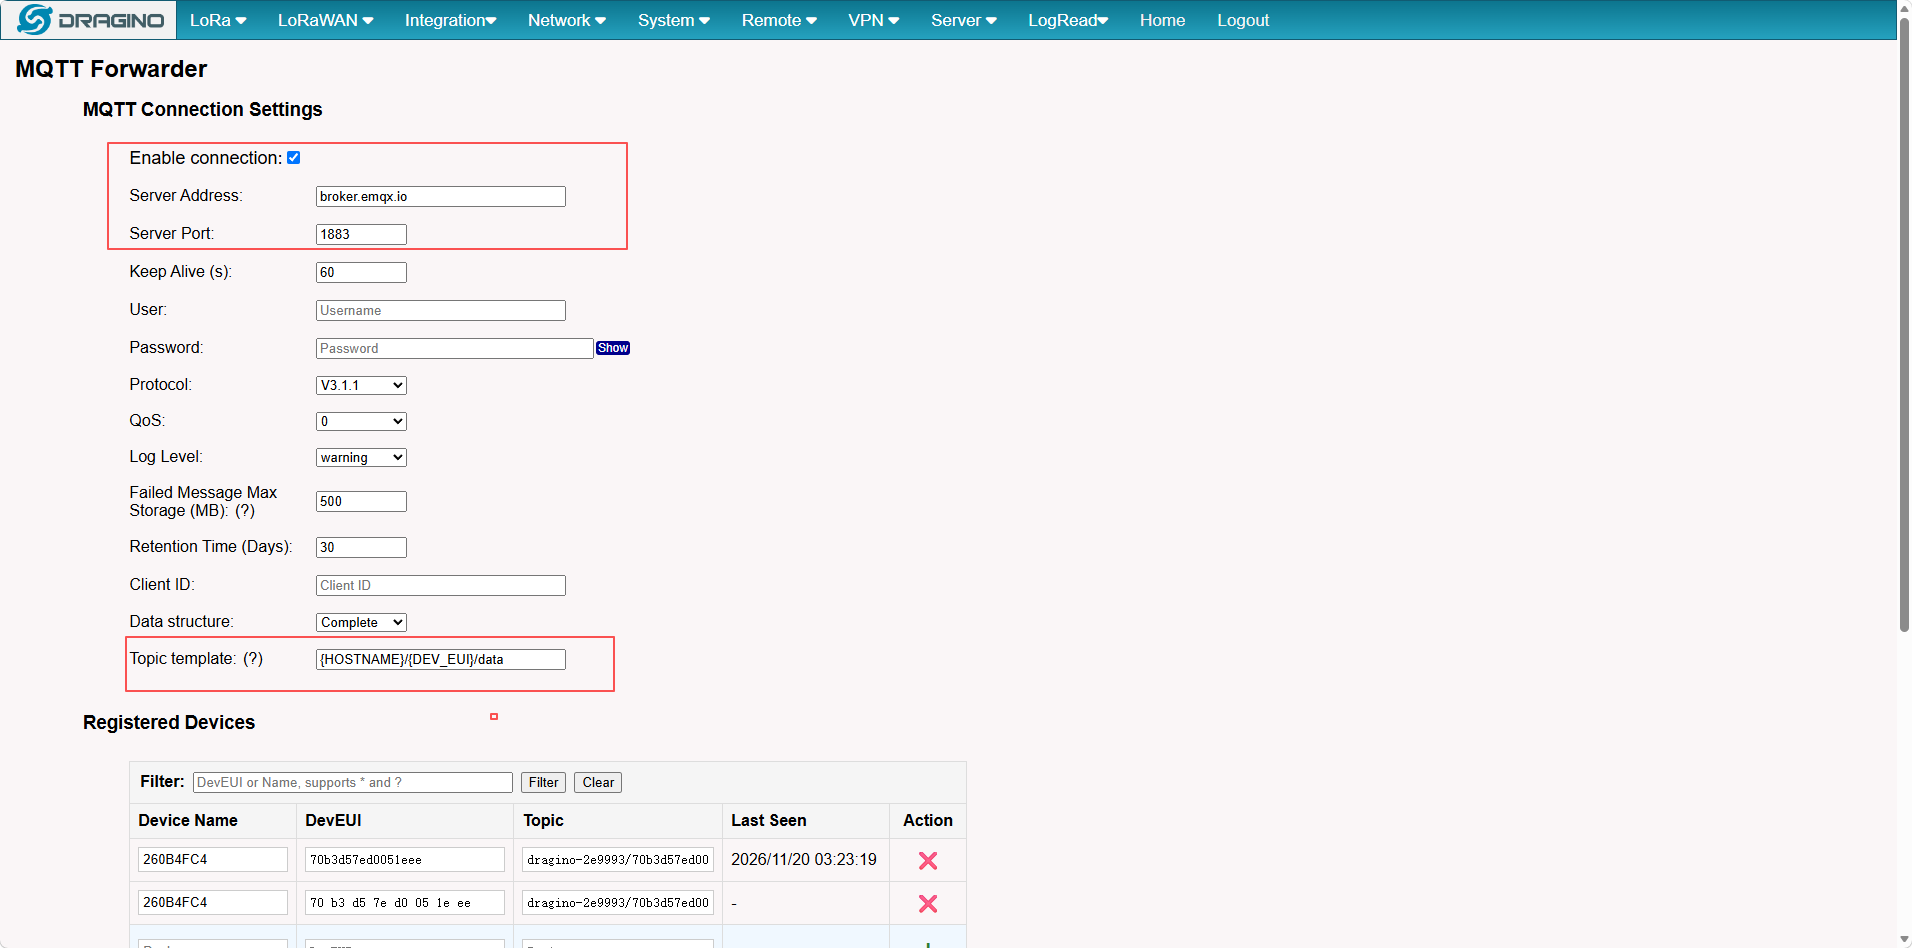
Next, configure the MQTT forwarding settings in the LPS8v2's main web administration panel.
-
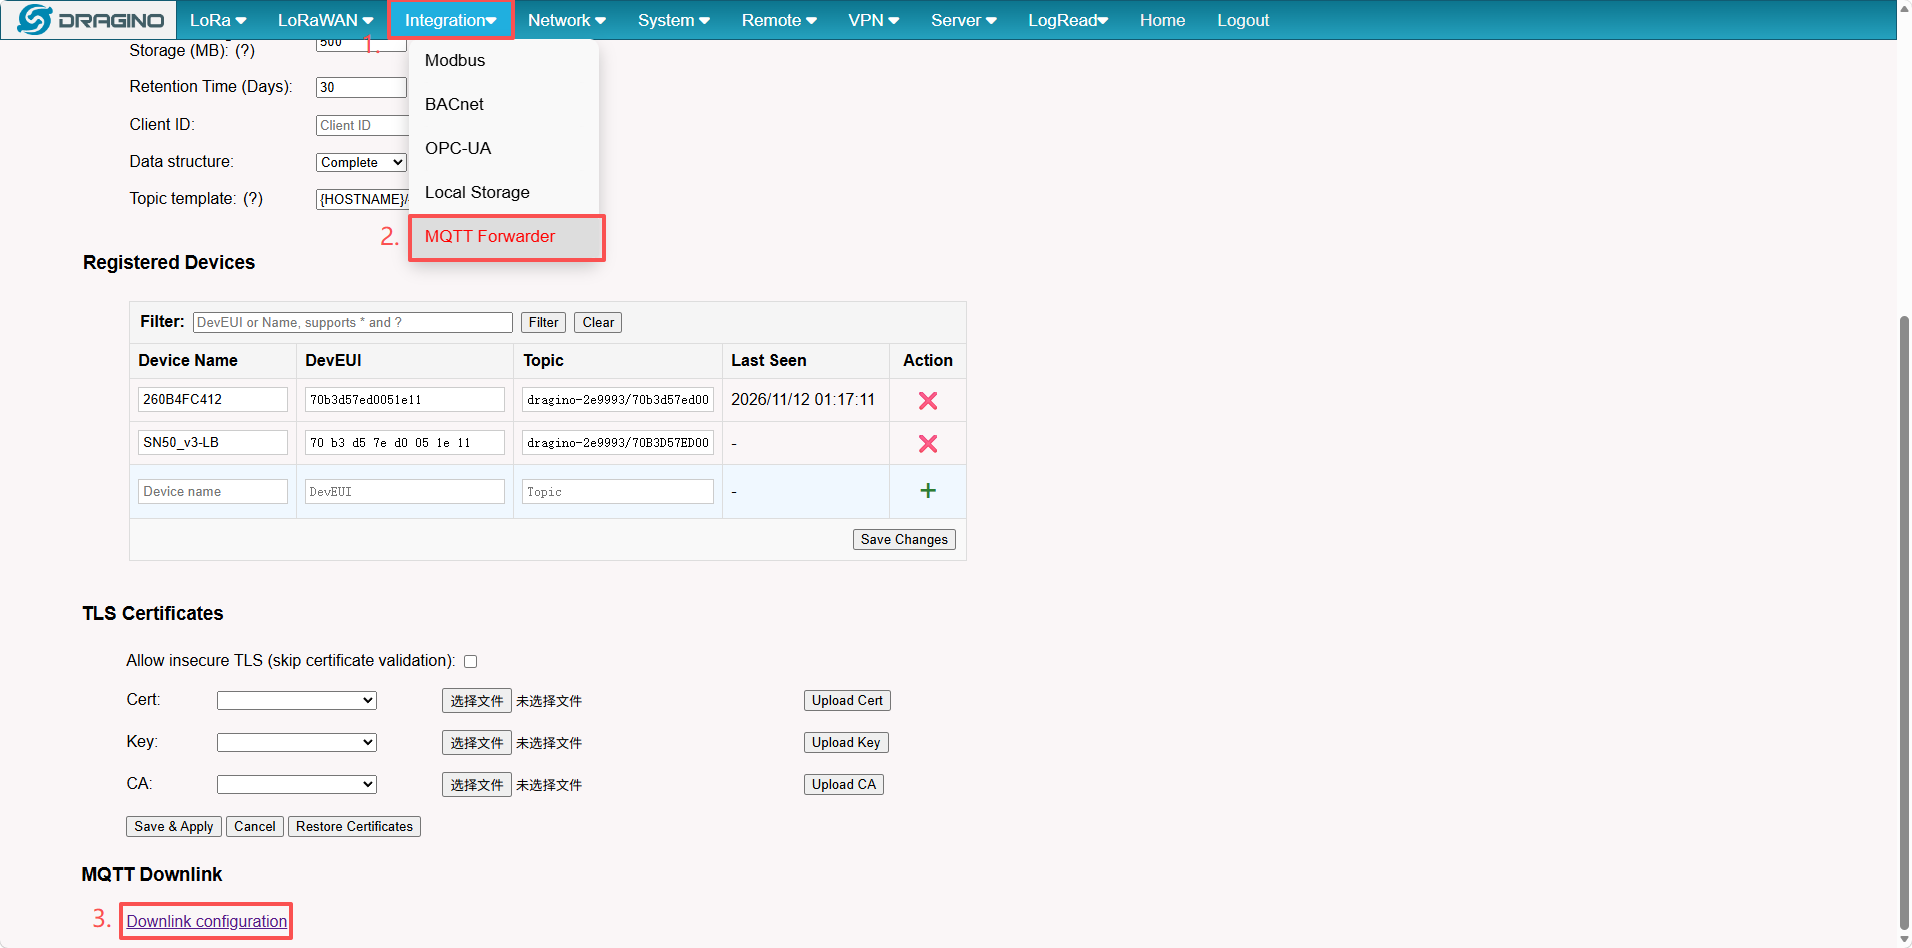
Go to the Integration -> MQTT Forwarder page.
-
In the upper section labeled MQTT Forwarder, configure the following:
-
Server Address: Enter the IP address or domain name of your MQTT broker.
-
Server Port: Enter the port of your MQTT broker (default is 1883).
-
Topic template: Use placeholder variables to define the MQTT topic where uplink messages will be published. You can combine text and variables, for example:
{HOSTNAME}: Gateway hostname. Current: dragino-27ecfc{GWID}: Gateway ID (GWID). Current: a84041fdfe27ecfc{DEV_EUI}: Device DevEUI.{DEVICE_NAME}: Device name (if known).
-
-
After entering the details, click Save & Apply.
- Example: If your gateway hostname is dragino-27ecfc, the device's DevEUI is a840413c907b526d, and you use the template
{HOSTNAME}/{DEV_EUI}/data, uplink data will be published to the topicdragino-27ecfc/a840413c907b526d/data.
- Example: If your gateway hostname is dragino-27ecfc, the device's DevEUI is a840413c907b526d, and you use the template
3.3.4 Verify MQTT Uplink Result
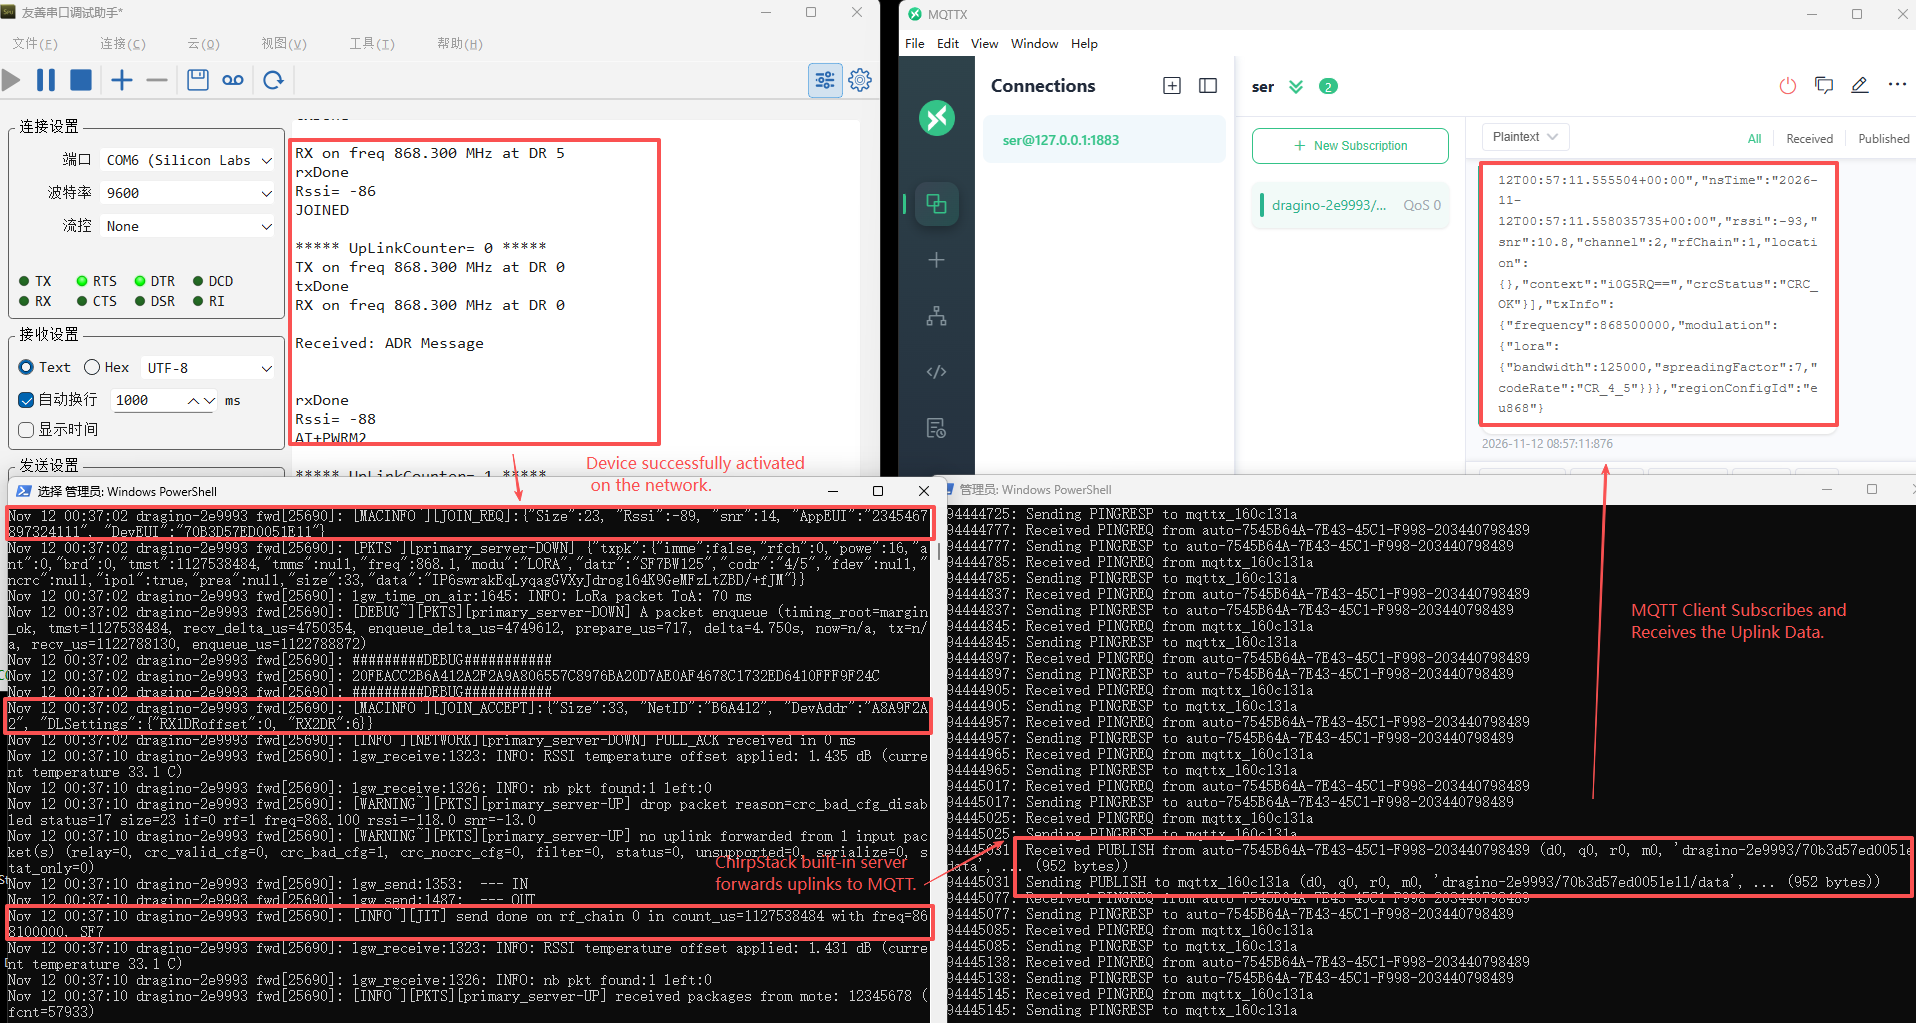
Once configured, you can test the uplink path.
- Use an MQTT client tool (such as
mosquitto_subor MQTTX) to connect to your MQTT broker. - Subscribe to the topic you configured in step 3.3.3 (e.g.,
dragino-2e9993/70b3d57ed0051e11/data). - Trigger your end device to send a new data packet.
- You should see the sensor data, typically in a JSON format, appear in your MQTT client, confirming successful forwarding.
3.3.5 Configure MQTT Downlink
The LPS8v2 can receive downlink commands via MQTT. This feature works by calling the built-in ChirpStack API.
-
On the same Integration -> MQTT Forwarder page, locate the MQTT Downlink section at the bottom left.
-
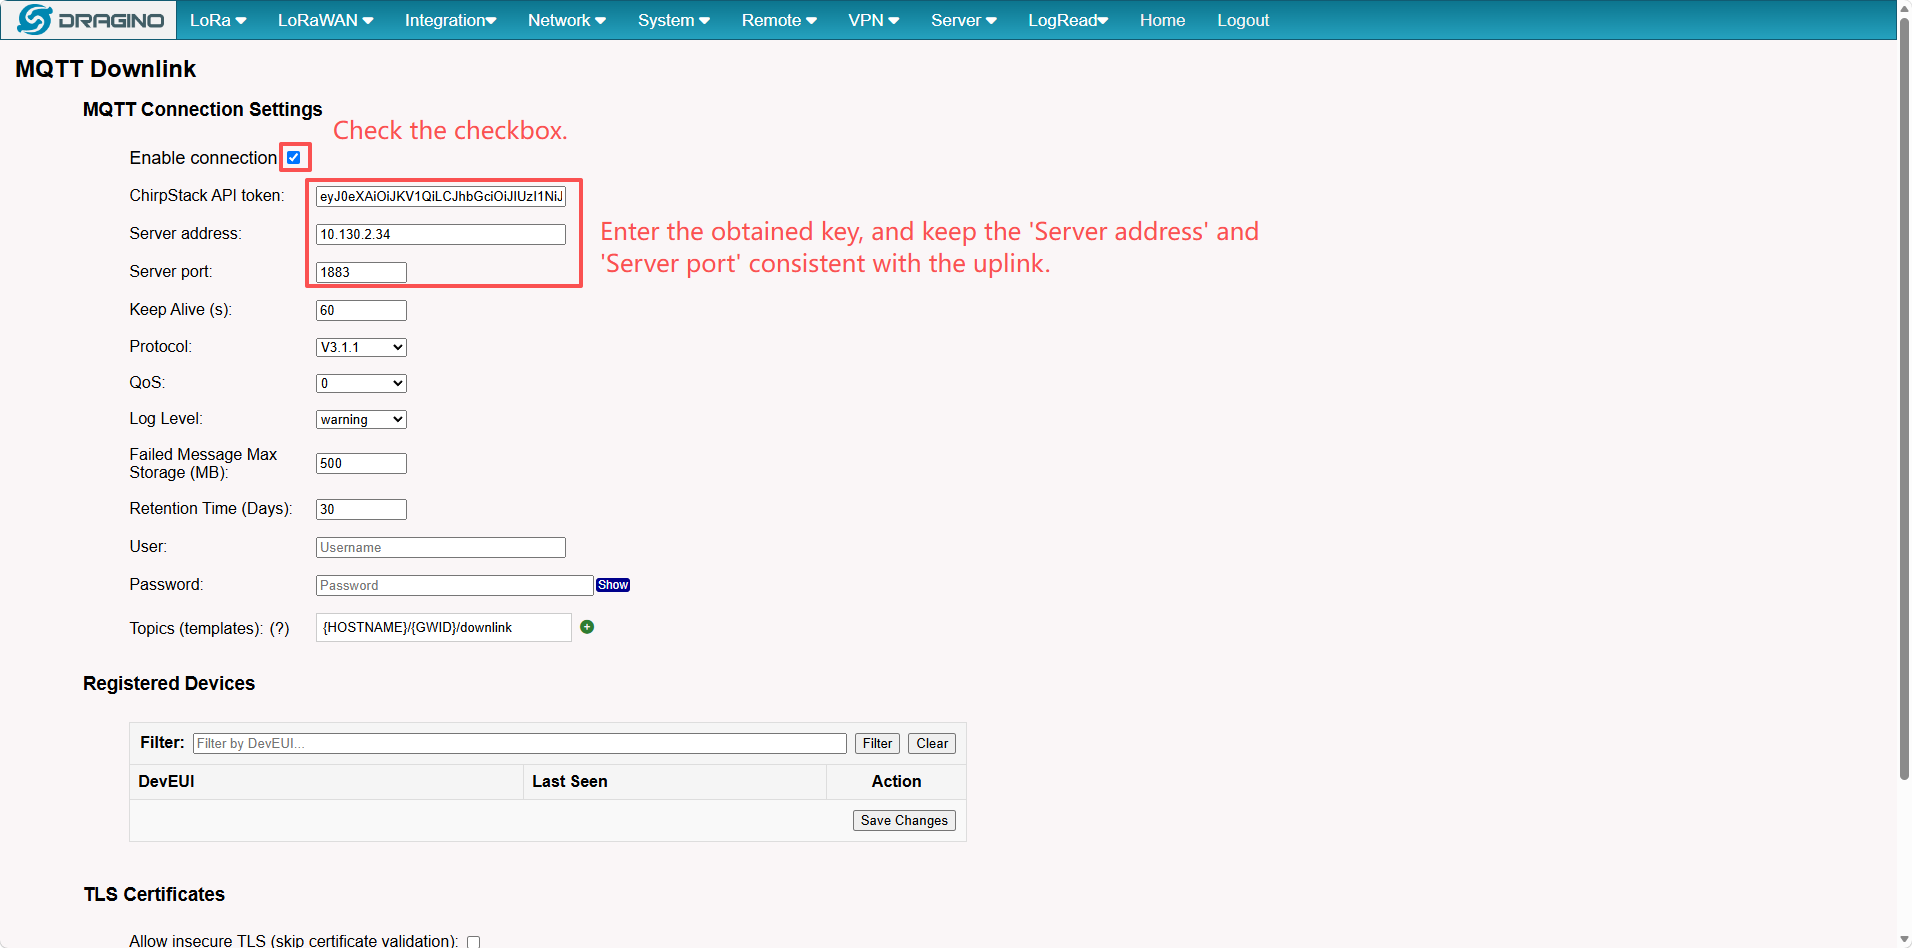
ChirpStack API token:
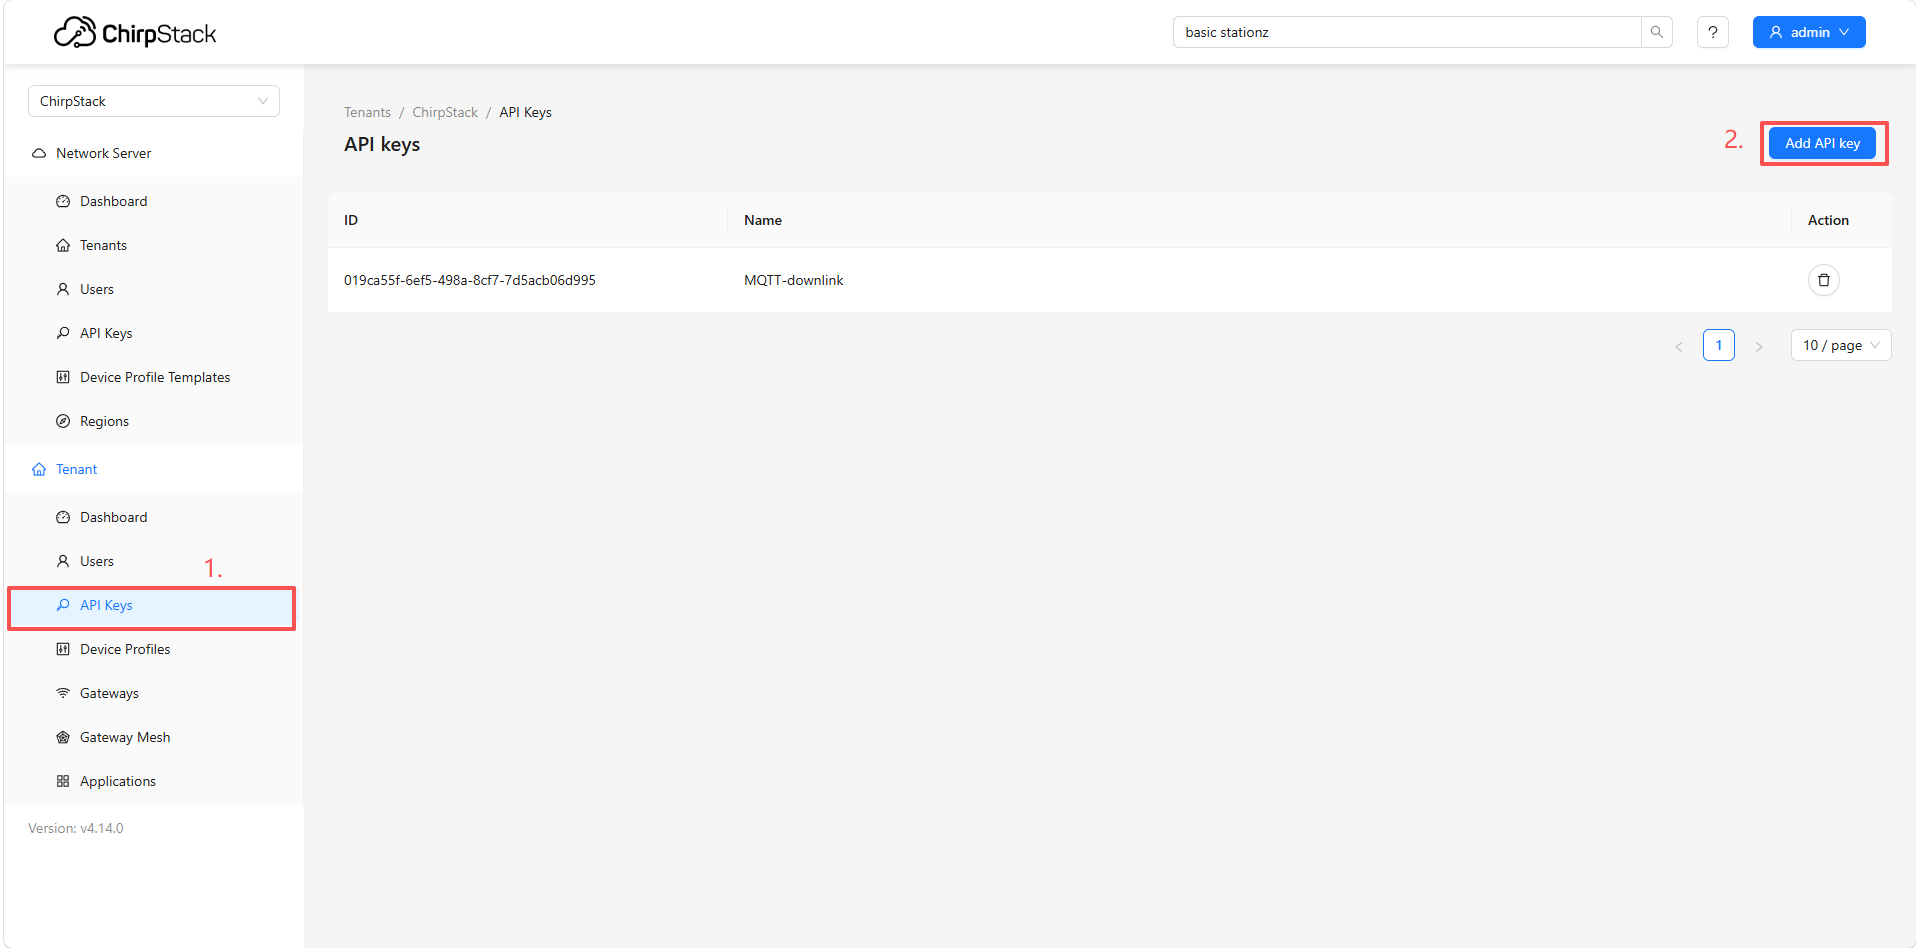
- Open a new browser tab and log in to the built-in ChirpStack Web interface (port 8080).
- Go to API Keys. Click Create API Key.
- Give the key a name (e.g., "mqtt-downlink"). You can generally leave the default permissions or adjust as needed. Click Submit.
- Important: Immediately copy the generated API token from the pop-up dialog and save it securely. You cannot view it again after closing the dialog.
- Paste this copied token into the ChirpStack API token field back on the LPS8v2's MQTT configuration page.
-
Enter the same Server Address and Server Port for your MQTT broker.
-
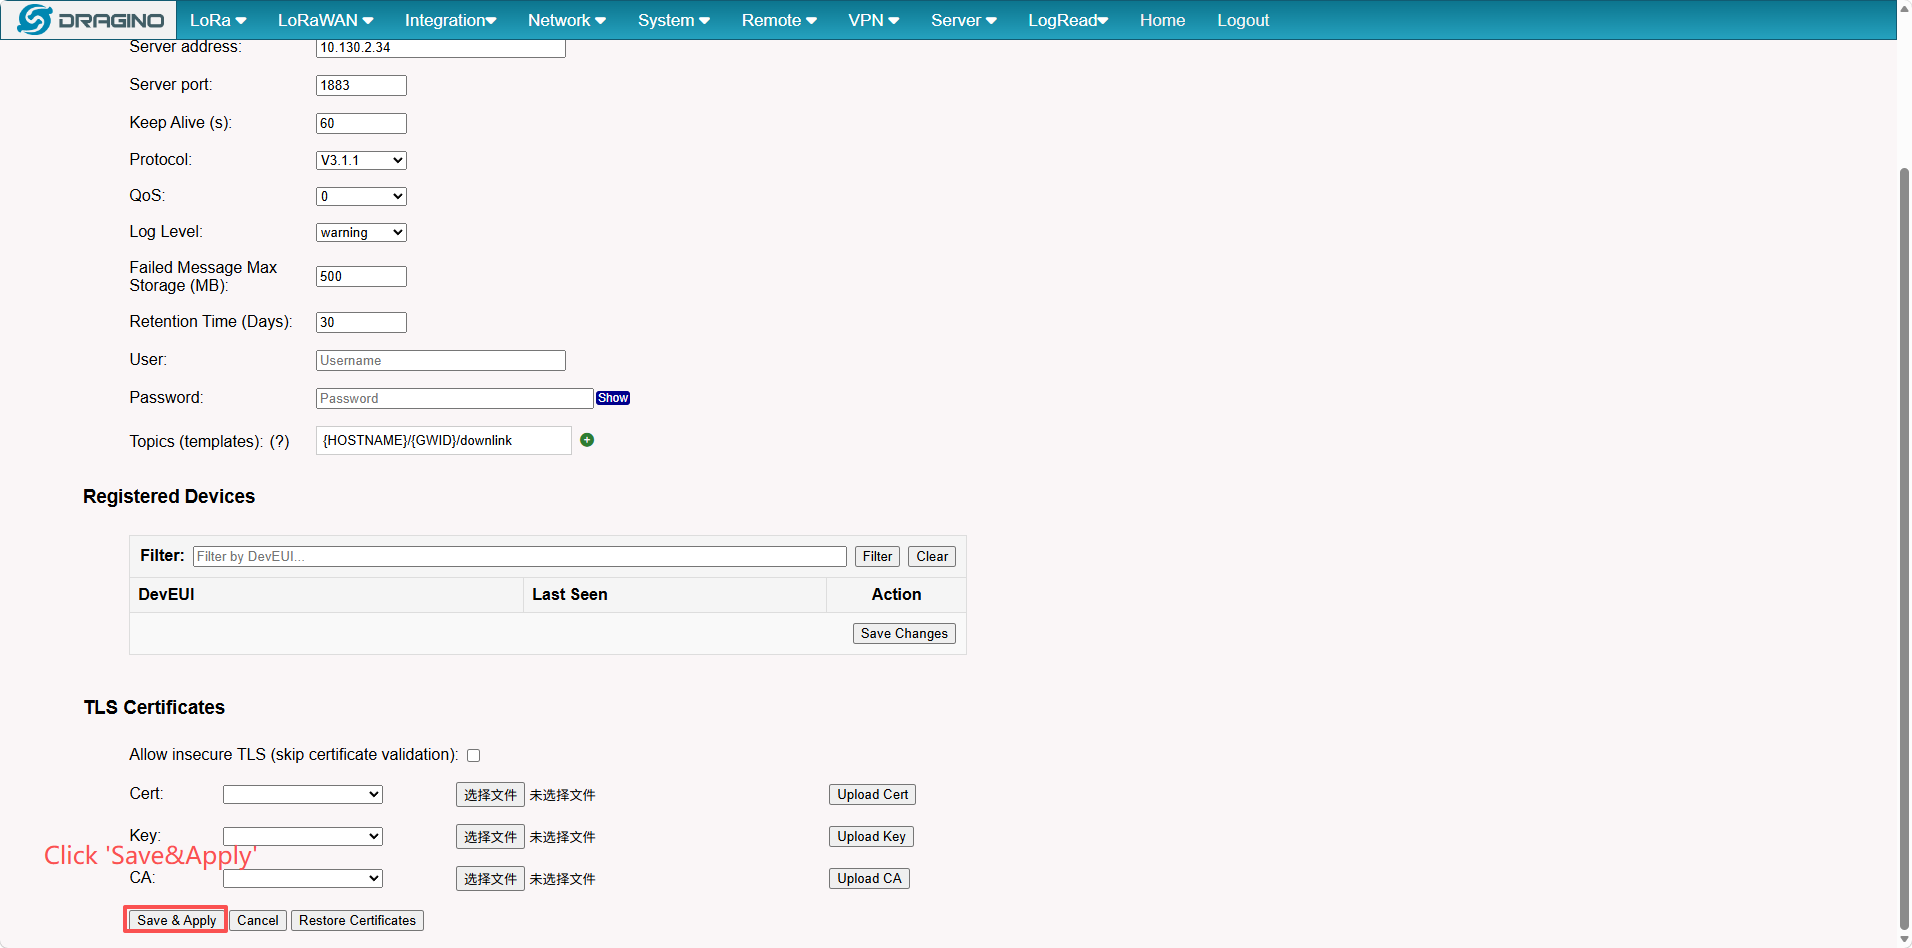
Click Save & Apply.
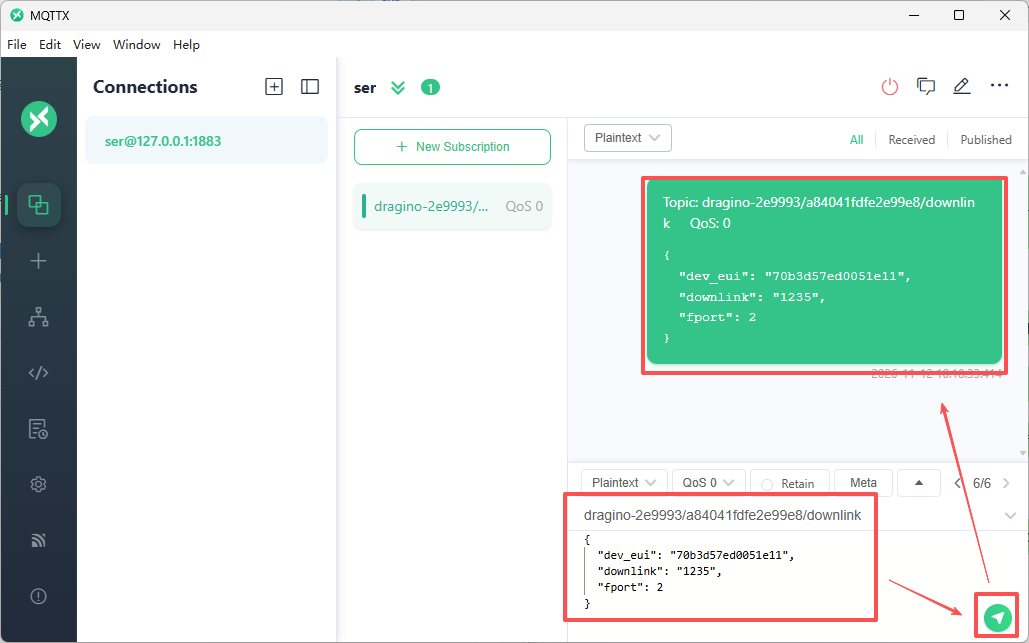
3.3.6 Send an MQTT Downlink Command
Now you can send downlink commands to your end device by publishing a specifically formatted message to your MQTT broker.
Publish Topic: {HOSTNAME}/{GWID}/downlink
{HOSTNAME}: Gateway hostname (current: dragino-2e9993){GWID}: Gateway ID without colons (current: a84041fdfe2e99e8){DEV_EUI}: Device DevEUI (used when matching wildcard topics)
Downlink Message Format:
{
  "dev_eui": "dragino-2e9993",
  "downlink": "0100000F",
  "fport": 2
}
dev_eui: The DevEUI of the target end device.- downlink: The payload data you wish to send, formatted as a hexadecimal string.
- fport: The FPort to use for the downlink (valid range: 1-223).
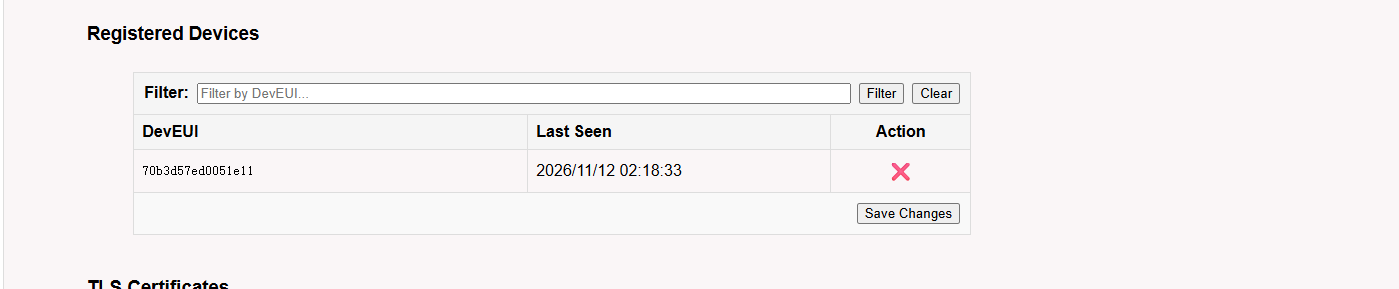
Check the MQTT Downlink Page
On the LPS8v2's MQTT Downlink page will first be in the downlink state
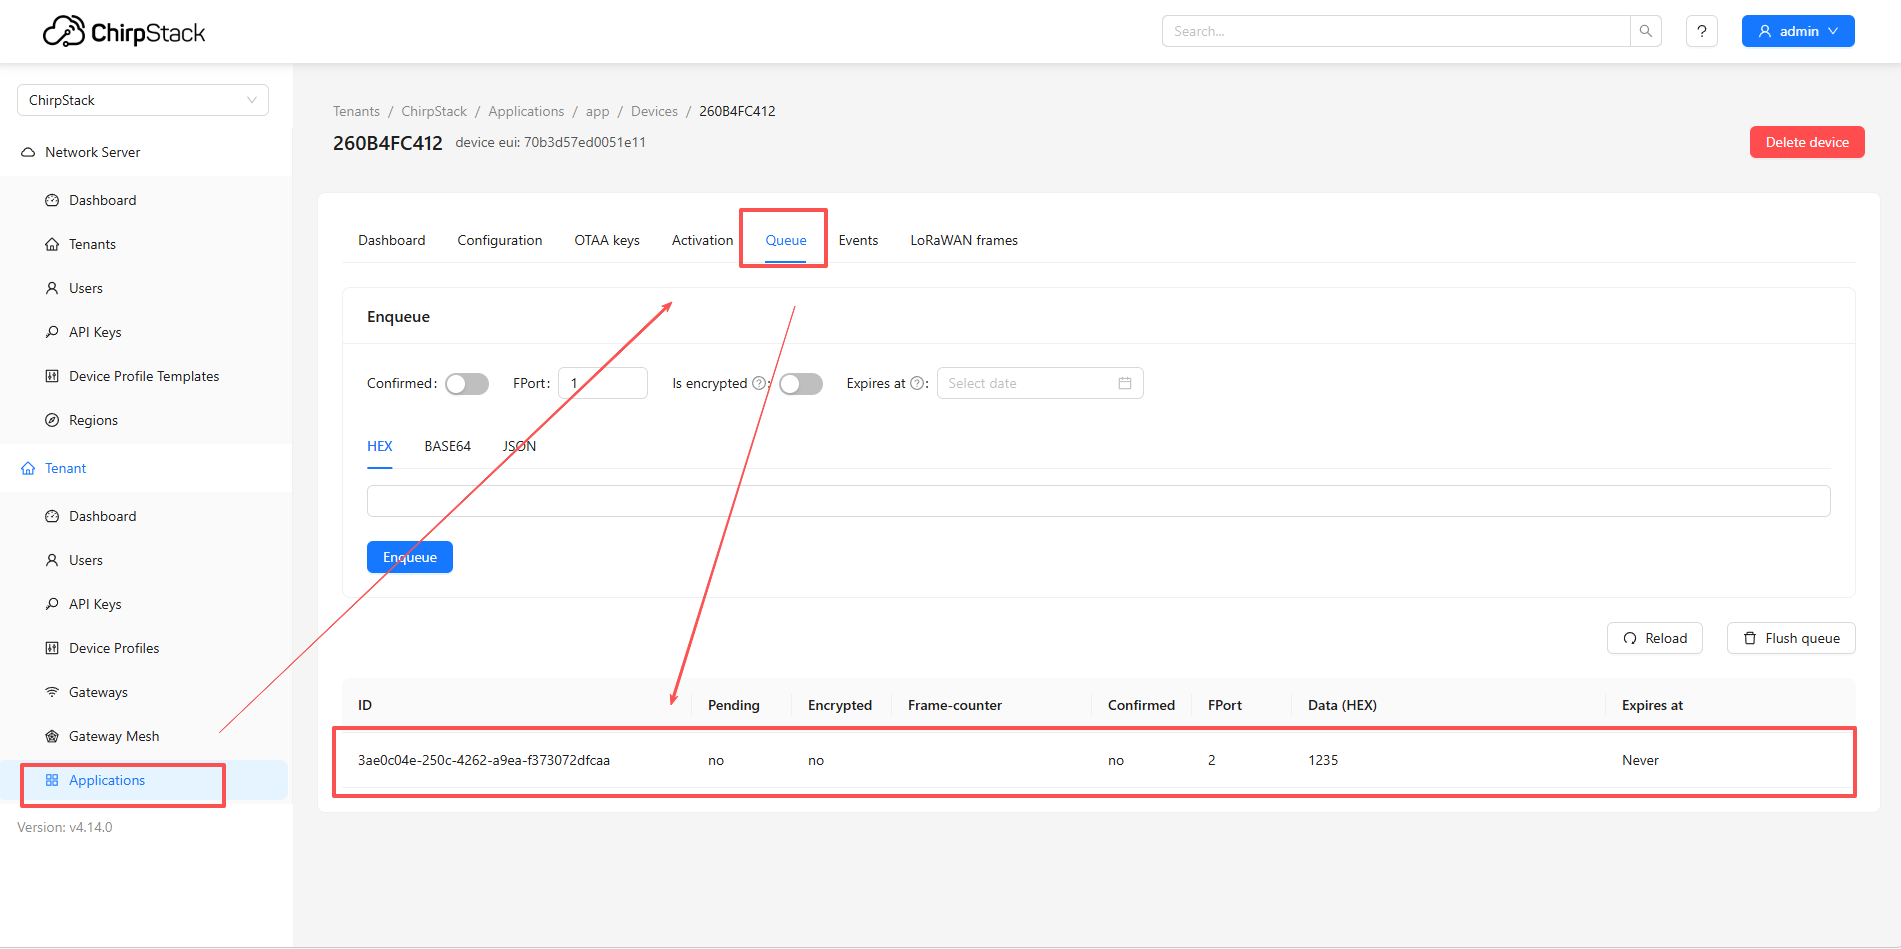
Check the ChirpStack Queue
4. How to ask for Support
If a user still not have trouble making it works. please send a mail to support@dragino.com with the below info:
- Detail of your LoRaWAN end node.
- Gateway Model and firmware version
- A set of screenshots you configure in the gateway according to our instruction
- A full log of "logread -f"